Tag Archives for " Scarlett "

Germany v Algeria-06-30-2014

HOW THE MATCH WAS WON by Keith Scarlett FIFA 2014 World Cup, Brazil Monday, 30 June, 2014 Germany 2 v 1 Algeria This second-round elimination match was another game of an underdog impressing and showing better form than the favourites, but still being sent home late after being punished for not taking their chances. Algeria entered

Continue reading

OP Technical Diamond

By Keith Scarlett

This activity works on technique of playing and receiving long balls both in the air and on the ground, first-touch, passing, receiving and striking a driven ball approximately 30 metres.

Set-up: 4 cones are set up in a diamond. The top and bottom cones are 40 metres apart and the two side cones are 25 metres apart; per the diagram. Players should be broken up and evenly placed at each cone. All balls should begin at one of the cones that are 40 metres apart.

OP_Technical_Diamond-World_Class_Coaching_Article-Keith_Scarlett-Diagram_9-1

How it Works: The player starting at the top cone starts with a ball plays

Continue reading

Germany v Portugal-06-16-2014

HOW THE MATCH WAS WON by Keith Scarlett FIFA 2014 World Cup, Brazil Monday, 16 June, 2014 Germany 4 v 0 Portugal Controlling? Definitely! PLUS Quick. ...as fire. PLUS Decisive. …as rain. PLUS Dominant. Equals Germany. Undisciplined. Definitely! PLUS Slow. …as smoke. PLUS Sloppy. ...as slush. PLUS Subordinate. Equals Portugal. This World-Cup opener for both

Continue reading

Atletico Madrid v Barcelona-05-18-2014

HOW THE MATCH WAS WON by Keith Scarlett La Liga Sunday, 18 May, 2014 Atletico Madrid 1v1 Barcelona As the days on the calendar flipped by and the sun rose on the beautiful city of Madrid again and again, the expectations for Atletico Madrid remained the same: to eventually fade away leaving what have been the

Continue reading

Dortmund v Bayern-05-17-2014

HOW THE MATCH WAS WON by Keith Scarlett German Cup Final Saturday, 17 May, 2014 Dortmund 2v0 Bayern Munich This match was one that Bayern Munich needed to really establish themselves at the top of German football. Borussia Dortmund, on the other hand, needed to prevent them from doing so because they themselves were in dire need

Continue reading

Real Madrid v Atletico Madrid-05-24-2014

HOW THE MATCH WAS WON by Keith Scarlett UEFA Champions League Final Saturday, 24 May, 2014 Estadio da Luz; Lisbon, Portugal Real Madrid 4v1 Atletico Madrid The Champions League is always a very exciting competition, but this most recent campaign provided a few more edge of the seat moments than most other campaigns have given us. After

Continue reading

5v4 - Defending in Defensive Third

By Keith Scarlett

This activity works on defending, timing of tackles, covering angles and decision-making.

In this crucial section of the pitch, defending needs to be precise and perfect! One of the biggest things that players need to learn is how crucial interceptions are to keeping the ball out of the net. There aren’t too many better ways to teach this aspect of the game than to simply throw them into the deep-end with an activity like this.

Set-up:
The playing area is 44 x 18 metres (basically the size of the penalty area; can use the penalty area if you choose). Place a regulation sized goal in the middle of one of the long (44 mtr) end-lines (similar to where it would be if using a penalty area).

5v4_Defending_in_Defensive_Third_Activity-World_Class_Coaching-Diagram_7-1-Keith_Scarlett

The attacking team has 5 players which include 3 midfielders (M) and 2 strikers (S) while the defending team has 4 players made up of 3 defenders (D) and a goalkeeper (G). There are

Continue reading

Chelsea v Atletico Madrid - 04-30-2014

HOW THE MATCH WAS WON by Keith Scarlett Champions League 2nd Leg (0-0 aggregate) Wednesday, 30 April, 2014 Stamford Bridge Chelsea 1v3 Atletico Madrid What we had on display in Atletico Madrid’s 3-1 win over Chelsea in the 2nd leg of their Champions League Semi-Final on 30 April, 2014 at Stamford Bridge was nothing short

Continue reading

Attacking and Defending At Close Quarters

By Keith Scarlett

This activity works on 1v1 attacking and defending in close quarters, 1st touch, intensity and to see who is willing to get stuck in on tackles. The exercise is done at top-speed, is a quick moving exercise and there is a good deal of contact.

Set-up:
The playing area is 18 x 44 metres (roughly the size of the penalty area). There is a goal on one of the 44 metre end-lines (where the goal would be if you were using an actual penalty area) and two markers should be 18 metres out directly opposite the goalposts (or roughly the location where the half-circle intersects with the top of the penalty area if using an actual penalty area for this activity). Players break into four lines. Two lines are on each post with balls and two lines are at the ‘markers’…or the corners of the “D”…without balls.

1v1_Post_to_Post_Activity-World_Class_Coaching-Diagram_6-1-Keith_Scarlett

How it Works:
The line besides the goal drives the ball to the first person in the opposite diagonal line and then

Continue reading

Philadelphia 3v3v3 Penetration and Defense Activity

By Keith Scarlett

This activity works on possession to penetrate, combination play, defending, pressure, cover, recovery and communication.

It is important for all the players to be on the same page. Both attacking and defending requires teamwork and that means every single player has to be on the same page. In this activity, we put the players under pressure from all sides and if they don’t play well as a unit, chances are, they’re going to be letting in quite a few in the game. The exercise is about playing your responsibility and staying on top of things. REMEMBER: the FIRST pass is of the utmost importance!

Set-up: The playing area is 30 x 20 meters, divided into two halves of 15 x 20 meters. One ball is used. There are three teams of three players each.

Philadelphia_3v3v3_Penetration_and_Defense-World_Class_Coaching_Article-Keith_Scarlett-Diagram_5-1

How it Works: The game begins with one team (Red) standing in the middle while the other two teams (Black and Yellow) stand at opposite ends of the playing area. The ball is given randomly to

Continue reading

Avedikian 2 v 2 Forced Man-Marking Activity

By Keith Scarlett

This activity works on 1v1 defending, pressure, cover, recovery and defensive communication.

When moving up the pitch to attack the opposition’s goal, losing possessing can lead to a counter-attack. This technical training activity is designed to help players understand the importance of falling back to defend their own goal. A couple of players will need to pass around or dribble past opposition to score a point and when they do, or if things don’t work out; they need to get back quickly and help out on defense. REMEMBER: the BALL is the MOST IMPORTANT THING!

Set-up:
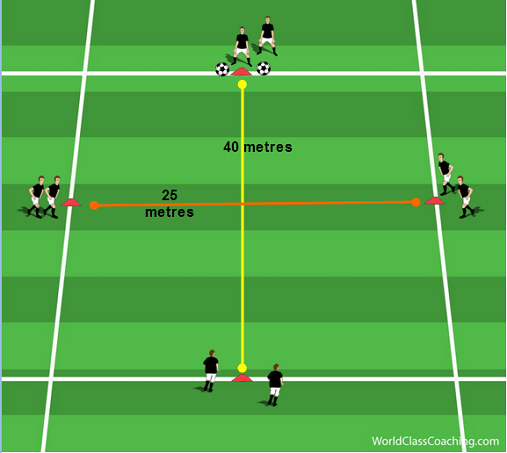
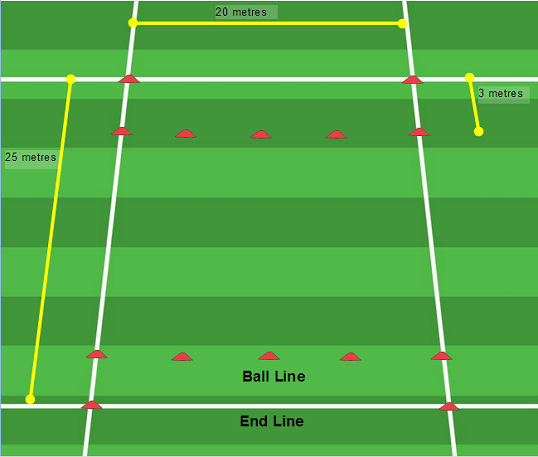
The playing area is 25 x 20 metres. Only one ball will be in play at a time. There are two-lines on either end of the pitch, the end-line; which is at either end of the playing area and the ball-line; which is 3-metres inside the playing area; per the diagram.

Avedikian_2v2_Forced_Man-Marking-World_Class_Coaching-Article-Keith_Scarlett_Diagram_4-1

To start this activity, one team starts with possession of the ball, at random. This team’s (the attacking team), players need to

Continue reading

Dutch Flow Exercise

By Keith Scarlett

This activity works on technical and tactical aspects of finishing, passing, attacking in a 1v1 situation and goalkeeping.

Set-up:
Field length is 44 yards (length of the penalty area). Width is from the edge/corner of the penalty area to the midfield line. Two flags should be placed in the middle of each end line to be used as goals. 4 additional cones should be placed equidistant from each corner-flag (goal-post) and each corner cone on the end lines; per the diagram.

Article 3-1
Each goal should have a goalkeeper in it whom is playing full-out and the balls should be split into two groups and placed

Continue reading

Chesterfield Shooting Activity

By Keith Scarlett

This activity works on finishing, passing, one-touch play and goalkeeping.

Set-up three cones facing one-goal at the top of the box. One cone each should be placed at the point where the field markings form the intersection of the penalty area and “D,” while the third cone should be placed 10 metres out from the edge of the penalty area in a straight line with the penalty spot forming a triangle; per the diagram.

Article 2-1

To start this activity, all of the balls should be placed on the “left” cone and the team should be broken up into three different groups with each group being assigned to

Continue reading

Griffith Technical Fitness Ladder

By Keith Scarlett

This exercise is a great way to have your players put in some quality fitness work while also garnering a large number of touches on the ball at the same time. All team members can take part in this activity at the same-time. This is a fast paced and high intensity activity that will put a tremendous amount of strain on your player’s bodies and thus is recommended that it only be done twice a week maximum and also allowing at least 48 hours to elapse between each time this activity is run. This activity will help develop players’ fitness base; ability to change both pace and direction; acceleration and speed while moving forward, backward and lateral both with and without the ball. It will also help develop tight touches, handling the ball in tight spaces, turning with the ball, running with the ball at speed and control of the ball during acceleration and deceleration.

Set-Up and Directions
This exercise is set-up as shown below with all players beginning behind the start cone. There are two rows of cones; one straight in front of the starting cone and a second 10 metres to the right of the first row. Each row should have no more than 10 total cones each (include the start cone in the total count of 10) and each cone should be spaced 10 metres apart from each other. The first cone in the second row should be placed 5 metres in from where the first cone would normally lie so each proceeding cone in that line would form a zig-zag formation, per the diagram, when spaced 10 metres apart from the first.

Article 1-1
The first player takes off and accelerates to a full-sprint for the first 10 metres before reaching the first cone where they now must

Continue reading