By Gregg Gillies -
Set Up: Size (dependent on strength and skill of your players) at least 8-10 players plus GK (in the progression). 6 player set up, as seen in diagram 1 below. Have at least 8, with an extra player behind Player #1 and Player #4. If you have more than 8, you can put players behind any of the other spots. As seen in Diagram 1, you can use mannequins for the middle players to check away from and receive passes. You can also simply use corner flags or cones.
The Drill:
Players #1 and #4 each start with a ball. Players #5, 6 and 1 mirror players 2, 3, and 4 below. For the players to understand how this fits into a game, these can be either backs or midfielders. Player #1 plays to Player #2 (this is like a fullback playing to an outside midfielder if that helps your players visualize). Player #3 starts at the manniquin and checks back into open space to support Player #2 when the ball is received.
Player #3 opens up, let's the bal roll across the body and takes the first touch with the left foot. Player #4 checks back to support and receive a pass from Player #3 (this pass should be with the right foot). The sequence starts again with Player #4 playing up the field to Player #5 the same way Player #1 passed to Player #2. Player #5 is in the Player #2 role and Player #6 is in the Player #3 role.
Depending on the skill level of your players, you may initially perform this drill with only one ball, starting at Player #1. Once they understand the drill and absorb the important details, such as checking into space, you can start with a ball at Player #4 and Player #1.
Each player follows their pass. Diagram 2 shows the completion of the passing sequence.
Diagram 1 (set up)

Diagram 2
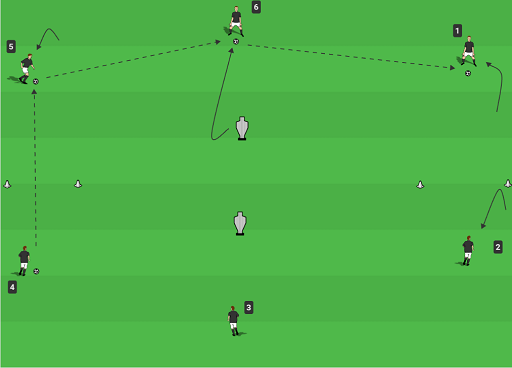
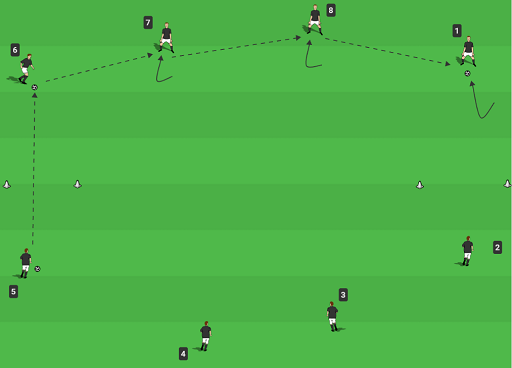
Diagram 3
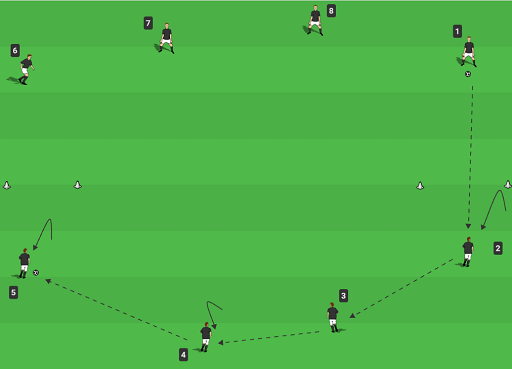
Progression: Diagram 3 and Diagram 4 adds a fourth player to the mix. Now you're working with a backline or midfield that has four players. The drill continues in the same manner.
Diagram 4
Coaching Points
The central player needs to start next to the manniquin (or cone) and drop into the support space to receive the pass facing forward. In the diagrams above, this would mean opening up and receiving with the left foot and then passing with the right foot.
When the central player takes that first touch, the outside player needs to drop back, open up their body and also take their first touch facing forward.
Make sure the players open up, receive with the proper foot and pass with the proper foot. In going left to right, the receiving touch should be with the left foot and the pass should be with the right foot.
The details are very important in a drill like this. The timing of the checks into space, the quality of the first touch, as well as the correct foot, the accuracy of the passes, as well as which foot makes the pass.
Opem up and receive with the back foot.
Progression/Variation
Switch direction of the drill. Now the first touch is with the right foot and the pass is with the left foot.
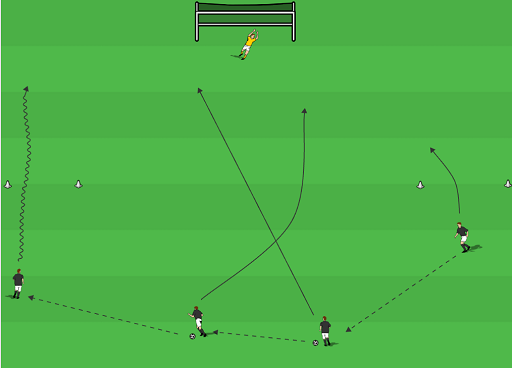
The next progressio is to make this drill more functional by going in one direction and adding crossing and finishing as well. There will also need to be a goalie.
Now the four players involved are facing a goal and they will switch the field from one side to the other before the outside player dribbles down the line and crosses the ball.
Diagram 5
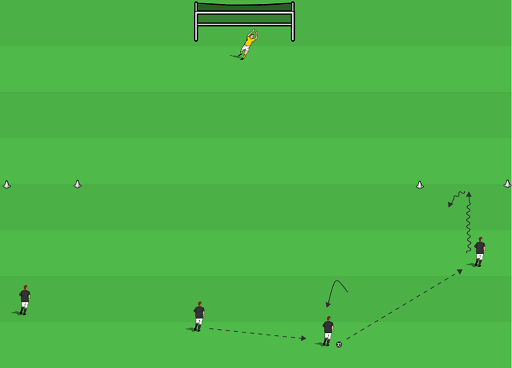
As you can see in Diagram 5 the ball goes across the field to the outside midfielder who dribbles forward, changes direction back, and plays a backwards pass to a supporting central midfielder. This midfielder plays the ball to the other central midfielder who completes the switch by playing out wide to the other outside midfielder.
This player dribbles foward to the corner and crosses the ball for a teammate to run onto.
Coaching Points
When the first outside mid dribbles forward (in diagram 5 this is the right outside midfielder), the other players move forward with him, just as in a game. When the outside mid makes his cut with the ball (as if protecting the ball from a defender), the inside midfielder needs to check back into a good support position to receive the pass.
Be sure and switch the direction so crosses come from both sides of the field.
As you can see in Diagram 6 below, the other midfielders all make specific runs. The two central midfielders cross each other with one going near post and the other going far post. The outside mid makes a late run for any cross that comes all the way through or over the central players.
Diagram 6
By Gregg Gillies
Gregg Gillies is a nationally licensed coach through the USSF and is a Youth Athlete Development Specialist and Head Coach at Mount Laurel United Soccer Club, where he currently coaches a u14 girls team, the MLU Raptors. He also is the owner of www.NoLimitsSoccerTraining.com, where his focus is on maximizing a player's individual technical skills, soccer IQ, and overall athletic development.

