By Philip Cauchi
Description: This training session represents realistic and relevant outcomes when playing in a 1-4-3-3 system of play against a 1-4-2-3-1. More important than the system of play utilised by our opponents is the game model they apply. A major part of the game preparation is to carry out a SWOT (Strengths, Weaknesses, Opportunities and Threats) analysis. We analyse where our strengths and weaknesses lie, where our opponents are weak and how we can capitalise on their weaknesses, and in which sector and phases of the game they can be of a threat. Therefore we come up with a strategy of how we can exploit our strengths, minimize our weaknesses and exploit the weaknesses of our opponents. We should also however get to know what the strengths of our opponents are and come up with ways on how we can neutralise them.
The interpretation of systems of play: The same system of play may be interpreted differently. As an example we may have a 1-4-3-3 with one or two defensive midfielders, we may push both full backs forward simultaneusly or just one of them, we may play with the front three close to each other or with both wing forwards hugging the touchline, we might leave the two central defenders operating close to each other or have the defensive midfielder dropping between them during the build-up. In the defensive phase we might press and also defend with three forwards and three midfielders.
On the other hand if the opponents play direct and have wingers or lateral midfielders who possess speed and excel in offensive 1v1 duels, we might drop both outside forwards and defend in a 1-4-5-1. This is just to provide some examples of how the same system of play can be interpreted differently by different teams or even by the same team. When playing opponents who are of an inferior quality to us, we play more aggressive by pressing them high and giving them less time and space to build-up play into zones and to specific players that will increase their team’s effectiveness. With higher level opponents we might be more cautious be defending deeper, more compact and narrower.
From the analysis these outcomes might emerge (as an example):
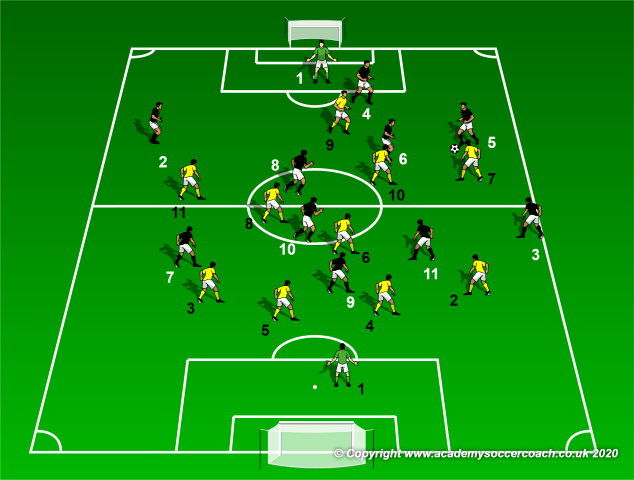
1. The opposition’s number 10 is very quick and skilful. He likes to operate between our midfield and back line. We must not let him turn and face forward with the ball at his feet. Therefore a midfielder should always remain between the lines marking the number 10.
2. The opponents aim to overload the middle by moving the 7 and 11 closer to the attacking midfielder 10. They create more playing options in the middle vertical zone while creating space for their full backs 2 and 3 to provide width and also length. Their full backs are good at 1v1. Therefore, our outside forward (7 or 11) on the ball side should cut the passing option towards their full back. By remaining high, the outside forward will force their full back not to venture too much forward in case of a negative transition. The outside forward on the opposite side of the field should tuck in close to the three midfielders. The trio in midfield should work together to eliminate passing lanes and also prevent getting outnumbered in central areas.
3. It is important that the outside forward on the weak side of the pitch drops to mark their full back should the first wave of pressing fails. This helps us to have more width at the back and prevent that our full back on this side to get outnumbered.
4. They have good free kick takers and thus we should avoid committing fouls in front of the penalty area.
5. As their full backs venture forward to attack, they leave unguarded space at the back which we can exploit on counter attacks. Therefore, on winning the ball our striker should run forward towards the centre of their defence. This will cause the opponents to focus their attention on him while our outer forwards and full backs break forward at speed to exploit the space left in behind. The ball should be played quickly in these areas and search to capitalize on the momentarily numerical advantage.
6. If outcome 5 cannot be achieved, we secure possession of the ball by creating various passing angles and support to circulate the ball and build an organised attack.
7. Their number 6, the playmaker, is good at building up and delivering accurate long passes behind defences. We therefore need a midfielder or forward to apply pressure on him, thus reducing the opposition’s options of constructing well-organised attacks.
The training session.
Movement preparation.
Aim: Prepare the players’ neuro-muscular system for the upcoming session.
Duration: 10 minutes.
Description: The players undergo a series of skipping and coordination exercises as well as mobility and dynamic stretching.
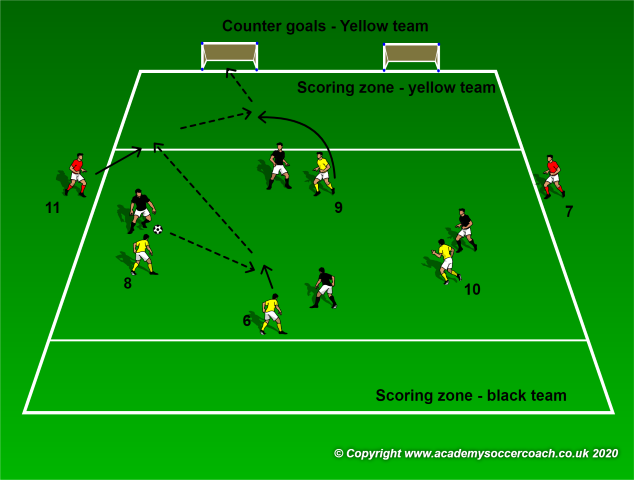
Activation: 4v4+2 with counter.
Aim: To prepare the players to perform soccer specific movements to our game model, to get them into the right mental frame and to strengthen the social bonds between players operating in the same sector or inter-sector.
Duration: 10 minutes (3 x 2 minutes with 1 minute rest in between).
Description: The attackers aim to score by stopping the ball inside the marked rectangle (scoring zone – black team). The defenders (yellows) aim to prevent the attackers from scoring, win the ball and counter quickly on the two mini goals. They are only allowed to score from inside their assigned scoring area (scoring zone – yellow team). If the defenders score after a counter with a quick combination by involving the lateral neutral players, the goal counts double. This is in preparation where we defend in midfield by having the three midfielders working close to each other and then exploit the space quickly behind the opposition’s defence while using our outside forwards (7 and 11). In the warm-up we are already working within the game model we want to adapt and the behaviour of particular players (sectors) during the defensive and positive transition phases of the game.
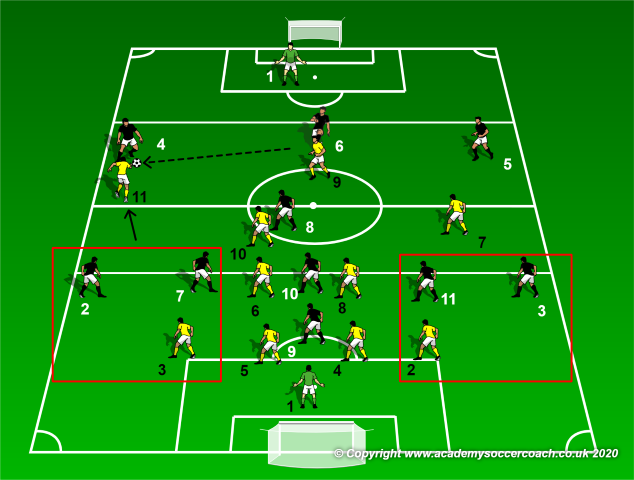
Game related practice 1: Prevent the vertical pass and defend compactly.
Aim: We need the players to identify the best ways to defend from the front as well as the limitations it brings with it. This is highlighted in the red squares in the next diagram where our full backs are outnumbered 1v2.
Duration: 10 minutes (play continuously for 8 minutes then rest for 2).
Description: No dead ball situations are in effect! Play always starts from the situation as depicted in the next diagram. This is because we need many repetitions of this phase of the game. Therefore the practice is divided into two parts. In the upper area we have the opposition’s two central defenders (4 and 5), the defensive midfielder (6) and the central midfielder (8) plus the goalkeeper playing against our front three (7, 9 and 11) and the attacking midfielder (10). The opponents’ aim is to play the ball into the lower area where a 6v6+GK takes place. On winning the ball, the defending team (yellows) have thirty seconds to counter and score in the regular goal. They are awarded one point for entering the final zone and two points for scoring. If the thirty seconds elapse, the game restarts from the situation mentioned above. For this practice the players must remain inside their assigned zones.
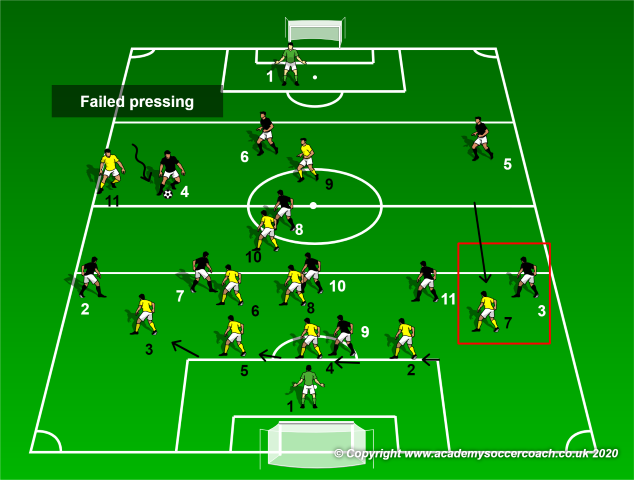
Variation.
Duration: 10 minutes (play continuously for 8 minutes then rest for 2).
Now we provide our players with an alternative solution. One where we will be more balanced at the back, and which leaves us with the appropriate number of players up front in order to counter attack. In this tactical move, we keep the outside forward closest to the ball high in order to press the central defender who will be receiving the ball. The outside forward should press this player when the ball leaves the passing player’s foot. Our striker and offensive midfielder man-mark the closest players, thus cutting off support. If the first pressing wave fails, the outside forward on the weak side drops to mark the opposition’s full back while the rest of the back four shifts to cover the whole width of the back line. Together with the defensive midfielder (6), the central midfielder (8) drops to mark and block forward passes in the central zone. Should the ball be played back to the goalkeeper, the whole team will have ample of time to readjust their positions. On the other hand should the ball be directly switched to central defender 5, our outside forward on that side (yellow 7) moves forward to contrast him while the back four readjusts its shape.
Game related practice 2: Defend, win the ball and counter.
Duration: 10 minutes (play continuously for 8 minutes then rest for 2).
Now we turn our focus from the defensive phase into the moment of positive transition. We want to hit the opponents hard during this moment when they are still disorganised and unbalanced defensively. It is therefore of uppermost importance to develop our players’ habits to ‘switch on’ immediately into an attacking mode and try to play vertically as soon as possible. We know that the opponents’ main weakness on the counter attack lies on the flanks in the space behind the full backs. Therefore in this practice, to reward a good offensive transition while exploiting the space behind the full backs, we position two gates (one blue and the other red), each ten meters wide, in which the team scores a point for dribbling through either of them. The team also scores two points for scoring directly in the regular goal. This means that if the central channel is not well covered by our opponents we want our team to attack the goal immediately instead of going through the gates. As shown in the below diagram, we leave the horizontal zones as they were in the previous practice. Every play should start by the black team from a pre-established point inside the yellow team’s defending zone. When the ball is won by the defending team (yellows) they should immediately look to counter-attack by playing the ball into the middle zone. When the ball is inside this zone, our number 8 and number 7 should quickly join the attack, thus making it a 5v4 plus goalkeeper. We also practice on the opposite side with the number 7 remaining high and the number 11 dropping back close to the back four.
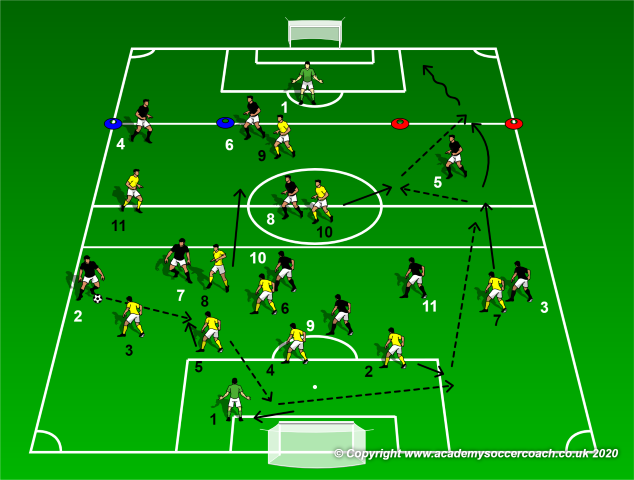
Progression.
Duration: 10 minutes (play continuously for 8 minutes then rest for 2).
Now the opposition’s full backs track back on the negative transition. We also instruct both of our full backs to move forward to provide width and momentum to the attack. This creates a further numerical advantage on the counter while our outside forwards move into the half spaces.
Global game.
Duration: 20 minutes (play continuously for 16 minutes and rest for 4).
In the final minutes of the training session we play a normal game. As coaches we should observe how our team is closing down the middle, defending on the flank and preventing situations of numerical inferiority and also to how we react to the positive transition.
Cool down.
Duration: 10 minutes.
We end the session with juggling competitions in groups of four using various restrictions such as two touch, one touch, use the knees or feet only, etc. The main aim for this is to get the players to relax after a mentally demanding training session. The final minutes of the session ends with static stretching exercises.
By Philip Cauchi

