By Sean Reed -
Objective
This is a finish session focuses on players finishing from different angles and crosses from wide areas. In addition it can be used as a physical session combining the finishing with the fitness. It will encourage players to make decisions whilst working under pressure. Acceleration and deceleration through movement from one finish to the next will challenge the players, as well as their ability to refocus on what the next action is..
First Shot
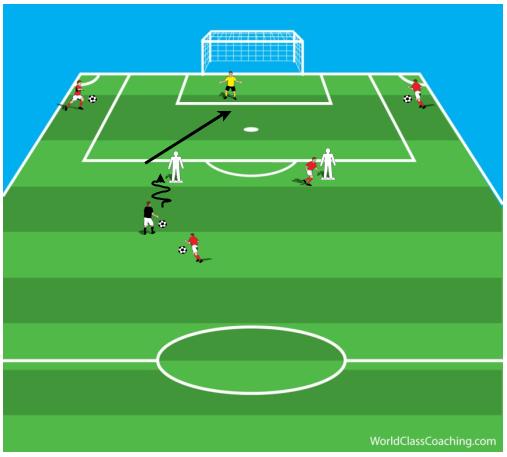
Diagram 1
Set Up
- Working in around the 18yd box, with 1 goal, 2 mannequins and balls for each server. See diagram 1
- 1x player is working, with 4x players resting, but serving from different areas around the 18yd box. 2x players will cross from wide areas, whilst 1x player will serve the 2nd ball into the player working and 1x player will be position near a mannequin to play a 1-2 with the player working. Plus the 1 Goalkeeper. See diagram 1
- 1st Shot – Start 5-10yds from the mannequin, player working runs with the ball at the mannequin either side, takes a touch past the mannequin then gets a shot off on goal. See diagram 1
- 2nd Shot – Player recovers goal side of the mannequin to receive a pass from a resting player, takes a touch either side of the mannequin to get a shot off on goal. See diagram 2
- 3rd Shot - Player recovers goal side of the other mannequin to play a 1-2 with a resting player to then get a shot off. See diagram 3
- 4th Shot – Player recovers to touch the other mannequin to then receive a cross-played in from the wide area (has 2 touches for a finish). See diagram 4
- 5th Shot – Player recovers to touch the opposite mannequin to then receive a cross from the other side (has 1 touch for the finish). See diagram 5
- Recovery Run – Once the player working has had the final chance on goal they then make a recovery run in line with the 2 mannequins. See diagram 6
- The number of times each player goes through depends on the physical objective
Coaching Points
- 1st touch to set for the strike on goal
- Looking to shoot across the GK
- Focusing on what the next action is
- Movement, changing direction and acceleration for the next action
Progressions
- To make it competitive keep record of the goals scored and the time to complete the 5 shots with the recovery run. If the scores were equal it would be down to the player who completed it in the quickest time.
- Change the starting point. For example starting 1st on the right side, to then starting 1st on the left side
- Reduce the number of shots
- Change where the starting positions take place, giving the player different angles to finish from
- Depending on the physical output change the end point for the recovery run
Second Shot
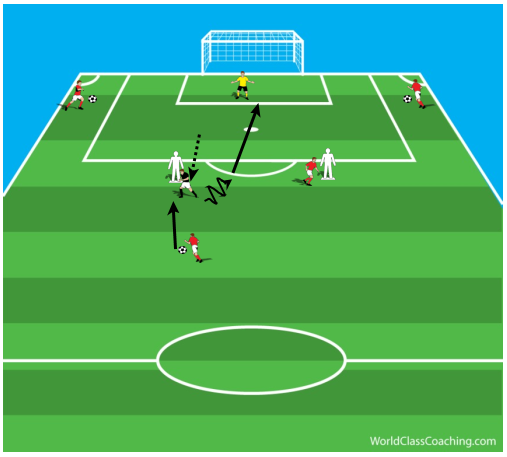
Diagram 2
[wpsharely id="1204"][/wpsharely]
Third Shot
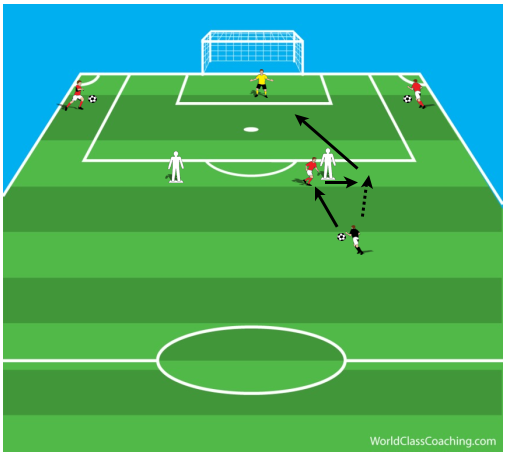
Diagram 3
Fourth Shot
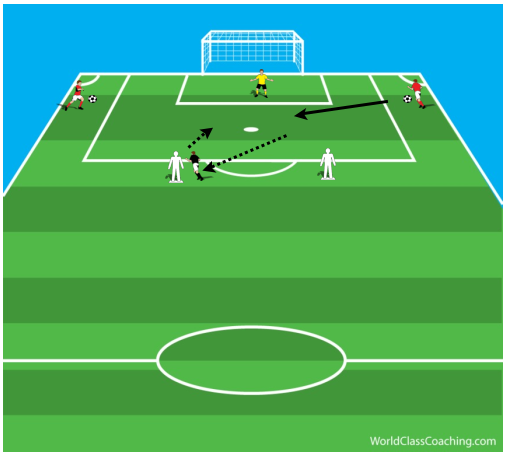
Diagram 4
Fifth Shot
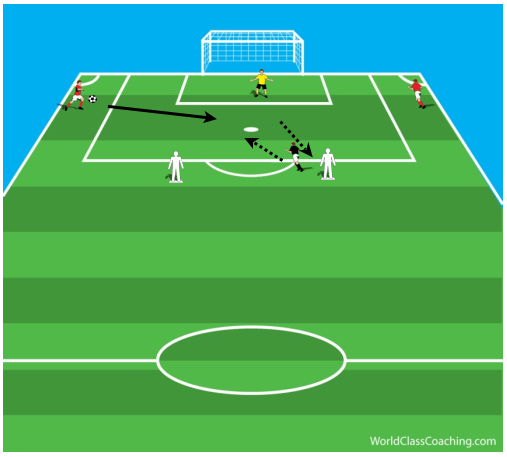
Diagram 5
Recovery Runs

Diagram 6
By Sean Reed
Former First Team Coach of Championship side Fulham FC. Sean is a UEFA A Coach with a Masters in Sport Coaching. He has over 15 years of experience working in professional football from Academy through to First team in the Premiership and Championship.
Linkedin - www.developmentofplayers.com
Twitter - @SeanJReed

