By Mike Smith -
Over the course of my 24 years of coaching in general and 16 years of coaching high school, one of the constants I have faced is the need to “make” a keeper. Most coaches have moved around a bit as far as teams and age groups coached, but in all my travels I have only inherited 3 actual keepers. The reason I mention this in an article about getting off the line is that playing keeper is intimidating and already takes a special kind of player. When this player is new or just trying it out to help the team, this intimidation often shows up with the keeper standing on the line. While good line play is a staple of good keeper play, we all know getting stuck there can spell disaster sometimes, so here is what I do the help the keepers “ get off the line”.
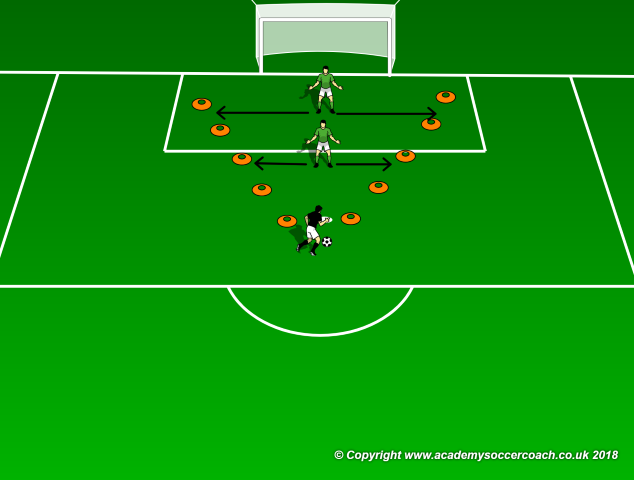
First, I explain to them about what I call the “ shooters V “. I set up cones as shown above and explain that this basic V shape pivots with the shooter and most of the time, the ball is going somewhere in this V ( unless the shooter shanks it, whiffs it or skies the bar – all fine from a keepers stand point ). Once keepers understand if they sit back, they have to cover more ground to make the save ( noted by the upper keeper and movement lines ) than if they step up and cut down the angle ( and coverage distance ) a bit ( noted by the lower keeper and movement lines ) they readily move out more. Obviously too close and they risk being burned by fancy footwork so again, most readily understand the benefits of stepping out a bit.
After a good warm up, we do a bit of shooting, with a twist:
Set Up
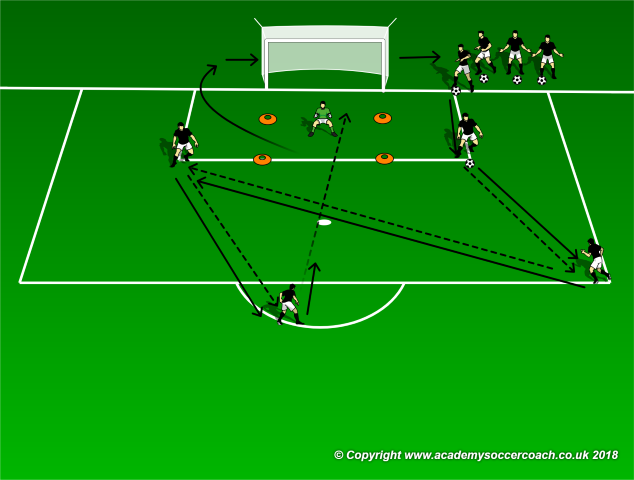
As shown above, cut the keeper box in front of the frame in half and have your keeper ( keepers ) make saves from there. Any shooting progression can be used, I use the one shown above most often as it mixes in short passes, diagonal passes, set up passes and shots from around the pk spot ( the shooter shags the ball so there is a bit of running there too). The numbers of shooters should allow for minimal recovery time as this should progress fairly quickly. Multiple keepers can rotate in after a set number of shots ( 5 – 7 ).
Progression
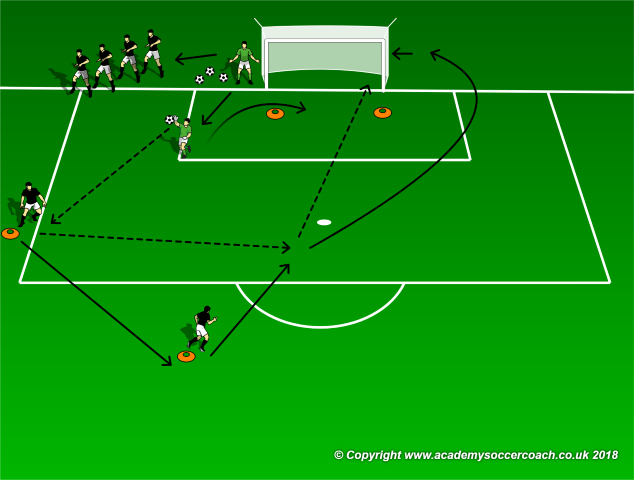
Once the keeper is comfortable operating in the area off the line in front of the goal, remove the top two cones from the keeper box and re-position the shooters as shown below. This drill starts with the keeper distributing the ball from the top of the 6 to an attacker who lays the ball across around the penalty spot. Another attacker rushes in for the shot. The keeper must distribute the ball the sprint behind the cone gate to attempt the save from between the cones. The shots should come in quickly enough to force the save just as the keeper is getting near the cones so attacker starting positions should be adjusted to facilitate this. After a save attempt, the saving keeper either digs the ball out of the net and then drops out, or drops out after a save with the shooting player collecting the ball. The in coming keeper waits until the net is clear to make the next distribution. Shooters rotate as shown.
A final progression would be a half field scrimmage 8 defenders vs 10 attackers to see how the keeper adjusts moving to and from the line.
Coaching Points
During the drills the coach should focus the keeper on cutting down the angles and being ready to make the save. For beginning keepers, just getting a hand on the ball is a win. During the scrimmage, the coach should stay by the goal and give the keeper cues on when to step out and when to hold the line but the overall main idea is to get the keeper comfortable using the right space inside the box at the right time – especially when it is time to “ get off the line”.
By Mike Smith
Currently the Head Coach for University Heights Academy Boys Soccer in Hopkinsville, KY , Mike is in his 14th year as a high school head coach with 23 years coaching experience overall and 34 year as a student and fan of the game. He holds a USSF D License.

