By Sean Reed -
Objective
A session to work with players to combine to finish, and making runs in the 2nd phase to finish from a cross.
1st Ball
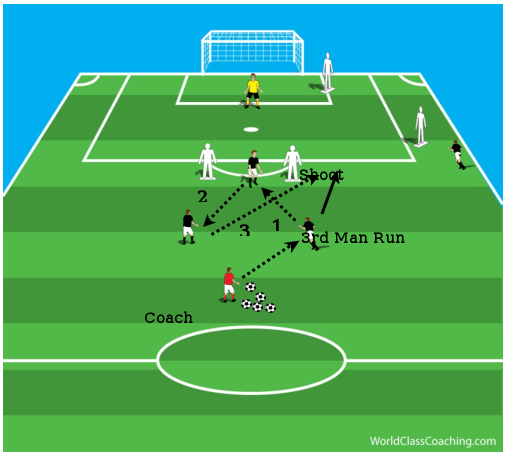 Diagram 1
Set Up
- Working in 3’s with 1 player out wide to deliver a cross. Depending on numbers you can have 2 players out wide to combine or 1 player each side to alternate.
- The players’ work in 3’s to combine to finish. Within the diagrams are options of how to develop this, but there is scope for the coach or the player to change the type combinations and runs they make.
- As in diagram 1 the mannequins or poles are 5yds outside the area. One player starts in between the two mannequins (poles) and the other two players start deeper (almost like a triangle).
- 1st Ball: The practice starts with the ball being played from the coach into Player (1) starting deep. 1st ball into the striker (player 3), who sets it back to the 2nd deepest player (2), who then plays a pass into the path, past the mannequin (pole) for player (1) to make his run from deep onto the ball. Player (1) will either look to strike it first time or take a touch to set themselves up for the shot. The sequence of passes 1, 2 + 3 are illustrated within diagram 1
- The mannequins (poles) can also represent the offside line to encourage the player from deep to time their run.
- Plus the starting position can be from either side depending on whether players want to work on their left or right side.
- 2nd Ball: Player (2) now receives the ball from the coach who then plays a pass into the striker (Player 3) to combine. Looking to receiving a pass the other side of either mannequin (pole) for player (2) to run onto to take a touch to break the line or striker first time for a finish on goal. See diagram 2 for the sequence and movement
- 3rd Ball: The striker (player 3) pulls off on the angle onto one of the mannequins (pole). On the half turn the player receives a pass from the coach to create a shot on goal. See diagram 3
- 4th Ball: Once the 3rd ball has been finished players will recover back goal side of the mannequins (poles). 2 of the players will then combine and play a pass out to the wide player. See diagram 4
- The wide player looks to work the ball past the mannequin and deliver a cross into the area.
- The 3 attacking players make their runs into the area to get a finish on goal. See diagram 4
- Encourage players to be creative with their movement and link up play
Coaching Points
- Movement prior to receiving the ball
- Communication
- Body shape when receiving the ball
- Receiving on the back foot
- Weight of pass
- Decision to play 1st time or take a touch
- 1st touch to break then line and create a shooting opportunity
- Timing of run (staying onside)
- Link up / combination play
- Finishing on target and across the keeper
- Reaction and movement for the 2nd phase
- Timing of runs for the cross, must get a player across the front post, which will allow for the pull back. Player at the far post avoids getting into too early
- As head drops for the wide player to cross, players in the area positive with their movements
2nd Ball
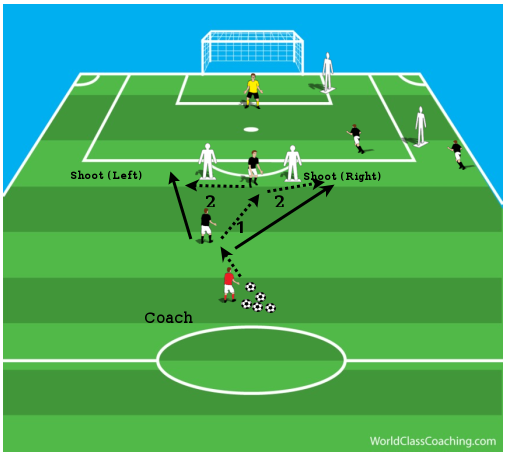 Diagram 2
[wpsharely id="1204"][/wpsharely]
3rd Ball
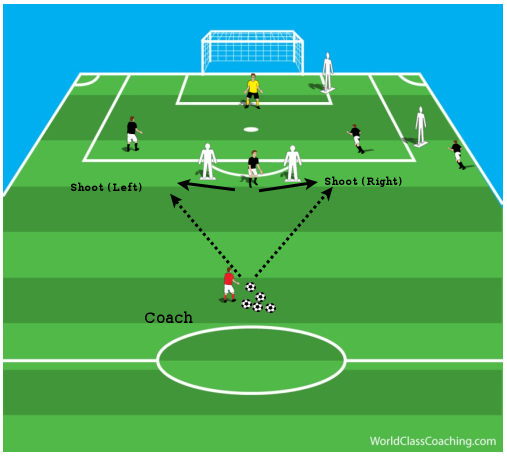 Diagram 3
4th Ball
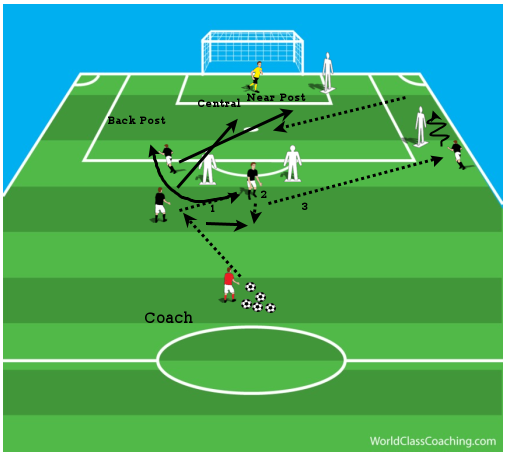 Diagram 4
By Sean Reed
Former First Team Coach of Championship side Fulham FC. Sean is a UEFA A Coach with a Masters in Sport Coaching. He has over 15 years of experience working in professional football from Academy through to First team in the Premiership and Championship.
Linkedin - www.developmentofplayers.com
Twitter - @SeanJReed

