WORLD CLASS COACHING
Club Curriculum U11/12 Season
By Tony Englund
TABLE OF CONTENTS
Part Two
PASSING AND POSSESSION SESSIONS
Training Session #6: Passing and Receiving.
Introduction
This session reviews technical passing in high-repetition environments and then adds a tactical element to encourage players to make good choices as they pass.
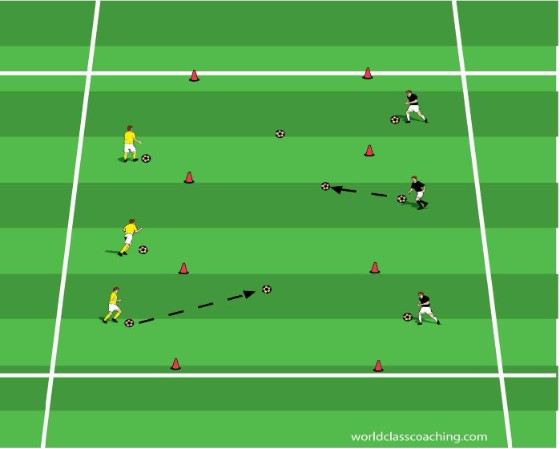
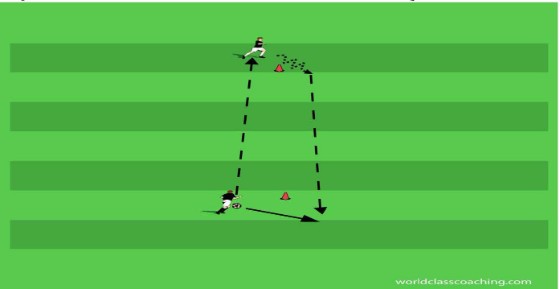
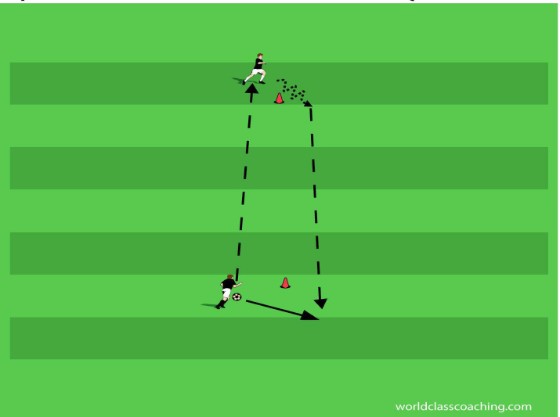
Cue ball - 25x12 yard area
Put a ball (or two) of a distinctive color in the middle of the grid. Put a ball supply in each end zone and put half of the players in each of the end zones. Explain that the goal of the game is to pass a ball from the end zone to strike the ball in the center. The target ball must be knocked into the opposing end zone to earn a point. Players may only enter the center area to retrieve a ball. If the target ball is knocked into a team’s end zone, they pick it up and run it back to the center and play continues. Teams may kick a cue ball at a target ball rolling toward their end zone in an effort to keep it from crossing the line. Play for five minutes and then check scores.
Pairs passing and receiving - 20x20 yard area
Line players up in pairs with one soccer ball along a line on the field. One player stands on the line while her partner stands four yards away and facing her.
First, review the key technical points for short passing:
• Find a comfortable, yet locked position for the knee and ankle of the passing foot before striking the ball (i.e. use the hip as the point of rotation). This creates both power and consistency.
• The plant foot should face the target. This allows for more fluid motion and also more accurate passing.
• The striking surface is the long inside of the foot. The toes should be slightly elevated and, relatedly, the heel lowered. This posture creates a better control surface.
• The striking point on the ball is the center back. Players should diagnose the missed strikes by watching the path and spin of the ball. If the ball hops off the ground, the striking point is too low. If the ball skids unevenly along the ground, then the player topped the ball, striking too high. Similarly, side spin on the ball indicates that the player struck inside or outside of center on the back of the ball.
• The follow-through is a critical component of accurate passing. Players must learn in this isolated technical work to “hold” their foot at the very end of the strike on the follow through. This hold reinforces a proper striking form and also the idea offollowing through with an eye toward pointing the striking foot at the target.
Players pass and receive with a focus on proper striking of the ball. Insist that players alternate the foot they use to pass the ball. Play for one minute. At this early point in the progression, encourage the players to stop the ball as they receive so that they are striking a standing ball.
Now review the key technical cues for receiving.
It is useful to look at receiving as being the reverse of passing.
• As in passing, the ankle and knee are locked, although suppleness in receiving requires a softer posture than striking. The hips and shoulders must be “open” (facing) the ball as it arrives.
• Begin with the follow-through used to strike the ball in passing. Here, one presents one’s foot in front of the body to “welcome” the ball.
• Once again, the receiving foot must be presented as a low heel and elevated toes to allow for a surface that will prevent the ball from bouncing.
• As the ball is received, players must learn to cushion it and take speed out of the ball without actually stopping it (see cue #5).
• In good soccer, it is said, the ball never stops. Ideally, the ball must be prepared for release in a single touch. If players stop the ball between their feet, they will need two more touches to release the ball, allowing defenders time to close and tackle. Therefore, players must learn to use their first touch to push the ball forward and outside of their hips and shoulders so that the next touch can be a pass if needed. This is done by sharply turning the hips in particular at the moment of reception. This change of angle allows players to avoid pressure and eventually prepare the ball in the direction they are planning to play.
• Players return to passing with their partner. Observe their ability to maintain good technical form in both passing and receiving. Play for two minutes, emphasizing that all players need to alternate the foot they use both for passing and receiving.

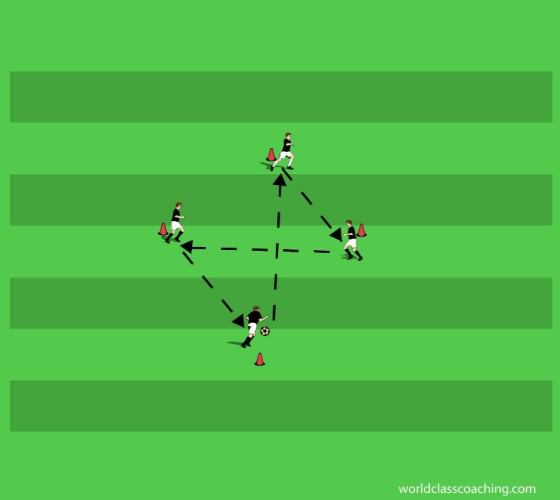
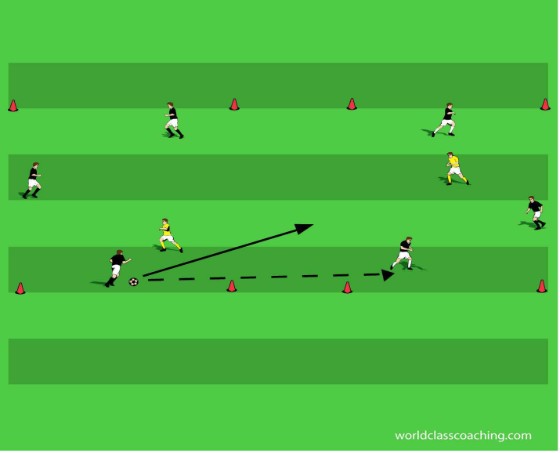
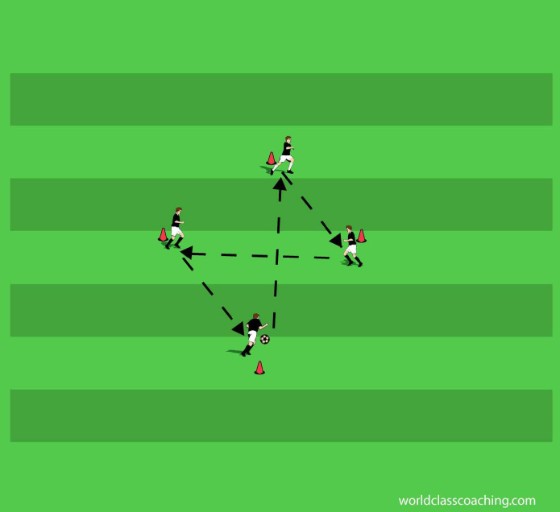
Pass and follow square - 12x12 yard grids
Build enough grids so that there are at least five players in each work area. Start by putting players at each corner cone of the grid (one per cone at three corners and the remainder in line behind the fourth cone, where the ball starts as well). The player with the ball plays clockwise to the player at the next corner of the grid and then follows her pass, and the pattern is established. Players pass and follow.
Coaching Points
• Although there is some movement, this is still a fairly low pressure exercise. The concentration here must be on continued good form in passing and also receiving.
• Explain that the receiving player should get the ball as early as possible while remaining near the cone (i.e. establish the habit of moving to the ball) and that early and sharp preparation of the ball is necessary. The ball must also now be moved in a particular direction, so for now, players should be receiving with the inside of their right foot and playing across their bodies to prepare to pass with their left foot.
• As play improves, increase the pressure slightly by encouraging players to pass with more pace.
• After two minutes, reverse the direction of play (the ball should travel counter-clockwise). Now players should receive with their left foot and pass with their right.
• Now go back to playing clockwise and ask the passing player to target the left, or leading foot on the player they are passing to (see diagram). This will require players to receive with the inside of their left foot and pass with that same surface. After two minutes, revert to playing counter-clockwise and instruct players to play with their right foot. Players should notice that this last variation is better soccer in the sense that the receiving player’s work is much easier if the ball is passed into the lane where they intend to play.
3 vs. 1 passing in a grid - 12x12 yard grids
Build grids so that there are enough to place groups of four with one soccer ball. Start with players on three of the corner cones and one player, the defender, in the middle. Demonstrate with one group. Explain that in this environment, players must pass only to the corner cones and that all passes must travel along the perimeter of the grid. Similarly, the attackers may only move along the perimeter of the grid. The defender may move freely within the area of the grid. Start the ball in a corner with one of the attackers.
Show that the attacker must always have two passing options available by moving the attackers not in possession to the adjacent corners of the grid. Begin the exercise by having the defender work at ½ speed so that the attackers get a rhythm and lots of repetition. If the defender wins the ball, have her return it to any of the attacking players. Rotate the defender every minute. After every player has taken a turn at the defender role, play through again, this time with the defender playing full speed after the first pass. Once again, if the defender wins the ball, she should return it to one of the perimeter players to restart play. This exercise is useful both to give some technical pressure to both passing and receiving, and also to begin the tactical building blocks of movement off of the ball and creating useful passing angles.
3v3 game to cone goals - 20x25 yard fields
Play 3v3 games. For the first five minutes require teams in possession to complete three consecutive passes before they can score. Then remove the restriction and let the players play.
Training Session #7: Passing and Receiving.
Introduction
This session emphasizes passing in combination with movement in small groups, and also looks at making the first receiving touch productive to avoid pressure.

Triangle pass and receive - ½ field
Organize players in groups of three with one soccer ball for each group. Demonstrate with one group. The player with the ball passes to either of the other group members and then runs between them to create a new triangle.
Additional coaching points and variations:
• Players should sprint after making the pass (the player who just released the ball is typically the least-marked player on the field).
• Limit the players to two touches in possession and encourage them to use their first touch to set the ball in the direction in which they intend to pass with their second touch.
• The receiving player should check to (that is come to meet) the ball.
• Before receiving the ball, the player who is the next target should move away from the ball and then check back (this movement will pull a close-marking defender away from the ball and create space in which she can receive).
• Require players to pass and receive with their off foot for ½ of the exercise.
• Both eye and verbal communication should be mandatory for both the passer and the target.
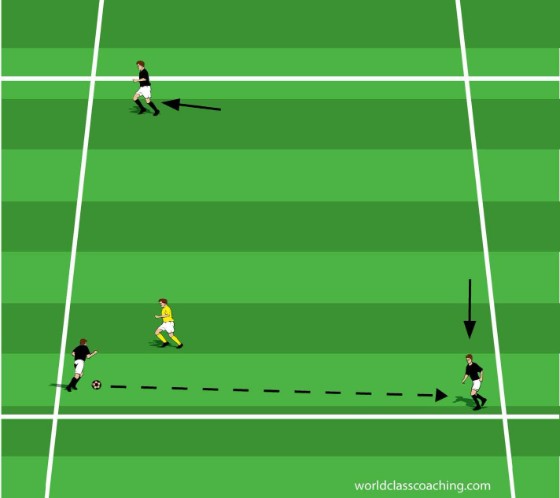
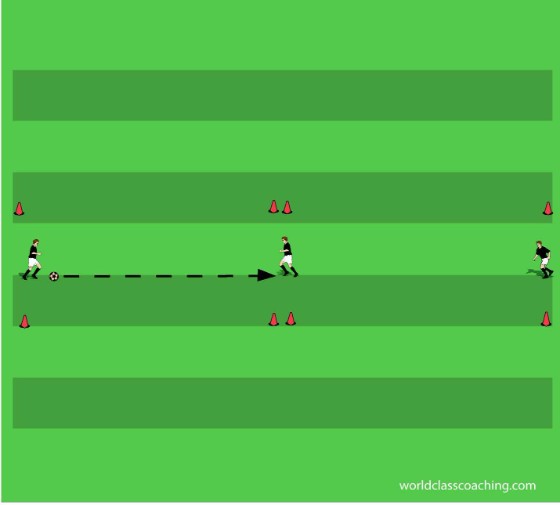
Angled passing in a grid - 10x10 yard grids
Build enough grids so players can work in pairs. Demonstrate with one group. Players start at opposite corners of the grid (see diagram). One player has the ball. This player passes at an angle to her partner, who receives with one touch and then plays straight ahead to her partner, who has sprinted over to the opposite corner on her end of the grid. After each pass, the players sprint to the other corner on their end, so that one player always plays straight and one at an angle.
Coaching Cues and Progression
• Having the players sprint to a pre-determined point compels them to learn to play to a moving target. It’s a bit easier because they are still playing to a fixed point, but there is still timing involved and players should learn to play with a sense of rhythm.
• The pace of the pass is critical. If they play too hard and/or too early, play will break down. If they delay or play with insufficient pace, their partner will be waiting for the ball at the cone, and the coach must encourage players to find the proper pace.
• The preparation touch is also important. Players must prepare the ball in the direction in which they intend to play. The first touch must get the ball out of their feet to allow them to play the proper ball on a consistent basis.
• Play for two minutes and then have the players change roles (i.e. so that the player who was playing straight ahead is now playing at an angle and vice versa).
• Play a second round, encouraging players to use one touch where possible. They will need to take a bit of pace off of the ball to allow the runner time to get to the cone.
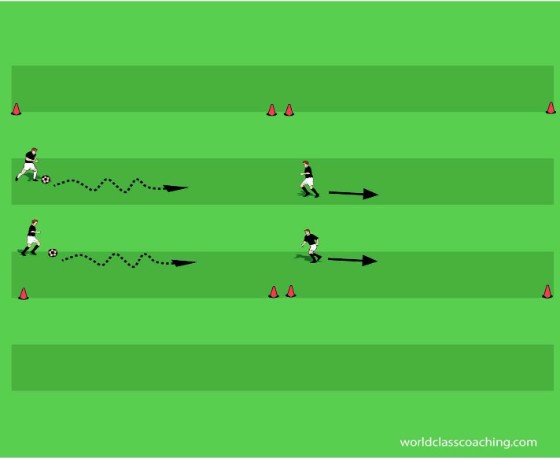
Teaching preparation touches 10x10 yard grids
Players work in pairs around two cones place seven yards apart. Demonstrate with one group. This exercise is designed to compel players to use their first touch to set up a pass with their second touch. Players start on the same side of their cones. The player with the ball passes straight ahead to her partner who receives about a yard behind her cone. The receiving touch must be played at a forward angle behind the cone so that receiving player can then step around the cone and forward to pass along the other side of the cone back to her partner and the pattern continues. This type of receiving forms good habits for both playing away from pressure and also getting the ball out of the receiver’s feet with her first touch.
More Coaching Points
• Players should pass with their right foot and receive with their left to start.
• After three minutes, change the pattern so that players pass with their left and receive with their right.
• To help players learn to play forward at an angle, show them how to turn their hips at the moment of contact with the ball.
• Players will need to be reminded that they must start behind the cone, as many tend to creep up and make it difficult to have a useful angle behind the cone.

3 vs. 3 functioning as 3 vs. 1 - back-to-back 15x15 yard grids
Play 3 vs. 3 functioning as 3 vs. 1. Build two grids back-to-back and place teams of three in each grid (one team in vests). Demonstrate with one set of teams. Put a ball in one grid and explain that the team in the grid needs to try to keep the ball in possession as long as possible through dribbling and passing. The other team (in the adjacent grid) sends in one player to try to win the ball (if she wins it, she passes it back to her team in the other grid and the teams switch roles. The coach should keep a supply of balls outside the perimeter where the two grids join and every time the ball leaves the area, the coach plays a new ball into either grid to restart play.
Coach/Observe
• The teams will tend to stand close together in possession. Through a demonstration, show that players who are more spread out in the grid can make longer passes and more easily maintain possession.
• Encourage players to work hard off of the ball to create angles where they can receive the ball.
• Players should learn to anticipate the angle they will use to pass the ball and then use their first touch to prepare the ball in that direction.
• If one player is unable to win the ball as the defender, release a second player to enter the grid to help win the ball.
3 vs. 3 line soccer - 20x25 yard fields
Play 3 vs. 3 line soccer. The objective of the game is to possess the ball with an eye toward passing the ball to a team member on or over the opponents’ endline. Require two passes in possession before a scoring pass can be attempted. Reinforce the importance of quality passing, receiving and running off of the ball under pressure.
Training Session #8: Possession.
Introduction
Session#8 offers more technical passing and also debuts no pressure possession in a progression designed to improve group awareness and cohesion in possession.
Gates - 30x30 yard grid
Create two equal teams (one in vests). The coach will need to have a supply of balls near the perimeter of the grid for restarting play when the ball leaves the grid. The two teams play a possession game inside the grid with the goal of passing the ball through any of the “gates” (pairs of cones one yard apart scattered throughout the grid as shown in the diagram).
Rules and coaching points:
• To score, a pass must travel through a gate and be received by a teammate on the other side.
• Explain to the players before beginning that it is very easy to defend a single gate as a defender can simply stand between the cones. Therefore, the teams need to look to possess the ball with an eye toward working to find an open gate. If a gate draws a defender, the attackers must look elsewhere.
The most common breakdown in this game is a tendency to crowd the ball. The coach should stop the action if need be a couple of times early on to demonstrate the need to spread out the game. Longer passes typically create open gates and relieve pressure for the attackers.
Play for seven minutes, using the game to assess the team’s ability to possess the ball under pressure.

Pairs pass and receive with a cone - 20x30 yard area
Arrange players in pairs with a ball. One player stands on the touchline with the ball and her partner stands behind a cone placed four yards from the touchline. Demonstrate with one pair. The player behind the cone works on the balls of her feet, alternately stepping around one side of the cone and then the other to receive. In receiving, she needs to touch the ball around the cone and play back on the other side. For example, if she steps around to her right, she should receive with the inside of the right foot and touch the ball behind the cone (forward, at an angle) and play back to her partner on left side of the cone using her left foot. Play for one minute and then change roles.
Variations:
• Play one touch for the working player.
• Play one touch for both players. This requires a very high work rate for the active player and will require rotation after thirty seconds.
No pressure possession in groups - ½ field
Put the players in two teams (one in vests). Each team has a ball. This environment is designed to allow players to focus on: Their technical ability; their speed of play; their communication; and their movement off of the ball. The two teams play in the field at the same time (they do not interfere with the other team’s possession).
Play each of the following variations for two minutes.
• Communication. Before a pass can be made, the passer and the target must get eye contact (visual) and call out one-another’s names (verbal communication).
• Pass and sprint. As the team knocks the ball around, the player who just passed the ball makes a five yard sprint away from the ball. Emphasize that all players must continue to jog and to use the entire space as their team plays. Explain that these rules apply throughout the exercise.
• Off foot only. Require players to both pass and receive with their off foot.
• Check runs. Players must sprint away from the ball and then come back to it before receiving. Explain that the purpose of this restriction is to create space in which to receive. Here communication becomes critical, and visual and verbal communication between the passer and target must be required by the coach.
• Think ahead. The passer must call out the name of the target before she plays. If the players do well with this restriction, then try having them call out the name of their target before the passer receives the ball. These restrictions compel players to plan ahead and to think quickly.
• Short pass, long pass. Here, the players must think about the use of space. If the pass to them was a short pass (i.e. ten yards or less), then they must make a longer pass as they release the ball.
• Change direction. After receiving, each player must use a cut or pull-back to change the direction of play before passing. This restriction is designed to force players to check multiple options (both targets and the direction of play) in possession.
6v6 to end line targets - 40x35 yard field
Organize two teams (one in vests). Each team places a target player on their opponents’ end line. The purpose of the game is to keep possession and play to the end line target. The player passing in to the target then takes her place. As the target re-enters play, she passes the ball to the nearest player from the opposing team and play continues. Remind players of the possession cues trained above. Keep a ball supply just outside the perimeter of the field (near the center) where the coach can restart play if the ball is played out of the field area.
This game also introduces the concept of transition. As even after a point is scored play continues, players must change roles from offense to defense and constantly remain alert for their team to be successful. Encourage the targets to be active on the endvlines, communicating with their teammates and moving to create open passing lanes. The coach can use any of the restrictions outlined in the previous exercise to require players to work to improve possession under pressure. Another useful restriction is to require a given number of passes (i.e. 3 or 4) before a pass can be made to a target.
6v6 to goal - ½ or full field
Play a standard scrimmage, at first requiring four passes before a shot can be taken. After five minutes, remove the restriction and let the players play.
Training Session #9: Possession.
Introduction
This session offers advanced training exercises for players learning to build possession within the team. The session introduces games that ask players to pass into targets and make good decisions under pressure.
Possession to Target Zones - ½ field with two 5x5 yard target grids
Divide the group into two teams (one in vests). Prepare a ball supply outside the perimeter of the grid. Each team posts a target in the grid at their opponents’ end of the field. The objective of the game is to get and keep possession and then try to play into the team’s target player in the grid. The player passing into the target player then takes her place.
When a point is scored, the target player restarts play by passing to a member of the opposing team. This game is a useful warm-up for a possession session in that it requires teamwork and movement off of the ball as well as passing under pressure. Once the players get used to the environment, it becomes apparent that given that one can play into the target from any angle, it is fairly easy to score, and a simple pass can open up an angle to score a point. Play for ten minutes, keeping score and being sure to rotate the target players if they are not played out by their team within two minutes.
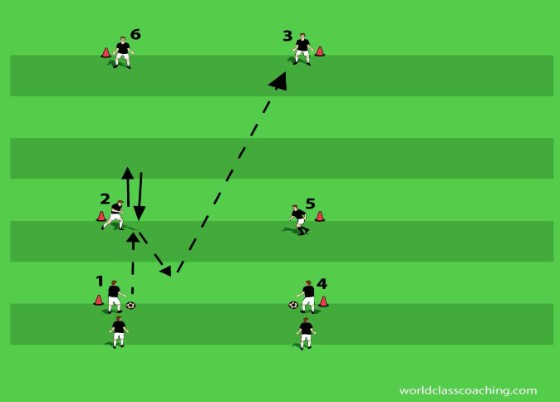
Diamond Pattern Passing - 12x10 yard diamonds
Players work in groups of five or six in a diamond. Put a player at each cone and those not on cones behind the first player on the end with the ball. Explain that this exercise is designed to give players the opportunity to work on one and two-touch passing and also receiving. The players pass the ball in the pattern outlined in the diagram and then follow their pass. Specifically, the pattern is: Straight; left; straight; right (repeat). To begin, allow players to play with two touches and simply encourage them to understand the pattern and develop some rhythm in their play. If there are enough players for two diamonds, hold a one minute contest to see which diamond can complete more passes.
Next, demonstrate to players that given one knows where the target of their passes will play, it is best to pass the ball to a position that allows their target to play with a single touch. Therefore, in the the diagram 1 plays the ball between 2 and 3, knowing that X2 will be playing to X3. Also, instruct players to consider the pace of their passes as they attempt to play 1-touch where possible now. Finally, the players must consider which foot they should use to make the pass (i.e. 2 should play with her left and 4 with her right). Let the players train this way for two minutes and then repeat the passing contest between the diamonds, encouraging players to use one touch where possible.
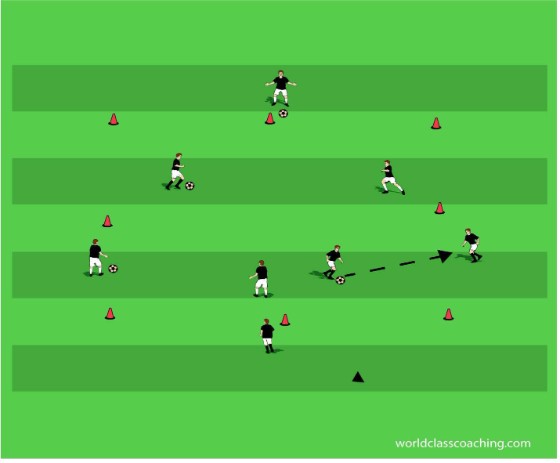
3 vs. 1 +2 vs. 1 - 30x20 grid
This is a possession-building exercise based on two grids (divide the large grid in half to form two 10x15 yard grids). Begin by putting a defender in each grid. Then place two attackers in one grid and three in the other. The coach has a supply of balls just outside the perimeter of the grid. Explain that the defenders are isolated in the grid that they are playing in and that the ball will start in the grid with three attackers. Those attackers knock the ball around and when they have the opportunity they play to either of the attackers in the other grid. When the ball is played into the other grid, one of the three attackers crosses over so that the 3v1 situation is repeated. If either defender wins the ball, they step on it and pass it to an attacker in the other grid and play continues. Play for two minutes and then change the defenders.
Coach/Observe
• The three attackers need to constantly reform a useful triangle around the lone defender. In other words, the two attackers off of the ball need to move early and sharply to angles to make themselves available so that the player with the ball always has two passing options.
• Encourage two and even one-touch play and emphasize good footwork and touches to facilitate possession.
• The two attackers in the other grid often show a tendency to stand at the common border between the grids. Discourage this practice by demonstrating how easy it is to mark standing players. Instead, the two attackers should be active in the back half of their grid (as far away from the ball as possible), waiting for a good moment to check in and receive the ball from the other grid. This will involve early and urgent communication by the checking player in particular.
Cone drop game - ½ field
Create three equal teams (two teams in colored vests). This game is designed to create a possession environment with an effort to play into specific targets. Put all three teams in the playing area, each player standing with her teammates. Explain that two teams will be playing while one team will serve as targets. In this game, the targets hold three cones of one color and three cones of another color.
Assign each of the playing teams a color of cone and explain that each time a target is played, she drops one cone of the designated color. The purpose of the game is to get all of the cones of a team’s designated color on the ground (that is, no target player holds a cone of that color). The target players are limited to two touches and they cannot be tackled. Emphasize that the target players should receive and pass and then drop the cone so that play develops some rhythm. This is a fun game, and players may need a reminder occasionally to focus on spreading the field, maintaining possession and just working hard to organize their team’s efforts toward finding the targets. The coach will need to keep a supply of balls along the perimeter of the grid to restart play.
Variations
• Allow the target players to walk around the area, but not check to the ball. This creates a constantly changing environment where the working teams will need to communicate to organize to find the target players.
• Allow the target players to play full speed. Now the game becomes much faster and the defenders’ tasks become very difficult as there are so many active targets for the team in possession.
6v6 scrimmage - ½ field
For the first ½ of the scrimmage, mix in the following restrictions:
• Require two passes before a shot at goal.
• All play is with the ‘off’ foot.
• Players in possession are allowed only two touches.
Remove the restrictions and let the players play.
Training Session #10: Turning.
Introduction: This session trains players to become familiar with their options for turning. The session gives players the opportunity to rehearse a number of possibilities and then closes with a zonal game requiring players to turn under pressure.
Touches and turning - 26x26 yard grid
Players work in pairs with one ball. The grid should be divided in half to create a pair of thirteen yard wide grids. One partner, with the ball, stands on the edge of the grid. The other partner stands where the grids meet (see diagram). There are two variations of this exercise, the first of which is a warm-up and the second of which introduces the turning topic.
• The player with the ball dribbles toward the center of the grid taking one touch for every step. This player should work hard and work fast to get to the center. Her partner backpedals to the edge of the grid on her side. When the dribbling player gets to the center, she passes the ball to her partner and their roles reverse. Play for two minutes.
• In the second variation, the player with the ball passes immediately to her partner in the middle of the grid. As she plays, she instructs her partner to, “Turn!” The receiving player gets “shoulder on” (turn one shoulder to point at the passing player. In this way, she is already half-turned) and receives the ball with the inside of the foot farthest from the server. She then turns and dribbles to the edge of the grid. Meanwhile, her partner sprints to the middle of the grid and their roles reverse. Instruct players that the running player who is checking to receive should time her run so that she is not waiting for the ball when it is played. Also, the turning player should alternate the shoulder she turns to the passer so that she can practice receiving with either foot. Play for three minutes.
Carolina turning series (I) - 12x20 yard grids
Players work in groups of three with one soccer ball. There are many variations of what is often called the “Carolina turning series.” Here, the purpose is to introduce the basic format and simple turns for players learning to make good decisions in possession. The three turns are outlined below. Here, the moves are performed without pressure. The working player needs to be instructed to check her space throughout the series. This is accomplished by taking a sharp look over her shoulder during the checking run. Each player should take a turn in the middle practicing each turn for two minutes.
• Front foot turn. This is the turn outlined in the warm-up exercise. Here the player decides that there is no pressure, gets shoulder on and receives with the inside of the foot farthest from the server. Once turned, she takes a dribbling touch and delivers the ball to the third player on the far end of the grid. The endline players need to be consistent in making the early command: “Turn!” Require the working player to alternate the receiving foot.
• Man on. In this case, the receiving player is operating under the pretense of pressure. Therefore, in making the checking run to the ball, she prepares to receive the ball with the outside of the foot nearest to the server. This touch puts the working player into a shielding position with her first touch. The passer hollers, “Man on!” with each serve. Once the working player has controlled the ball, the passer hollers, “Back!”. At this signal, the working player passes the ball back to the server. Note: The passer should get into the habit of changing the angle of the back pass by sliding left or right while calling the ball back. This adjustment will serve the players well when they get into this situation on the big field in that the change of angle requires the defense to adjust their pressuring runs, and new passing angles are created immediately for the team in possession. Note: For this “turn” only, a second ball is required (that is, each of the endline players has a ball).
• Self-pass. Here the working player again operates under the pretense of pressure. Instead of shielding and back-passing, though, the working player “self-passes.” In essence, this amounts to the working player getting into a shielding position, but instead of a shielding touch, she uses the outside of the foot closest to the server to take a longer touch (typically about a yard or a bit longer). The purpose of this touch is to create separation from the defender. The working player then runs sharply back around the ball to face up with the defender and takes a couple of touches before delivering the ball to the endline player on the far end of the grid. This turn is extremely useful in particular for quick, agile players (often on the flank) who can use their speed to get separation from the defender and then face up to create favorable 1v1 dueling situations. Instruct players to alternate the foot they use to make the self-pass.

1v1 to goal with turning emphasis - 1/3 field
Collect balls centrally and twenty-five yards from goal. An attacker and a defender begin in the “D” as shown. The attacker checks to receive a pass from the first player in line. Instruct defenders to vary their initial pressure so that the attackers can learn to think their way through their turning options. Play is live until the defender touches the ball or the ball leaves the area (i.e. through a goal or shot at goal). The easiest rotation is passer becomes attacker; attacker becomes defender; defender retrieves a ball and gets back in line.

3-zone game - 25x45 yard field
Play 6 vs. 6 on a field divided into three 15x25 yard zones (see diagram). This game can be played to full-sized goals or to small goals, depending upon the numbers available. The teams place two defenders (and a goalkeeper if possible) in their defensive third; two midfielders in the middle third and two forwards in the front third. Explain to the players that for the first part of the game, they are locked into the zones where they are placed. This restriction is designed to compel players to play the ball forward, creating situations where the players can practice both the communication and technical execution of the turns introduced above. The coach will need to encourage target players in the zones ahead of the ball to avoid lingering at the near edge of their zone, waiting for the ball.
Instead, they need to be disciplined about creating space by remaining well away from the ball and then checking in to receive when supporting players are prepared to play to them. The other important coaching point that often needs emphasis here is the advantage gained by checking in at an angle to the ball. A player checking in at an angle is a much easier target to find and play accurately to than a player coming straight on to the ball.
After ten minutes, introduce a new rule: Allow a player who makes a successful pass into the zone directly ahead to join the attack in that zone. This will help build possession as teams can get an advantage in numbers by playing intelligently. Also, point out to players that they can play back to the zone behind them if they receive the ball under pressure and in this way the team can organize possession and create more service to target players in the next zone. Note: When possession is lost, any players who have worked their way forward must return to their original zone. Remove the zone limits for the final ten minutes of the scrimmage and let the players play.
Training Session #11: Two-person combinations: 1-2 and overlap.
Introduction
Session#11 rehearses one-twos and overlaps, giving players a better understanding of the technical and tactical requirements of two-person combination play.
Windows - 30x30 yard grid
Divide the team into two equal groups. Put one group of players, each with soccer balls, in the middle of the grid and the other team spreads out around the perimeter. The players in the middle dribble and pass the ball to the players on the outside and then go and receive the ball from another perimeter player and the sequence continues. In this first round, the players need to focus on clean touches, hard work and communication.
Play for one minute and then have the players change roles. This environment can be used for a variety of training topics. Here, the purpose is to get in a good warm-up and then introduce the two-person combinations that will be emphasized in this session.
Variations
• Put balls with the players on the outside. The inside players check-in and receive a pass from the targets on the outside, returning it with one touch. The working players need to alternate the foot they use to return the pass and to help facilitate this, they need to indicate (using their hand to gesture) which foot the server needs to play to.
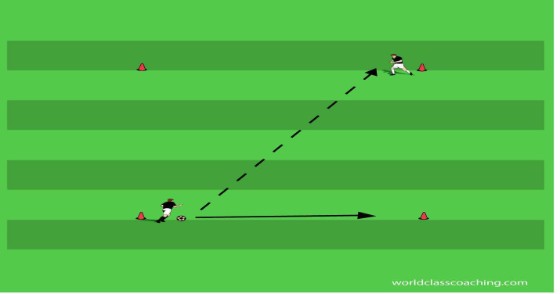
• 1-2’s. The players in the middle each have a ball. Demonstrate a 1-2 using a player on the outside of the grid to complete the combination. For now, the crucial coaching points are: 1. Get eye and verbal contact early with the target; 2. Play the ball to the foot on the target that will turn that player in the direction of the run the working player intends to make; 3. As soon as the pass to the target is made, sprint to the new space to receive the return pass in stride; 4. The runner needs to verbally demand the ball be returned and also indicate, using her hand, where she wants the ball played; 5. The target player plays one-touch. Allow each group to train the 1-2 basics for two minutes.
• Overlap. Once again, the players in the middle each have a ball. Demonstrate an overlap using a player on the outside of the grid to complete the combination. The working player gets eye and verbal contact with the target player on the perimeter and delivers a pass to the feet of that player. She then calls, “Hold!,” alerting the target player that her run will create space and that she wants the ball returned. The working player then runs around the perimeter player (stay three yards away from the ball) and re-enters the grid on the far side of the target player, who then returns the ball to her using the outside of her near foot. This surface is used to disguise the overlap pass in the flow of play of the game. Give each group the opportunity to train for two minutes on the communication, runs and technical demands of the overlap combination.
1-2’s in a grid - 12x15 yard grids
Build grids and groups of three with a soccer ball and a single vest. Demonstrate with one group. Identify a defender (have her start with the vest in hand) and explain with each restart, the defender must go to the mid-point of the grid. The defender is passive for the first stage of the exercise. The purpose of this particular set-up is to sharpen the players’ understanding of the technical and tactical requirements of the 1-2 combination. In essence, the two attackers will work back and forth across the grid, using a 1-2 combination to eliminate the defender each time and changing roles with each action.
Here are the cues the coach should introduce and coach:
• The player with the ball at the beginning of the sequence is the first attacker. This designation is for tactical identification, and the most important point of emphasis in this situation is that the first attacker must engage and occupy the defender. In the grids, the first attacker must take several touches toward the defender to compel the defender to focus on her in particular.
• The other attacker is known as the second attacker. It is the responsibility of the second attacker to create support opportunities off of the ball. In the case of a 1-2, the second attacker must sprint ahead to a position directly to the side of the defender (if she is too far forward or back, the passing angles become sharper and less efficient). The second attacker should also be 3-4 yards away from the defender, close enough to make for a quick combination and yet far enough away where the defender will have difficulty cutting out the passes or pressuring the target player. The other crucial piece of information for the second attacker is that she must get face-up with the side of the defender. Often, the runner tries to be a target for a 1-2 while still running and facing straight ahead toward the end of the grid. This makes for a very poor target and often destroys the rhythm of play.
• The first attacker, seeing the second attacker in position for a 1-2, dribbles hard at the defender before passing the ball with the outside of the near foot to the lead foot on the target player. These details are significant in that the use of the outside surface causes minimal disturbance to the first attacker’s running stride and also helps disguise the pass until the last second. The target player’s lead foot must be the receiving point for the pass because if her back foot is played, she often has to turn her hips and shoulders back and away from the area where the ball needs to be played with her first touch. In addition, she will have a more difficult time rejoining play immediately if she is forced to turn back. Finally, the passing angle for the return pass is also sharper and more likely to be interdicted by the defender.
• The players temporarily switch roles as the target player receives the ball. This is the critical moment in the combination. The first thing that must happen is that the target player and the runner must check to see that there is space available behind the defender. If there is not, then the target player must keep the ball. If there is, the runner sprints around the back side of the defender (leaving her sight as she turns with the ball) and into the space, calling for a return pass.
Play for two minutes and then rotate the defender. After two rotations, let the defender play full speed and emphasize to the attackers that if the combination is not on, they should work to the other end of the grid any way they can.
Overlap in a grid-12x15 yard grids
Use a similar set-up with three players and one ball per grid. Again, the defender will be passive for the first phase of the exercise. This time she should start each sequence midway between the center of the grid and the near endline where the attackers begin to set up the overlap.
• Once again, the first attacker starts the sequence by engaging the defender.
• The second attacker starts her run from behind and one side of the first attacker and she sprints across the back of the path of the first attacker. As she begins her run, she shouts, “Hold!” to inform the first attacker of her run. Her run must both get her beyond the defender and also create a viable passing angle from the first attacker.
• The first attacker runs at the defender and passes to the runner by using the outside of her near foot. Once again, this surface allows for the best speed retention by the runner and this surface also disguises the pass until the last moment. After giving the pass, the attacker then sprints past the backside of the defender, who has turned to face the ball. Both players work out the end of the grid and then turn around and change roles before completing the combination in the other direction. Change the defender after two minutes.
• After rotating each player through the defender position, play through a second round with the defender playing full speed. Explain to the attackers that they have the option of using the overlapping run or faking the pass and dribbling past the defender. As the defender will anticipate the overlap, this decision-making becomes a critical component in the learning process for the attackers.
5v5+2 to end lines - 25x40 yard grid
Create two teams of five and two neutral players. This is a possession exercise with an emphasis on combination play. To score, a team must first complete a two-person combination and then dribble the ball over their opponents’ end line. The coach should encourage the teams to settle into possession first and then look to combine to get to end line. The two neutral players play with the team in possession and their presence should allow the attackers to establish possession and create opportunities to combine. Play for twenty minutes, rotating the neutral players every three minutes.
6v6 - ½ field
Play a standard scrimmage. For the first ten minutes, give the teams a point for a combination and two points for a goal. Then give just a point for a goal and let the players play.
Training Session #12: Finishing.
Introduction: This session reviews ball striking and provides a number of fun, efficient finishing exercises.
Score on either goal - ½ field
Divide the group into two equal teams (no goalkeepers) and play on ½ field. Explainteams may score on either goal. The coach keeps a supply of balls on the perimeter of the field and restarts play by randomly serving balls around the area. Encourage players to shoot as early and often as possible. Play for seven minutes, keeping track of score and assessing players’ shooting ability.
Pairs passing and shooting progression - ¼ field
Players work in pairs with one soccer ball per pair and along the touch-line. Instruct each pair to start and stay four yards apart. The following progression is designed to both give players numerous striking touches and also provide them with a useful tutorial in learning to select a finishing surface. Play each sequence for two minutes, focusing upon proper technique, accuracy and also assuring that players alternate the striking foot each time they play.
• Two-touch passing. Using the inside of the foot, players ping the ball backand forth with their partner. Emphasize speed and quality of footwork and striking.
• One-touch. Using the inside of the foot again, players knock the ball back and forth with their partner, alternating the striking foot with each touch. Players use one touch where possible and two touches when necessary to sustain the exercise.
• Laces striking: Short distance. Demonstrate with one pair proper use of the laces surface to strike the ball. Explain that this surface allows for the greatest striking power, but also creates more room for error, as the laces surface is more narrow and inherently less stable than the inside surface of the foot. Therefore, players must work very hard to develop consistency in striking with their laces. The technical cues for striking with the laces are:
1. Lock the ankle with the toes pointed at the ground.
2. Place the plant foot next to the ball, below the shoulder, assuring that the toes of the plant foot point in the direction of the target.
3. Encourage players to put their knee in a firm position as well and consider their hip as the point of rotation. Players should practice this striking motion without a ball to begin, holding their foot on the follow-through to check their form.
• Laces striking: Medium distance. Move the players back so that the pairs are working with ten yards between them. Players continue to strike the ball with their laces, alternating feet with each strike. Continue to emphasize accuracy and proper technique. The most common technical errors are:
1. The ball pops up in the air. This indicates that the player is striking the ball at a low point, causing the ball to fly upward off of her foot. This player needs to strike the middle-back of the ball to keep it traveling on the ground.
2. The ball consistently travels wide of the target. Here, the player is typically either playing with the plant foot pointed away from the target or failing to strike the ball on the center back, so that the ball spins off of the laces to one side.
3. The ball does not travel the distance. Here the player is typically failing to lock her ankle and/or knee or she is not striking the ball with sufficient force.
• “Shooting Dance.” Players should begin to learn at age 11 and age 12 how to maximize the power in their strike of the ball. Therefore, have them practice (without the ball to start) the movement of the intended strike and then encourage them to land on kicking foot during their follow-through. This is accomplished by utilizing a scissors movement of the feet on the follow-through. The footwork will feel awkward at first, but it is important for the players to learn this power step early on in their technical development. Practice with the ball for five minutes, developing comfort with both feet and with the footwork of the so-called “shooting dance.”
Goal box
In this exercise, players can begin to put the technical lessons learned above to work with movement and without pressure. Use the following progression to allow players to gain comfort in striking the ball properly and also in developing a finishing mentality.
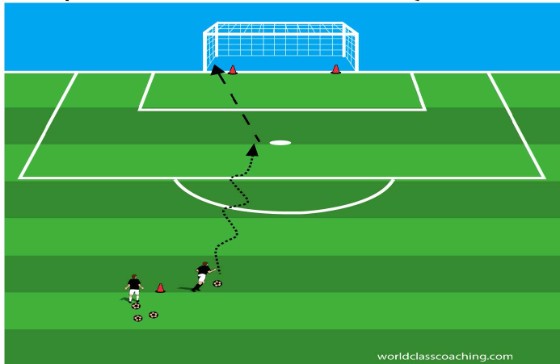
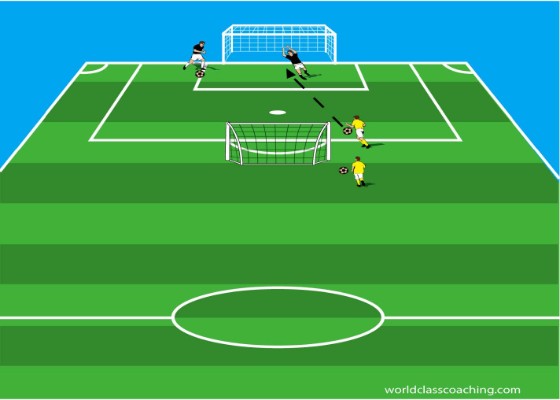
Players line up, each with a ball, at the top of the goal box. Place a cone one yard inside of each post. Players dribble to the penalty kick mark and then strike the ball with their laces. For now, all goals must come off of strikes on the ground. For the player to earn a point, the shot must pass between the cone and post on one side of the goal. If the players are doing well, offer an extra point for all goals scored where the shooter lands on the shooting foot after the strike. Play for five minutes.
Progression:
• Require players to shoot with their off-foot for five minutes and check scores.
• Now, start the players ten yards outside the goal box. This is the same exercise as above except that the players must now shoot from the top of the goal box. To help players increase their accuracy and consistency, encourage them to look up at the goal after their preparation touch (the last touch before they shoot) and then focus on the ball as they strike it.
• Add a goalkeeper
• Add a pressuring defender who chases the attacker.
Shoot-keep-retrieve
Divide the team into two groups. Put each group at the side (opposite sides – see diagram) of a goal. Players take turns shooting the ball at the other goal, then playing goalkeeper for one turn and then getting a ball and getting back in line. Players may not cross the center line between the goals before shooting. Adjust the grid size to be sure that players are not too close (for safety reasons) or too far away (shots are not reaching the goals). For U8 players, the goals should be about 10 yards apart and 3 yards in width. Encourage players to shoot on the ground and to use their laces or the inside of their foot to strike the ball.
4 vs. 4 with endline bumpers - 25x25 yard area
Play 4 vs. 4 in the assigned area to full-sized goals. A third team of four function as “bumpers.” These players are stationed on the end lines (one on each side of the goals) on each end. They are limited to a single touch each time they receive and they should use their touch to play the ball in front of the goal on their end. In other words, the game is a standard game except that teams may use the bumpers on their opponents’ end to set up shots. Note that the bumpers may not be tackled or used by the defending team to build possession. Play for five minutes and then change the bumpers. Keep track of total goals throughout the three games.
Training Session #13: Advanced Passing and Combination Play.
Introduction
This session features technical and tactical passing in increasingly complex sequences, testing players’ efficiency in possession.

Sequenced passing - ½ field
Divide the group into two teams (in different color vests). Give each team a ball. Every player on each team should have a number as well. Explain that the purpose of the exercise is to work through the following passing and possession variations. In every case, players need to continue to move (the teams can and should intermingle), and they should move to a different part of the grid after they pass the ball. In addition, communication and checking to the ball should be emphasized as well.
• Each team passes the ball to players in their group (color).
• Each team passes the ball to players in their group using only the right foot to pass and receive.
• Each team passes the ball to players in their group using only the left foot to pass and receive.
• Each team passes the ball to players in their group using one touch passing where possible.
• Each team passes the ball in sequenced order within their team.
• Teams pass the balls, alternating the color they pass to.
Advanced receiving -2 cones
Players work in pairs with one ball. Here the focus is on utilizing the first touch to both set up a second-touch pass and also sharply change the direction of play. Players receive the ball on one side (and behind) the cone on their end. They use their first touch to play forward and to the opposite side of the cone. Emphasize a change of speed and a sharp pass with the second touch. Play for one minute and change feet.
Diamond passing
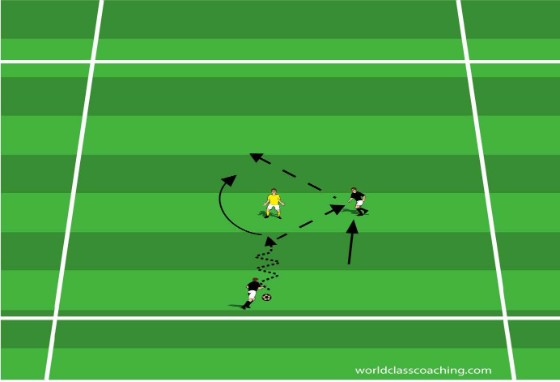
This is an advanced passing exercise involving check runs, 1-2’s, one-touch play, and creative running off of the ball. The basic pattern should be practiced first and then the more advanced variation can be implemented. Players move up one cone after each repetition. The player at the right side of the diamond checks away and then back to the ball. The server plays into her feet and the ball is laid off for the server to run onto and play into the player at the opposite end of the grid. The two players move one station counter-clockwise and play continues in the opposite direction.
Variation
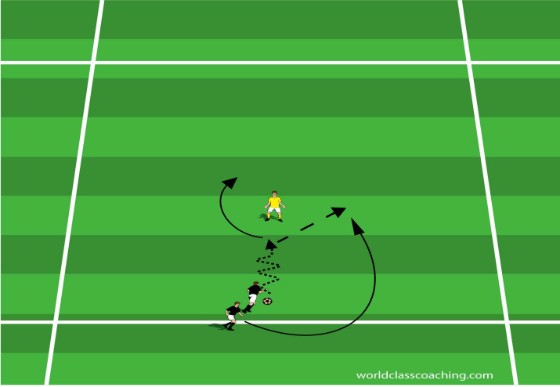
• The runner at right, after laying off for the server, spins off to the outside and is played in behind by the server. The runner delivers the ball to the far end of the grid, and play continues in the other direction.
Rhythm passing - 6 cone area
This exercise is an advanced passing environment that maximizes technical passing and receiving requirements and also places considerable pressure on players to communicate, run off of the ball and also create rhythm in their passing. The player at the second level (2)cone begins by checking away and then back to the ball. The player with the ball (1) plays into the runner’s feet.
The checking runner lays the ball off to the inside for the server to run onto and play a long pass to the opposite side player at the far cone (3). This player dribbles at speed back to the starting point. Players advance one cone with each repetition (follow the pass). After players 1-3 complete the sequence, players 4-6 complete the pattern and play continues.
5v5+ end line and side bumpers - 25x35 yard field
Play a game to small goals. Each team has one end line bumper and there are two neutral sideline bumpers. The bumpers are limited to two quick touches. The bumpers cannot be tackled and they cannot enter the field. The neutral bumpers can move up and down the length of the grid and they play with and for the team with the ball. The end line bumpers can move along the width of the end line (but not in the goal area) and they look to play quick passes to teammates in the front of the goal area.
Rotate the bumpers every three minutes. The coach can place restrictions on the field players to require 1-2’s with the neutral players and/or the end line player before a goal can be scored. This should be a fast-paced, rhythm-oriented playing environment, and the coach can encourage sharp communication, passing, receiving and movement off of the ball.

