WORLD CLASS COACHING
Club Curriculum U11/12 Season
By Tony Englund
TABLE OF CONTENTS
Part Three
TECHNICAL SESSIONS
Training Session #14: Long Passing.
Introduction
The U11/U12 years are critical to the development of sound ball striking and the ability to play over distance through long passing. This session features a progression from basic passing through technical long passing and then a pair of playing environments where playing over distance is required.
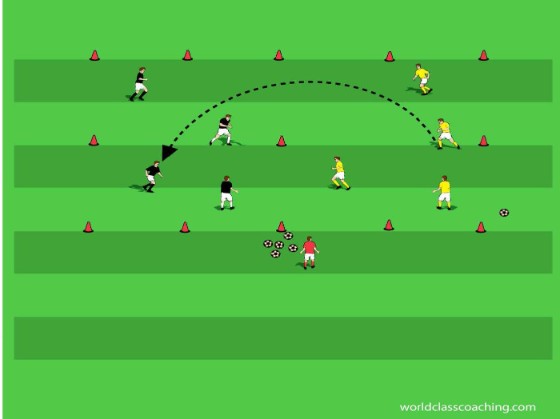
Passing warm-up - ½ field
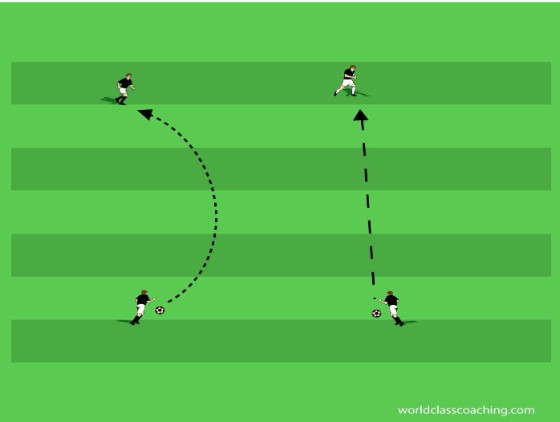
This exercise requires soccer balls of several different colors (three is preferable). There should be ½ as many balls as the total number of players. Players are instructed to spread out around the playing area. The team jog around the area, exchanging the soccer balls in the prescribed manner. For example, a white ball calls for a throw-in; a red ball indicates a short pass, and a black ball must be played over distance (long pass – which should be at least 15 yards). Play for three minutes. The coach can use this time to assess the players’ ability to play a variety of passes with particular emphasis upon long passing.
Pairs passing – Touchline
Players work in pairs with a soccer ball for each pair to start (have a second ball nearby).
Progression
• Two-touch passing. Players pass in pairs using two touches. Emphasize technical speed and proper technique, including locked ankle, utilizing the inside of the foot, pointing the plant foot toes at the target and holding the foot momentarily after the strike to accentuate proper follow-through. Players should alternate the strike foot with each pass. Play for one minute and then change partners.
• One-touch passing. Players pass in pairs using one-touch where possible. Here the emphasis is upon measuring the strike so that the ball can be returned with one-touch. Once again, players must lock ankles, point the plant foot at the target, and use the laces surface. Players should also change the passing foot with each strike. Finally, point out to players that they need to be aware of the part of the ball that they strike. To keep the ball on the ground, players should focus on striking just above the mid-point on the back of the ball. Play for one minute and then change partners.
• Two-ball passing. Players pass in pairs with two balls using two touches. Here, the players must work to develop a rhythm in both passing and receiving. Players pass the ball simultaneously with their right foot and receive the pass from their partner with their left foot. Their first touch should be made with the inside of their left foot and should push the ball forward and across their bodies so that they may pass the ball with the inside of their right foot as the sequence begins again. The purpose here is to apply light technical pressure while also developing consistency in technique. Play for one minute and then change the passing and receiving foot.
• Pairs laces passing. Players work in pairs with one soccer ball. Here the players stand about four yards apart and focus on passing the ball to their partner with their laces surface. As the focus of the session is long passing, the laces surface will be critical to the technical success of the session, so players must focus on getting their toes down, locking their ankles and finding a comfortable placement for their standing foot, pointing the toes toward the target of the pass. Players work to get consistency in their strikes. After each pass, the ball should be stopped so that the technique can be practiced in isolation. Players should alternate the passing foot with each strike.
Driving range - ½ field
Introduce long passing. There are three types of long pass: Driven, lofted and chipped. Demonstrate one pass and allow players to practice striking the ball with a partner over a twenty to twenty-five yard space for about four minutes, compelling players to switch to their off foot after two minutes.
• Driven pass. This pass is very similar to a driven shot. This pass is used to send the ball over distance as fast as possible. The pass is driven and usually not more than shoulder high, and is often used to cross the ball (near post usually) or to change fields, and to play sharp, long through balls.
1. Lock the foot with the toes pointed down.
2. Use the laces to strike the ball.
3. The plant foot is placed comfortably next to the ball and in a more forward position than in the lofted or chipped balls. This placement helps to limit the height of the pass.
4. Players should think of their leg below their hip being locked and the hip as the point of rotation, as this will increase consistency and power.
5. The strike point on the ball is on the center back, slightly above center. Again, this will aid in keeping the ball down.
6. Follow-through should be held to emphasize a clean strike and balance and also the foot should be kept low.
• Lofted ball. This pass is used to put the ball over defenders to teammates. Typically, the lofted passis utilized when the ball is crossed to the back post, or cleared from the back line, and also in changing fields and sometimes in playing through-balls.
1. Lock the foot with the toes pointed down.
2. Use the laces to strike the ball.
3. the plant foot is placed comfortably next to the ball and in a more withdrawn position than in the driven ball. This placement helps to create the height of the pass.
4. Players should think of their leg below their hip being locked and the hip as the point of rotation, as this will increase consistency and power.
5. The strike point on the ball is on the center back, below center. Players need to learn to feel their laces cupping beneath and on the back of the ball. This lower striking position helps to raise the ball off of the ground for a lofted pass. Follow-through should be held to emphasize a clean strike and balance and also the foot should be raised to accentuate the lift placed on the ball
• Chipped ball. This pass is used to drop a ball over a defender or group of defenders to the feet of a target. This is the most difficult of the passes to learn well, but it is also important for players to learn to perform this skill in that it teaches a new way to strike the ball in a way that is important for consideration in numerous situations on the field. Chipping the ball is particularly useful in that the strike creates backspin, allowing the ball to settle off of the bounce, meaning that the receiving player should be able to play it more easily and quickly than a driven or lofted service. The ball is often chipped on free kicks to put it behind the defense; on through-balls; to change fields to a particular target; sometimes to find a target on a short cross, etc.
1. Lock the foot with the toes pointed down.
2. Use the laces to strike the ball.
3. The plant foot is placed comfortably next to the ball and in a more withdrawn position than in the set for the driven ball. This placement helps to create the height of the pass.
4. Players should think of their leg below their hip being locked and the hip as the point of rotation, as this will increase consistency and power.
5. The strike point on the ball is on the center back, well below center. Players need to learn to feel their laces cupping beneath and on the back of the ball. This lower striking position helps to raise the ball off of the ground for a chipped pass.
6. The follow-through is the major difference between the chipped and lofted passes. With a chipped ball, there is no follow-through. In -the strike, the player “digs” beneath the ball and then does not follow-through. Players must practice both of these cues, as part of the learning here is that with the chip, there is a bit of contact with the ground, which helps create backspin on the pass, and the lack of follow-through will not feel natural at first, but this also increases the backspin effect on the pass.
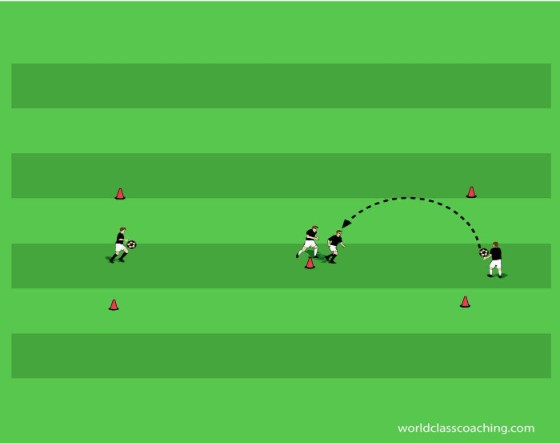
Short-short-long - ½ field
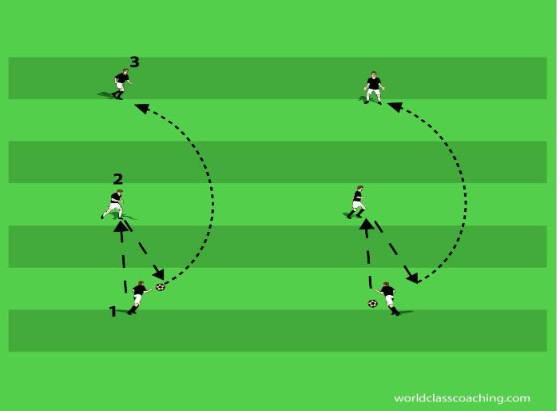
Players work in groups of three with one soccer ball. Demonstrate with one group. Put two players (1 and 3) about twenty five yards apart and the third player (2) between them. Player 2 starts the exercise by checking (running) toward the player with the ball (1). Player 1 passes into the feet of player 2, who returns it with a single touch if possible (note the change of angle on the return pass, which creates an easier approach for player 1 and also makes the work of defenders (not present) more difficult. Player 1 then takes a touch to settle the ball before playing a long pass to player 3 on the other side. The inside player then checks to the player with the ball and the sequence continues. This is a commonly used exercise that can be adjusted to train long passing at any level.
Here are some additional considerations for the coach in tweaking the exercise:
• Players learning to chip and loft the ball often benefit from having a target to play over. Therefore, with a warning about playing safely, the endline players can be encouraged to play lofted or chipped balls over the central player to their target on the other side.
• To make play more realistic, players who can already long pass well can be required to play the long pass one-touch (no settling touch) off of the return pass from the central player.
• Notice in the diagram that the angle of the return pass from the central player is changed. This is done both to create a better approach angle for the outside player and to force a defender pressing the central player to adjust her run if she were to try to press the long-passing player. The long-passing player should indicate (using a hand signal) to the central player where she wants the ball played to set up the long pass. These considerations are not as important for players just learning the technical aspects of long passing, but are very important details for more advanced players.
• Another variation that adds some emphasis on skill for more advanced players is to encourage the endline players to receive and play the pass to the central player with one touch. This will force them to play the ball in the air sometimes and to learn to take some pace off of the ball in making the pass.
• Finally, to add a bit of skill emphasis for the central players, have the endline players receive and control the ball off of the long pass and then pick the ball up and take a throw-in toward the central player who settles the ball before playing the set-up pass back to the endline player.

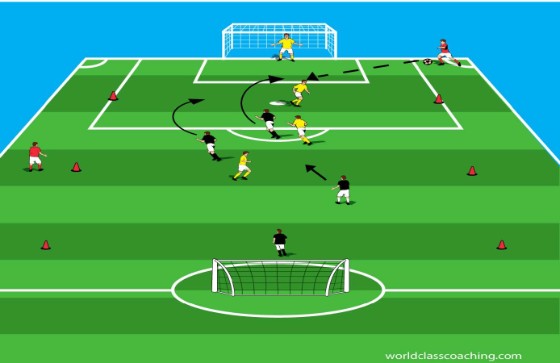
3-zone passing game - 20x42 yard grid
Split the group into three teams and put them into different-colored vests. Each team occupies one of the three zones. Explain that the purpose of the game is to practice long-passing between the two end grids. For teams just learning to long-pass, the players are all confined to their respective zones. The coach serves a ball to either end grid. The team in that grid knocks the ball around to find a useful angle to play through to the far grid. The player in possession then lofts, drives, or chips (the coach can require a particular type of pass) the ball to the far grid.
The team in the central grid attempt to knock down (no hands) the pass. For players learning to long pass, keep the central team in their grid even if they win a ball. Instead, the coach plays a ball into the other end grid and the players there attempt to play through or over the central grid to the far grid. Play for two minutes, giving each end team a point for every successful long pass. The central team also earns a point for each pass they knock down.
Here are more advanced variations:
• Every time the middle team knocks down a ball, their team takes the place of the team failing to play a successful pass and that team moves to the middle grid.
• Teams must receive the ball properly after a long pass or move to the central grid.
• The central team sends one player (as shown in the diagram)into the end grid when the ball arrives there. If that player wins the ball or forces the ball out of the grid, her team exchanges places with the team losing the ball.
• Building upon the last variation, require the end line team to string together 4-5 passes before playing a long pass. This allows the pressuring player from the center grid to apply pressure before a long ball can be played and also compels the teams in the end grids to be more active, making the game more realistic. When introducing this restriction, it is often useful to freeze the pressuring player from the center grid once the team in possession has strung together 4-5 passes. This will usually give enough success to develop some flow in the exercise. Then remove the “freeze” restriction so that the end grid teams are forced to play long passes under some pressure.
5v5 with a dead zone - full field
Play 5 vs. 5 with a neutral dead zone. Each team places three players plus a goalkeeper in their defensive zone and two players in their attacking zone. No player may enter the dead zone. The coach has a supply of balls on the side of the dead zone and he or she restarts play from there any time a ball leaves play. The defenders have a 4 vs. 2 advantage in their respective zones and their purpose is to win the ball and play a long pass over or through the dead zone to a teammate in the attacking zone. Play this way for ten minutes and then remove the dead zone, allowing open play, but encouraging players to look for a long pass to set up scoring opportunities and to clear their own defensive zone.
Training Session#15: Receiving out of the Air
Introduction
This session is a review of the technical elements involved in playing the ball out of the air. At U11-U12, players must learn comfort receiving the ball out of the air with their feet, thighs, chest and, eventually, head. The earlier this comfort and skill are mastered, the more effective the player will be playing in the air.
Bounce juggle - 20x20 yard area
Each player has a ball. This is an activity designed to introduce players to juggling the ball. For young players, reacting to a ball in the air is an evolutionary process and this first challenge allows them to begin to work on their touch and to often experience some success as well. Players begin holding the ball at shoulder height. They allow it to drop and bounce and then try to use their laces surface to play the ball straight up in the air (not very high – usually waist high is a good starting point) and then the ball is allowed to bounce before they strike it again. Allow the players some time to experiment with and develop rhythm and touch. How many bounce juggles can they complete consecutively? The surfaces used in this progressing (laces, thighs, head) are three of the four standard surfaces (along with the chest) for receiving out of the air.
Progression:
• Alternate the striking foot
• Touch the ball with the thigh after one bounce, then the foot after a bounce, followed by a touch with the other thigh and finally the other foot (pattern repeats).
• Alternate between a touch with the head and one with a foot. When heading the ball, players should be instructed that safety is the primary focus at this age. Players should have their eyes open and mouths closed when heading and they should contact the ball at the hair line on their forehead.
Can they create other patterns?
Pairs receiving out of the air - touch line area
Players work in pairs along a touch line, with one player on the line and another on the field facing her, two yards away. Players on one side serve to their partner (underhand serves) for her to receive, settle to the ground and pass back. After ten repetitions, players change roles.
Progressions
• Receiving with the laces. The receiving player gets in line with the ball, presents the foot to be used to receive the ball, contacts and cushions the ball by lowering the foot at the moment of contact, and settles the ball to the ground. Players should learn to receive the ball with the outer half of their laces, pushing the ball into space outside of and in front of either foot. This first touch puts the ball in a position to avoid immediate pressure and also to be able to pass the ball with the second touch (where as dropping the ball between the feet often requires an extra touch to put the ball in a position from which one can pass). Instruct servers to toss to alternating feet on the working player.
• Receiving with the thighs. The receiving player gets in line with the ball, presents the thigh to be used to receive the ball, contacts and cushions the ball by lowering the foot at the moment of contact and settles the ball to the ground. Players should learn to receive the ball with the outer half of the thigh pushing the ball into space outside of and in front of either foot. This first touch puts the ball in a position to avoid immediate pressure and also to be able to pass the ball with the second touch (where as dropping the ball between the feet often requires an extra touch to put the ball in a position from which one can pass). Instruct servers to toss to alternating thighs on the working player.
• Receiving with the chest. The receiving player gets in line with the ball, pushes her chest forward and shoulders back, contacts and cushions the ball (contact point is the high center chest boney spot well below the base of the neck) by pushing the shoulders forward and guiding the ball to the ground. Players should learn to turn to one side above their waste, pushing the ball into space outside of and in front of either foot. This first touch puts the ball in a position to avoid immediate pressure and also to be able to pass the ball with the second touch (where as dropping the ball between the feet often requires an extra touch to put the ball in a position from which one can pass). Instruct the active player to turn the ball to alternating sides with each serve.
• Receiving the ball with the head. Although this is a technique that is rarely used (most often the ball is driven with the head rather than controlled with this surface), it is a useful introduction to heading for young players and a skill that can be very useful in game situations. Once again, the receiving players should be instructed to keep their eyes open and their mouth closed for safety. In this sequence and to learn to control the ball with the head, the server will continue to serve a ball for the active player to receive, but the goal, rather than settling the ball to the ground, will be to see if the active player can get the ball to stop, even briefly, on her head. This involves cushioning (the ball may bounce on the head a bit, but players should try to get shorter bounces with each touch) the ball with good balance. For this exercise, the players should alternate server/active player roles with each toss. Can anyone get the ball to settle on their head and stay there?
Individual collections - 20x20 yard grid
Each player has a ball. This exercise adds movement to the receiving. Players dribble around the area. Every 5 touches, they pick up the ball, toss it up high and settle the ball using any of the surfaces trained in the previous exercise.
1 vs. 1 with throw-in restarts - 10x10 yard grids
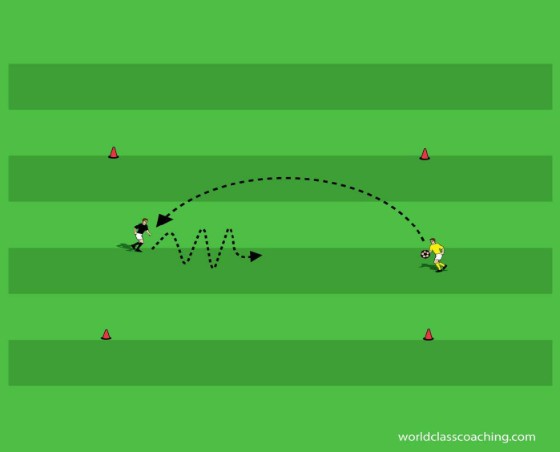
Put two players at each end of the grid as shown. A ball supply is located at one end. The server restarts play with a throw in to her opponent, who settles the ball out of the air. The two players then duel, trying to dribble the ball over one-another’s end lines. When the ball leaves the grid, the duel is over. The two players change roles and the next duel begins.
3 vs. 3 games on a narrow field with throw-in restarts - 15x25 yard fields
Play small-sided games on narrow fields (to create more throw-in opportunities) to small cone goals. All re-starts are throw-ins and the target player for each throw is allowed one free touch before other players are live. Players should focus on receiving the ball and settling it. Mid way through the scrimmage, remove the restriction and allow free play.
Training Session #16: Heading.
Introduction: This session introduces heading, working players through a progression designed to strengthen the power and refine the technique of their striking, and then gives players the opportunity to utilize heading in a game situation.
Soccer Volleyball - back to back 6x8 yard grids
Play 3v3 soccer volleyball games. This is a fun and flexible activity to warm-up in a session focused on playing in the air. To begin, the coach serves balls randomly to either grid. Each team is allowed one bounce of the ball on their side of the cones each time the ball enters their area (for advanced players, no bounces should be allowed). Play to ten points.
Variation
• Play multiple games simultaneously and have the grids compete against each other for the highest single total number of exchanges (one point for each ball played from one side of the center line to the other.
Pairs technical heading progression - Touch line area
Players work in pairs with one soccer ball through each stage of the progression. At each level, emphasize safety (eyes open, mouth closed) and quality repetition. Explain that the progression is designed to isolate particular muscle groups and motions that strengthen heading and improve technique.
Progression
• Active player laying on her front side. The active player lays down facing her partner with her arms fully extended and supporting her shoulders and head. The server prepares to toss balls underhand and not more than a foot in front of the working player’s head. The working player initiates each repetition by arching her back and pulling her head and shoulders back away from the server.
1. Eyes open, mouth closed.
2. Contact point is the hair line at the top of the forehead.
3. Shoulders and head should be locked with the head forward and the shoulders pushing away at the moment of contact.
4. Drive the ball back into the hands of the server.
• Active player seated. The active player initiates the repetition by leaning back to do about 1/3 sit-up.
1. Utilize the lower back muscles, in addition to the points of emphasis above.
2. Now the arms are held low and forward before contact and then thrust away from the ball (accentuating the shoulder movement) at the moment the ball is struck.
3. Drive the ball back into the hands of the server.
• Active player standing. The server initiates each repetition with the toss.
1. In addition to the above points of emphasis, it is advisable for young players in particular to have them stagger their feet, with one foot closer to the server and one comfortably further away. The working player starts each repetition with her weight on her away foot and transfers the weight to the front foot as part of the striking motion. This posture adds power and also gives a longer time window for timing the heading motion.
2. Attacking heading. In attacking situations (i.e. in finishing crosses), it is often best to drive the ball downward (this makes it very difficult for defenders and the goalkeeper to react to). Show players that to create a downward angle on the header, the players need to contact the ball on the back side and above the center-back.
3. Defensive heading. In defending situations (i.e. defending crosses) it is preferable to head the ball upward, clearing the ball away from danger and giving the defense time to organize while the ball travels. Show players that to create an upward angle, they need to contact the ball on the back side and below center.
Pairs heading contest - Touch line area
Working in pairs with one ball, see which group can complete the most consecutive headers. Players must alternate touches. Restarts are by a toss from one partner to the other. Explain that this exercise simulates defensive heading, as it requires that the ball be headed upward t one’s partner. Players can use their feet, thighs and shoulders (not hands) to sustain their juggle, but those touches do not count toward the total. Keep track of the single best sequence for each pair.
Variation
• Rather than tracking the best single sequence, record the total number of headers by each pair throughout the exercise. This is a useful variation for very young players in that it encourages repetition rewards hard work if the players are unsuccessful with the standard rules of the game.
Competitive Heading - 10x10 yard areas
Players work in groups of 4, with two working players in the middle and two servers on the ends with soccer balls. The working players return to the center cone after each duel. Servers toss balls for the working players to try to head back to the servers. Any ball caught by the server is a point for the working player who headed the ball. Encourage servers to vary the height and type of service (i.e. lofted ball or flat throw).
Variations
• Players need to settle the ball before playing back.
• Players need to flick the ball on to the other server (shorten the area of play for this variation).
4v4 Games to goal with controlled restarts - 18-yard box
Play 4v4 games to goal with all restarts coming from throw-ins. This restriction creates numerous opportunities for players to duel in the air.
Additional ideas
• Goalkeeper re-starts are short, high punts.
• Goals can only be scored off of crosses (add neutral crossers to promote)
Training Session #17: Cross and finish.
Introduction
This session reviews long passing and then provides a basic structure for training cross and finish situations.
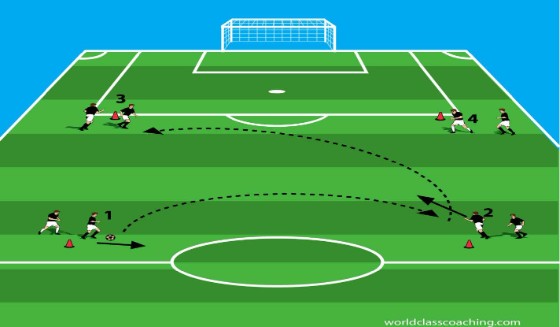
4 corners long passing - ½ field
Divide the team into four groups. Each group forms a line behind one of four cones placed to form a 20x20 yard grid in the center of one end of the field. Keep a ball supply at one cone. Explain that this is a passing sequence warm-up that will be expanded into a long passing exercise. The first player in line (1) with a ball passes straight ahead to the first person in line at the cone opposite her line (2). She then follows her pass and goes to the end of that line. The player receiving the ball (2)at the second cone then passes at a diagonal to the first player in line at the third cone (3) and follows her pass.
The player at the third cone plays straight ahead (to player 4) and then follows her pass. Finally, the player at the fourth cone plays diagonally back to the start and follows her pass and the sequence begins again. This is a useful warm-up to emphasize passing accuracy, quality receiving (players should receive the ball using their first touch to set up their pass with the second touch, which is to say that their first touch should push the ball in the direction that they intend to pass), and running after the pass.
Progression:
• Play for two minutes, and then see if the players can keep two balls moving at the same time.
• After two more minutes, move the cones back to create a 25x25 yard space. The exercise remains the same, except that now the passes are longer and the coach can dictate what type of serve (driven, lofted, chipped) is required. The coach should require players to alternate the foot they use for passing (in the short and long phases).
• Once the players have the pattern for the long pass, introduce a second ball to apply some time pressure and also more repetition for the players.
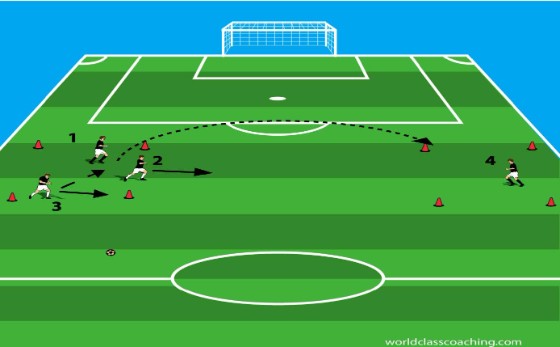
Fitness long passing - 10x10 grids (spaced)
Players work in groups of four with a ball. Place one player (4) in a 10x10 yard grid, and the other three in a 10x10 yard grid that is set up about twenty-five yards (adjust to fit the abilities of the players) from the other grid (see diagram). Demonstrate with one group. In the grid with three players, identify a single, passive defender (2). This player moves at walking pace to start. The remaining two players (1,3) are to pass the ball at least three times before one of them plays a long pass to their teammate in the far grid.
Once the ball has left the grid, the player making the long pass (1) stays in the grid, while the other attacker and the defender race to the far grid. The last player to arrive in the new grid becomes the defender, while the other two players are attackers. The attackers move around the grid to connect three passes while the defender provides passive resistance. Then the long pass is made and the sequence continues. It is important that players understand the changing roles before commencing the exercise. This exercise provides long passing practice, highlights the importance of providing early support to the ball when the field is changed, and also raises the players’ fitness by requiring frequent, short sprints. Play for five minutes.

Simple cross and finish - ½ field
This exercise is designed to create a very simple environment to train the basic patterns involved in crossing and finishing the ball. Place two players with a ball supply near the right touchline, near the top of the large box. The goalkeeper will be the only defender in the exercise at this point. The remaining players are divided in groups of three and gathered outside the top of the “D.” The first thing to establish is the running patterns and crossing cues for the wide player as she prepares to serve the ball.
• At first, quality runs and service are more important than speed.
• The server should make all of her runs to the end line at first. The idea here is to build into the players’ understanding that this run creates a lot of trouble for the defense, as they are forced to retreat deep and may either lose track of runners or the ball and they are often poorly positioned to clear a cross.
• The server’s last touch before crossing should be in the direction of the goal and not the end line. This is referred to as “turning the corner.” Many young players serve a lot of crosses behind the goal, often because they are trying to catch up to a touch that has them facing the ball as it rolls toward the end line. If the last touch before crossing is in the direction of the goal, the player will be able to then look up at the target area and select a target for the cross, turn her hips and shoulders toward the goal, and plant her non-striking foot pointing toward the goal as well. When these cues are followed, the server has a better chance of executing a successful cross.
• Also point out that the best crosses are often on the ground and cutting back across the defense. In other words, the ball is played back up field, into the area between the small box and the penalty kick mark (on the large field, this is referred to as the “second six”).
• The other point of focus here is the runs to get onto the end of the cross. There are several stages of development in learning to finish crosses, and the most basic imprint is desired here.
• Impress upon the runners the tactical importance of creating space and timing the runs. The most difficult aspect of this process is getting the players to hold their runs until the appropriate time. If players arrive in the target areas before the ball has arrived, they are much easier to mark and the effectiveness of the movement will be very limited under pressure. It is often useful for the coach to hold the runners and release them a bit late so that they learn to be more patient.
• Target areas. In 8v8 soccer, there will rarely be more than three targets for a given cross. Therefore, it is useful to teach players at this early stage to sort out runs to three critical areas.
1. Near post. The first player in will crash the near post.
2. The second player in will arrive in the second six at the same time as the ball.
3. Back-post. This player is the last player to arrive and is typically the back-side midfielder or forward. It is useful to emphasize that this player’s purpose, particularly at the younger levels, is to assure that any ball that passes by the first two targets and the defenders is kept “in the mix,” which is to say that she cleans the ball up by either finishing it at the back post or pushing the ball back into critical space if the cross has passed out of the target areas. The most common concern here is the that back-post player will want to close too tight to the goal, when she is often best served by remaining wider and higher until after the ball is hit and it becomes clear that she needs to adjust her position. This run becomes very important as players become more adept at serving lofted crosses to the back post, where the far target can get in to finish.
• Bent runs. Players will want to run straight to the goal. This choice makes them easier to mark and also gives them poorer finishing angles to the ball, an element that is critical to building success and confidence in young players. Instead, players need to be shown how to bend their runs away from the ball as the crossing run is developed. This forces the defenders to give attention to either the ball or the player, but makes it difficult to do both. Also, as the players then close at speed into their target positions, their collective body positions will be “open” to the ball, meaning that the ball will come straight at them (as opposed to from the side), giving them more finishing options and a better look at the ball (which gives them the ability to adjust their runs on approach to the ball as well).
Improving quality. Here are some additional suggestions for improving the quality of basic crossing and finishing as the exercise is developed.
• Allow play to continue as long as the ball is knocked down by one of the runners inside the large box. This way, young players are not compelled to finish with the first touch as they learn to deal with balls driven toward the front of the goal.
• Begin the exercise with a pass from one of the runners in the center to the flank runner. The idea here is that most crosses are set up by a ball served to the runner from a central position, so the pattern is expanded to simulate a realistic opportunity to set up a cross.
• Create teams and keep score. Each server and group of runners are a team (and the goalkeeper is her own team, earning points for quality saves) and each team earns a point for scoring (or if there are not a lot of goals in the early stages, give a point for a first-time shot that is on the face (i.e. would be a goal but the goalkeeper made the save) and two points for a goal.
• Be sure to switch the service to the left side (if there are enough players, arrange service from both sides and alternate the source of the runs and crosses).
• Also be sure to alternate the servers so that all players have the opportunity to serve and learn the runs to goal (players should also alternate the runs they make to goal (i.e. back-post, near-post, etc.).
• Encourage players to serve crosses on the ground first (to an open target), and then encourage them to try playing a long cross in the air to the back post area as they get more comfortable.
• Train all players to communicate. The server should visually and verbally identify her target and the runners should learn to demand the ball from the server.
4v4 with neutral crossers - ½ field
Play 5v5 with neutral crossers and goalkeepers. The crossers are required to stay in the neutral lanes on the flanks (see diagram) and no other players may enter that space. Re-starts come from the goalkeepers (place a supply of balls in each goal). The only means of scoring a goal is directly off of a cross, so teams will need to work to play in to the crossers to set up scoring opportunities. This is a good environment for training the runs for the targets and also for building the quality of the crossing. The coach should encourage early service wide to the crossers (even from the goalkeepers at re-starts) to create numerous crossing situations. Play for two minutes and then change the crossers. Crossers need to make end line runs before crossing. Coach the runners as above. Keep track of score.
6v6 to full-sized goals - Full Field
Play 6v6 to goals. For the first ten minutes, give three points for a goal scored as a result of a cross and one point for all other goals. Then remove the three point bonus and let the players play.

