WORLD CLASS COACHING
Club Curriculum Building a Better Goalkeeper
By Tony Englund
TABLE OF CONTENTS
Part One
INTRODUCTION
TRAINING SESSIONS
Part Two
TRAINING SESSIONS
Part Three
TRAINING SESSIONS
Part Four
TRAINING SESSIONS
ABOUT THE AUTHOR
INTRODUCTION
“Who wants to play goalie today?” How many younger teams’ pre-game discussions begin with this question? The goalkeeper position in soccer at the younger ages is a bit of a conundrum for parents, coaches and club directors. Although national associations rightly discourage children from specializing at the goalkeeper (or any) position until at least their U12 year, failing to train goalkeepers and goalkeeping into a team often leads to frustrating, confidence-shattering goals being allowed and an attitude that being put in goal is an act of temporary banishment from the team with potentially unhappy consequences (letting in a ‘soft’ goal).
This book is designed to bridge the needs of all concerned with goalkeeping at young ages:
• Club goalkeeper trainers. The exercises and variations in this book provide a full season of specialist curriculum, designed to be easily parceled out to trainers as needed.
• Team coaches. The curriculum is specifically designed to be easily combed into team training by theme and increment or to form distinctive goalkeeper training sessions.
• Parents. The detailed descriptions, numerous photos and diagrams all make it easier for parents of young and prospective soccer goalkeepers to learn about and instruct their young players to master the key concepts fundamental to successful goalkeeping.
Training Goalkeepers
Whether a player will be playing in goal for a half or half a season at the younger ages, it is critical that they be surrounded by positive feedback from teammates, coaches and parents. Much of any stigma associated with playing goalkeeper comes from the isolation of the position from the others, both physically in the game setting and also technically and tactically in training. Making goalkeeping an inclusive, fun (especially and U9 and U10) part of training and then lauding the efforts of those playing in goal on game day is a great way to make playing goalkeeper a fun, valuable part of the team experience. Above all else, patience must be the watch word for those training young goalkeepers. The psychological and motor development of the children is far from complete and skills such as judging and catching a ball flying through the air will take time to master.
How to use this Book
The sessions are designed to serve as a progressive and comprehensive curriculum for goalkeepers. The sessions will work very well as free-standing team goalkeeper training sessions. The team coach, club specialist or parent can also train goalkeepers in brief ‘keeper-only sessions (i.e. after team training) by picking and choosing within a theme to focus on desired development areas. Needless to say, the sessions are most effective when repeated multiple times to maximize players’ time on the ball and learning.
Training Session#1: Basic Stance and Goalkeeper Movement
Introduction
The goalkeeper’s set position and ability to move efficiently in the goal area are the first items to introduce to young players learning about the position. This session introduces and demonstrates the proper techniques for ‘keeper set position and basic movement through a number of informative and fun exercises.
The Zoo - 20x20 yard grid
Players are ‘animals’ in a zoo (the grid) (for young players, let them choose which animal they want to be). The animals cannot leave the area, and they must mind the zookeeper (coach). Begin by having the players jog around in the grid. When the zookeeper calls out ‘freeze!’, the players must stop and get into their set position. Demonstrate the set position as shown below.
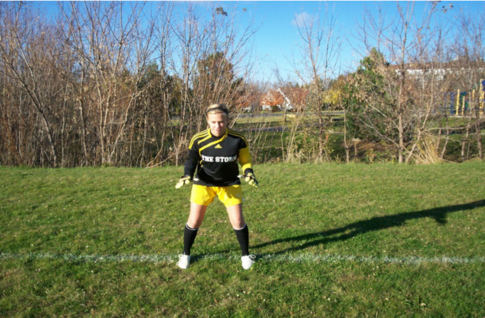
Set Position
• Feet shoulder-width apart.
• Shoulders over toes (slightly hunched).
• Heels off of the ground (an inch or slightly more).
• Head steady with eyes up and forward.
• Drop hips slightly (not seated!).
• Hand position: Either with extended palms and hands at sides or with palms facing down and hands together in front of the body (‘handcuffs on’).
Who will be the first to get into the proper set position?
Explain that soccer goalkeepers always go to this set position when they expect to make a save.
Progression
• Players shuffle rather than jogging. Goalkeepers shuffle to move across the face of the goal. It is critical that players learn early on to keep their toes, hips and shoulders facing forward as they shuffle (the feet do not cross and the heels do not come together, as either of these occurrences leave the goalkeeper with poor balance and momentarily unable to change directions quickly).
• When the coach calls ‘change’ the goalkeepers alter the direction in which they are shuffling. Emphasize quality footwork over speed, explaining that the change of direction should result from a quick stop and a sharp step in a new direction.
• Players can shuffle, backpedal or move forward, but must keep their hands in a ready position throughout (‘be a goalkeeper the entire time’). Once again, the coach should mix in ‘change’ and freeze’ calls.
• Spread balls throughout the area. When the coach calls, ‘ball!’ the goalkeepers must hustle to pick up a ball.
• Players pick up balls and then set them down as they move (continue to insist upon goalkeeper movement and also mix in ‘change’ and ‘freeze’ calls). Who can pick up and set down the most balls in one minute?
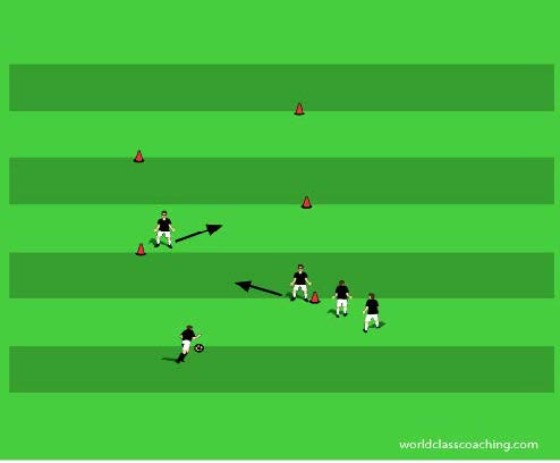
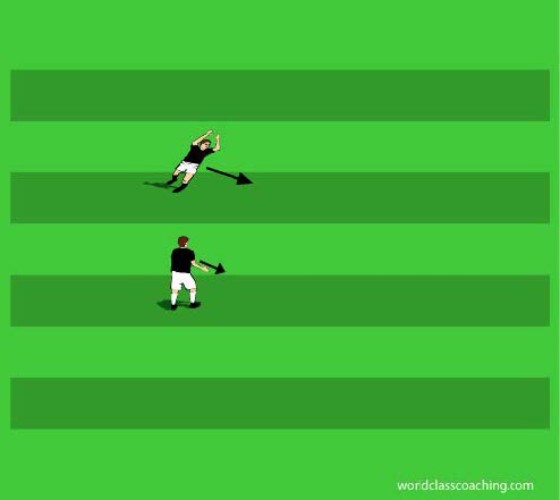
Zig-zag - 10x30 yard area
Spread cones in a zig-zag pattern as shown, with the two cone lines as far apart as the width of the goals in which the players will play on game day. The vertical distance between cones in the same line should be 6 yards (the length of the small goalkeeper box on the field). Players shuffle back-and-forth through the cone zig-zag, shuffling throughout and also being careful to sustain a ready position as they move. When the player in front of them reaches the second cone, the next player in line may begin. Note the single ball placed at the front of the exercise area. Players must keep their eye on the ball (as they would in the game) throughout their movement.
Young players tend to rush (and loosen their form) through the zig-zag, so the coach must consistently emphasize the importance of moving at a comfortable pace while checking one’s footwork and posture.
Progression
• The coach stands at the ball and periodically fakes to strike the ball. Demonstrate for the goalkeepers the importance of stopping their feet and getting into their ready position. A goalkeeper moving side-to-side when the ball is struck is often unable to properly react or push in the direction of the shot to save. Each time the coach fakes the shot, check to see that all active goalkeepers get stopped and properly set before continuing.
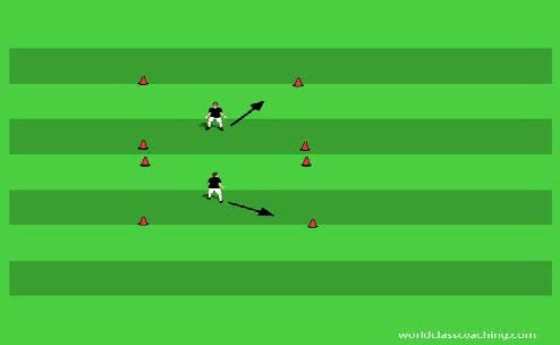
Mirrors - 6x6 yard grids
Utilize two 6x6 yard grids. These grids are the same depth as the 6-yard box, and the exercise is designed to make the goalkeeper more quick, comfortable and aware in this space. One goalkeeper stands in her ready position in each grid. One goalkeeper leads and the other goalkeeper must mimic her every move. Stress to the goalkeepers from the beginning that all movements must be those that the ‘keeper uses to maneuver in the 6-yard box. In other words, shuffling, backpedaling, closing-down and occasional cross-over steps (to cover a lot of ground quickly) are all acceptable. The lead goalkeeper should work hard in leading her partner, but should not try to lose her. Play for twenty seconds and then change roles.
Progression
• For fun, allow the leader to mix in somersaults and other gymnastics to work on agility and flexibility as well.
• Add a ball. The player with the ball leads and the pair toss the ball back-and forth every few seconds. At this point, the focus is still on proper footwork and getting set before the ball is received.
• Use the back end lines of the two grids as goals and have the players play a mini game, 1 vs. 1. Goalkeepers cannot cross the center line (the must remain in their own grid…use larger grids or compel older goalkeepers to shoot from their own end line. To emphasize movement, compel both shooter and goalkeeper to touch a corner cone in their their grid before each shot.
Training Session#2: Introductory handling: Proper technique
Introduction
The most intensive focus in training goalkeepers at any level is in the area of handling the ball. Young players are still acquiring motor skills and will develop the ability to handle and manipulate the ball at very different rates, but it is important that all prospective goalkeepers develop their ability to both react to and also control the ball. In this session, the emphasis is both on a large number of touches (goalkeepers need many touches with their hands on a regular basis just as field players need numerous touches with their feet to sharpen their skills) and also on the quality and technique of various catching positions. The session opens with a movement exercise reinforcing the footwork and basic stance introduced in the first session.
Shadow Goalkeeping - 10x10 yard grid
One goalkeeper leads and one works. The lead goalkeeper gives hand and verbal signals to her partner, who responds quickly to the various cues. Examples: Point up: Go up and catch a high ball. Point right: Shuffle left. Point Left: Shuffle right. Point straight ahead: Back-pedal. Point at self: Close down (move forward in set position). Point right and down: dive left. Point left and down: Dive right. If the leader calls ‘set’ the working player must get into her ready position. In addition to the footwork and technical shadow saves, this is a good environment to encourage the leading goalkeeper to be assertive, as they have complete control and they need to be decisive in their communication. Play for 30 seconds and then change roles.
Progression
• Add a ball for the working player. When the leader calls out ‘ball’ the working player must get to and pick up the ball as quickly as possible.
• Add a ball for the leader. Periodically, the leader shoots a ball at the goalkeeper for the working player to save and return.
Individual Touch Sequence - 20x20 yard grid
Each player has a ball. This series of handling activities give the goalkeeper intensive touches and increasing confidence on the ball. Perform each variation for twenty seconds. To challenge a group, check the number of touches each player achieves in each exercise to see which player gets in the most work.
Progression
• Pushing the ball back in forth between hands in the ready position (use the fingers and make the hands soft) and then above and in front of the head.
• Pushing the ball back and forth above head height. These first two variations are designed to increase the goalkeeper’s ability to feel and control the ball.
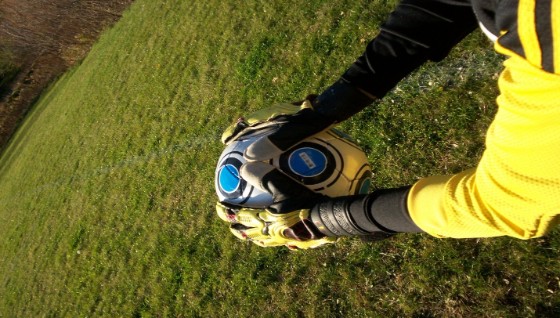
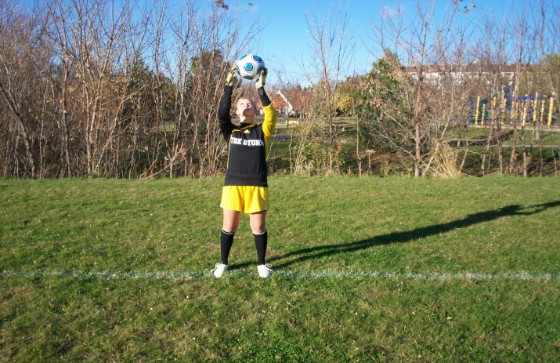
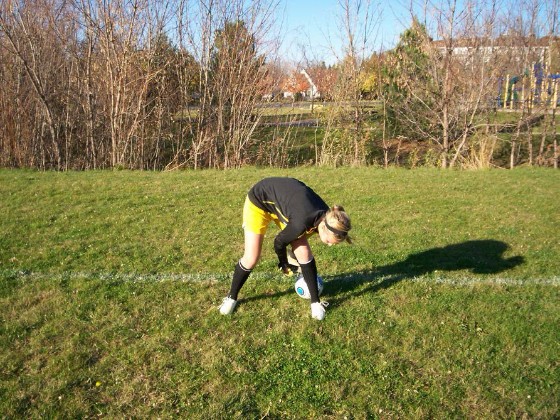
• Bounce and catch the ball (focus on creating a “W” with the thumbs and pointer fingers of each hand on the back of the ball). Explain that this position is the ideal catching posture for all balls received above the base of the rib cage. Encourage players to bounce the ball in an arc, to their sides, behind one foot, etc. In every case, emphasize that the goalkeeper must both catch the ball and then take a moment to look at and secure the ball before bouncing again. If young goalkeepers get in the habit of receiving and then securing the ball before moving on, they will develop both good concentration on the save and also good catching habits that will limit the number of drops.
• Skip and catch.
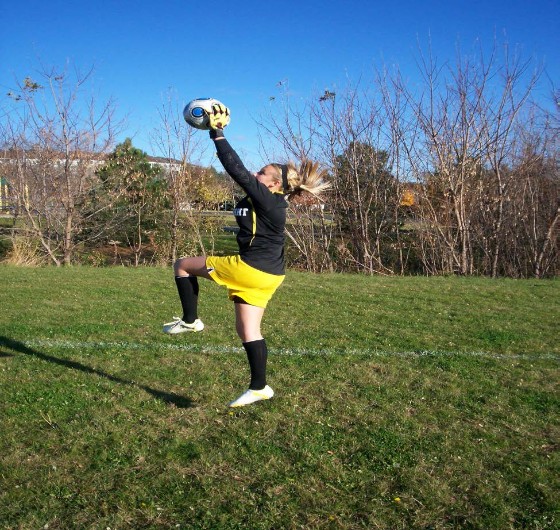
• Toss a high ball and catch. Note the goalkeeper’s posture and extension. The goalkeeper jumps from one foot, driving the opposite knee in the direction of the ball. She catches the ball at the earliest possible moment, both above her head and in front of her body.
• Sit down and “ride a bike” (in a ¼ sit-up position, work the ball between the legs while creating a biking motion)
• Work the ball in a circular motion around one leg (using both hands), working the ball from the knee down to the ankle and back up again – change legs).

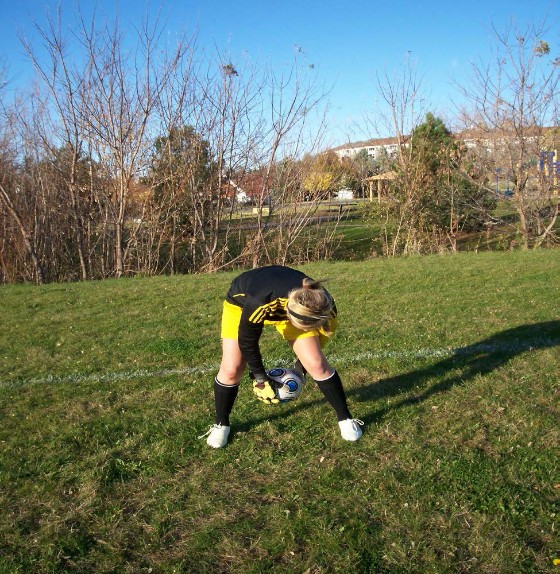
• Figure “8” working the ball around the legs at knee height.
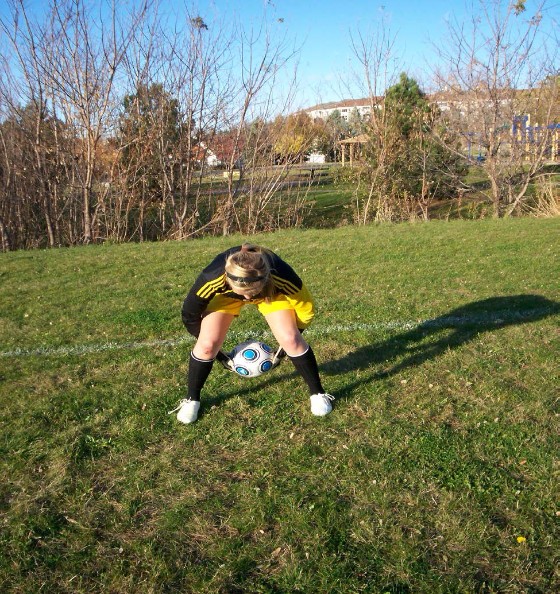
• Figure “8” with the finger tips (ball on the ground). Emphasize that the fingers must be able to instinctively feel the ball for the goalkeeper’s handling to be sharp.
• Handling challenges – 1. Hold the ball with both hands behind the knees; flip the ball upward and forward and catch the ball with the hands in front of the knees.
• Handling challenges - 2. Staggered hands (one in front of one knee and one behind the other) hold the ball; flip the ball up and alternate the hand position before catching.
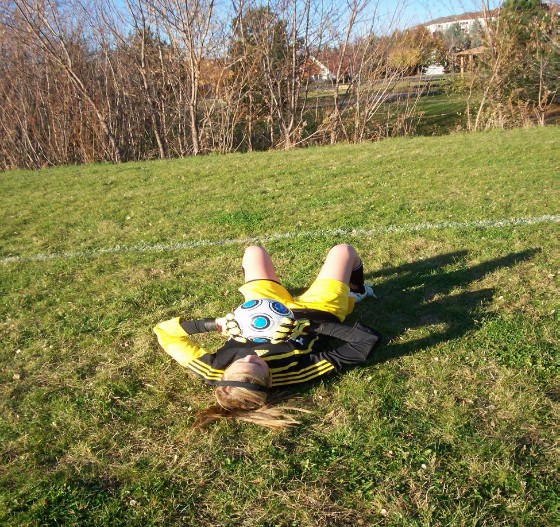
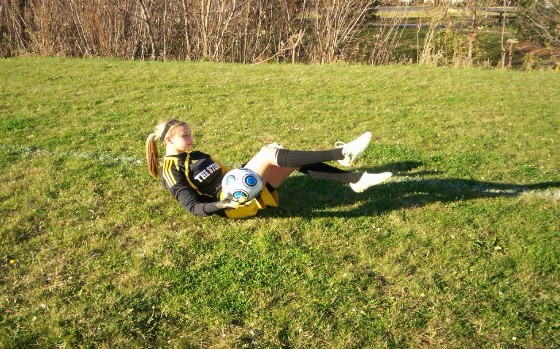
• Recovery handling – 1. The goalkeeper lays on her back, tosses the ball up in the air and gets to her feet before catching (do not let the ball bounce).
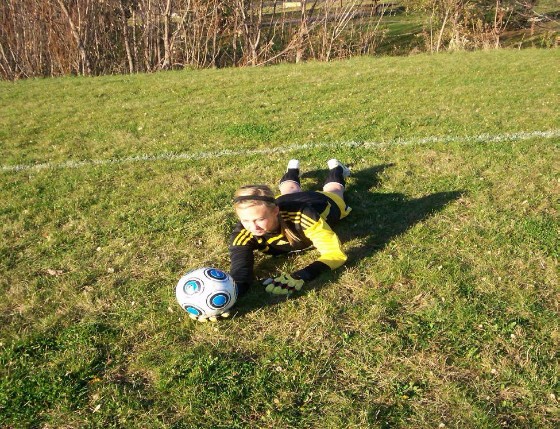
• Recovery handling – 2. The goalkeeper lays on her front side, tosses the ball up in the air and gets to her feet before catching (do not let the ball bounce).

