WORLD CLASS COACHING
Club Curriculum Building a Better Goalkeeper
By Tony Englund
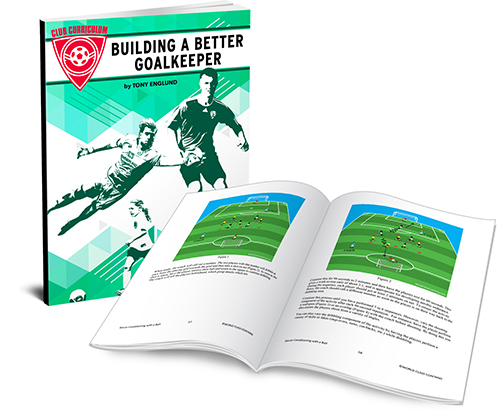
TABLE OF CONTENTS
Part Three
TRAINING SESSIONS
Training Session#6: Diving: Collapse, Extension and Blocking.
Introduction: After young players are introduced to basic, safe, technical diving, it is useful to teach them that there are multiple types of diving saves, each designed to deal with a particular shot or situation. This session refines collapse (standard) diving by looking at dive angle. Then ‘keepers learn about extension diving, which allows them to reach balls beyond the reach of collapse dives, and blocking, which allows the goalkeeper to increase her chance of making a save in a pressure situations close to goal.
Pairs Diving Progression (revisit and reinforce)
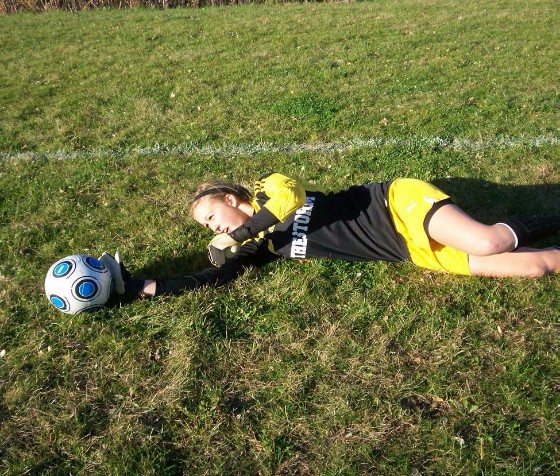
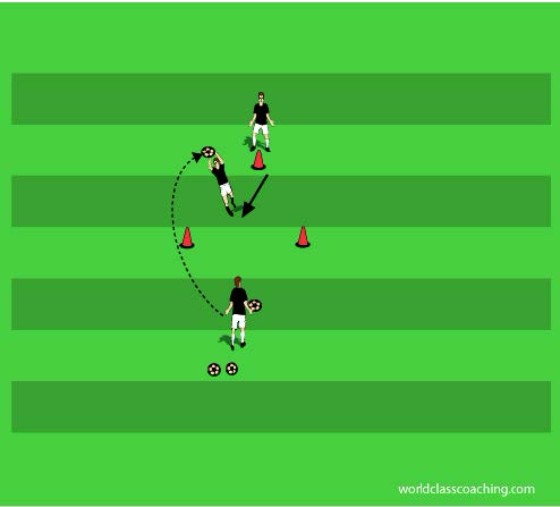
One goalkeeper begins on her knees on the endline. Her partner holds the ball. The server rolls balls to alternating sides for the working goalkeeper to save. The goalkeeper dives to save on either side.
Key technical diving considerations
• Contact points for the body in the dive are the outside of the knee, the hip and the shoulder (do not land on the elbow!).
• Receive the ball with two hands and at eye level, with the near-side hand on the back of the ball and the trailing hand on top of the ball.
• Young ‘keepers are taught to consider the ground to be a “third hand” with which to control the ball.
• The elbows should be slightly bent and act as springs to cushion hard serves and any attempt by an opponent to kick the ball.
• The head is raised off of the ground, with the eyes focused on the ball throughout. The trailing knee is kicked in front of the body and up to stomach level (the knee should not be any higher off of the ground than the hip). The recoil from this movement will help the goalkeeper recover to her feet after the save.
• The most common errors are stomach-diving (emphasize contact points); improper hand placement; and failing to bring the knee forward, which both leaves the goalkeeper vulnerable and often results in the goalkeeper rolling on her back at the end of the save); sideways or backward dive angle (work to get the shoulders and hands forward with each dive).
Progression
• Serves in the air.
• bounced serves.
• Repeat the progression with the goalkeeper working from a standing position.
Forward Dive Angle
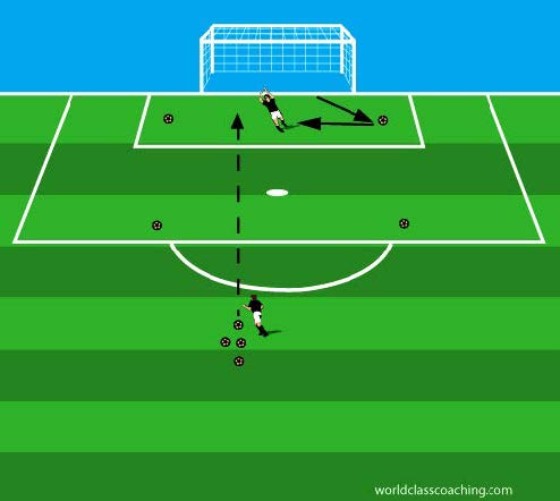
For intermediate and advanced goalkeepers, the concept of forward dive angle becomes very important. Specifically, if the goalkeeper can adopt a forward line in diving (look at a line between the hips and shoulders after the dive), she will cut more angle and also receive the ball earlier. Goalkeepers are taught to always be working forward in their progression. The relevant slide in this set shows a simple, efficient environment for training forward dive angle. The working goalkeeper passes to her partner and then moves quickly forward through the gate to save the subsequent shot. The server looks to push the ball to the far cone, which can be adjusted in the direction of the server to force a sharper forward dive angle. After both goalkeepers have an opportunity to train in this setting, reverse the angle on the gate cones to allow for left-side diving. For young goalkeepers it is useful to show this refinement so that the young ‘keepers are aware of the benefits of diving at a forward angle.
Extension Diving
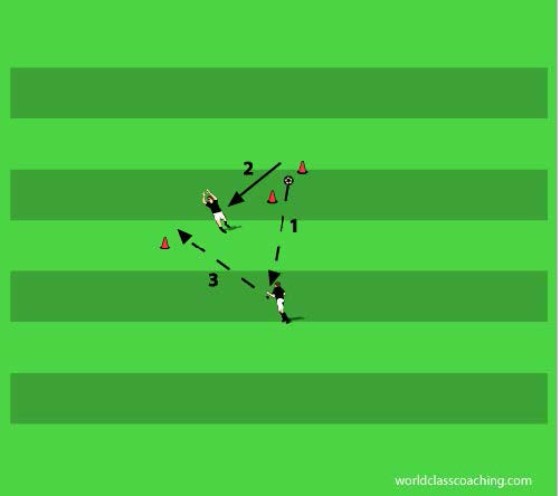
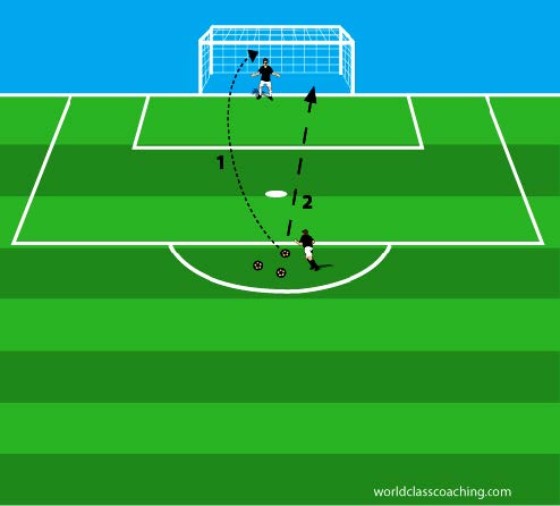
A second form of diving (the standard diving outlined above is referred to as “collapse” diving) is extension diving. The purpose of extension diving is to reach balls that cannot be reached through collapse diving. In the slide shown, the goalkeeper starts with the ball three yards off of the post. She initiates the action by playing to her partner (1) and then backing off to touch the post (2)before moving across the face of the goal (3) and saving at the back post (4). The exercise is then repeated in the opposite direction. Because of the requirement to move across the width of the goal, this exercise is a useful means to creating extension diving opportunities.
Focal points
• The footwork is crucial to setting up the dive. A cross-over step can be used to quickly cover the area, and very fast shuffling is required to both get to the post and also create momentum and explosive power in the dive.
• There is a tendency with younger goalkeepers to go running across the face of the goal and stomach dive (for younger ‘keepers, start this exercise in the middle of the goal to cut the distance and have them work slowly, focusing on technique).
• In the final push, the legs must be bent, and the leg nearest the post becomes the push point, while the backside knee adds drive to the effort. The most common error in this type of diving is the tendency to jump upward and overplay the ball.
It is important to emphasize that the guiding principal in this regard is, “make the simple save.” On a low shot, pushing along the ground increases the likelihood of holding on to the ball and decreases the likelihood of injury. In this exercise, most of the serves should be along the ground. Change roles after one minute.
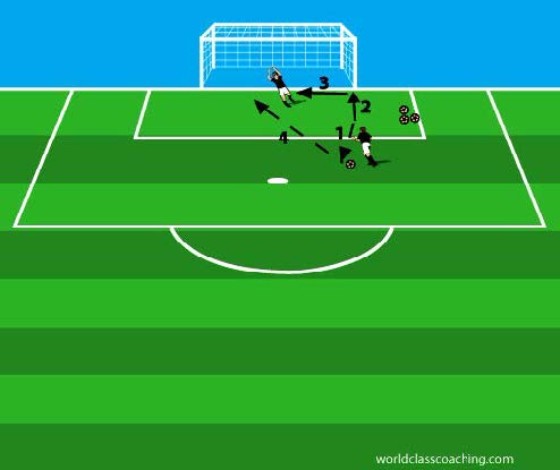
Blocking Line
This is typically not a favorite for goalkeepers, but it is an exercise that highlights a very important skill for all netminders: Dealing with a ball that one will not get to in time to cover. The task then is to block the ball. The attacker moves through the line of balls, pushing each ball in sequence, with the goalkeeper either getting back to her feet or getting her feet in position to push on to the next ball. The purpose of the exercise is to familiarize the goalkeeper with going to ground in front of an attacker. Hand position is critical. If the goalkeeper cannot get to the ball first, her bottom hand is placed along the ground (palm facing the ball) and the top hand is held higher than in a normal dive in an effort to knock down a shot that would go over her. Alternate roles and work each ‘keeper in each direction.
Variation
• The attacker allows the goalkeeper to get to some or all of the balls first and then pushes on the ball.
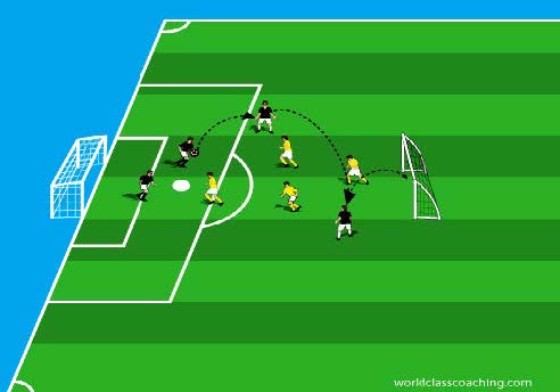
The Pit - Place four balls (no cones) to form a 10x10 yard grid.
The goalkeeper starts in the center of the “pit,” and her partner has a ball supply ten yards outside the grid. The goalkeeper moves to cover any of the four balls and then quickly recovers to deal with a shot from her partner. This exercise emphasizes both diving and speed in recovery. This exercise can also be organized in the area, as shown, with the pit set up in the large box and the partner’s follow-up shot being at goal. For purposes of this session, the follow-up shot should be on the ground and designed to force the goalkeeper to dive to save.
Training Session#7:Advanced Handling: Punching; Low and High Tipping.
Introduction
Although punching and tipping are advanced skills for goalkeepers, it is useful to show young goalkeepers how to perform these techniques, as it helps them understand their options when stopping shots. The cautionary note is that each of these skills is to be utilized only when catching the ball is not possible.
Punch Juggling
The goalkeepers stand two yards apart. The goalkeepers use two fists to punch the ball back and forth between them (always start with a toss from one to the other). Have the pair keep track of their best total over two minutes. Emphasize that punching is used to defend shots in high wind, wet conditions, in a crowd in front of goal or in an emergency.
Key technical considerations
• Placement of the hands (fists with thumbs resting on the pointer fingers – not tucked in! – and either together (best feel) or slightly separated (for advanced goalkeepers this creates a more broad surface).
• The fists should be set together early and close to the body, with the fists driving through the ball to punch.
• As virtually all punching needs to be upward in motion (to clear the ball and create time for the defense to react and adjust), this exercise is also useful for emphasizing the importance of punching on the back and underside of the ball to create proper lift.
Variation
• Play again, this time utilizing only one fist for punching (boxing). This is a riskier save given the smaller target surface, but it is also useful in emergencies and for improvisation to be able to box a ball out of trouble. Compel goalkeepers to alternate the fist they use to punch. Play for two minutes and check for the high score.
Low tipping
This skill is utilized to deal with balls that cannot be held in a dive due to weather, deflection, pace, the goalkeeper seeing the ball late, or a ball that will get in before the goalkeeper can get both hands there. It should be noted that some goalkeepers prefer to utilize the heel of the hand (power) while others prefer the fingertips (more reach and control). Either way, successful tipping requires very good hand-eye contact. The most common error occurs when the goalkeeper turns her palm down and the ball gets trapped under the hand. To prevent this from occurring, the goalkeeper should practice moving her hand along the ground with the palm facing up-field throughout the save. For very young goalkeepers, the working player can start from her knees to ease the fall and simplify timing. Be sure to work both sides of the goal.
Progression
• The server tosses low serves (knee high) for the working goalkeeper to tip.

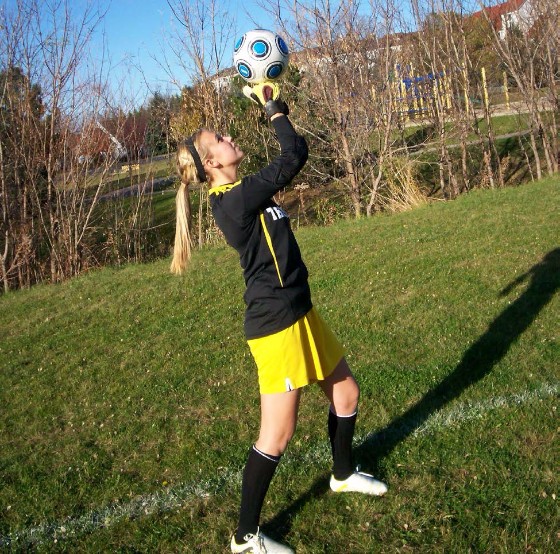
High Tipping
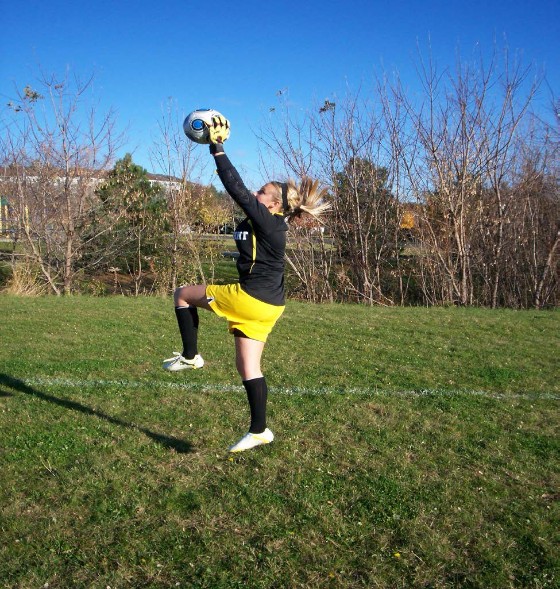
This is a difficult save that is often not well understood and there are consequently many mistakes that lead to goals out of high tipping opportunities. High tipping typically occurs when the goalkeeper has been off of her line and has to recover to deal with a ball that is headed for goal or when a ball is hit with pace and location that will not allow the goalkeeper to maneuver and catch. For young goalkeepers, it is useful to teach this skill in isolation. In the picture, the goalkeeper works from her knees, with the server tossing balls from the foreground for the ‘keeper to tip over an imaginary goal.
This position removes footwork and thus movement from the execution, allowing the goalkeeper to focus on the tipping motion. The server should toss balls that have a slight arc, aiming for the goalkeeper’s near shoulder. The goalkeeper shows the tipping hand early, with the wrist facing the ball (turning the wrist is the most common error and creates a downward arc that can throw the ball into the net). The ball is received on the high palm and base of the fingers and lifted over the goal. Practice dealing with balls on both sides.
Goalkeeper Wars - 2 goals 14 yards apart
This is the most popular pairs training game for goalkeepers, and it is a very good coaching environment as well, as the technical concepts introduced in many of the earlier exercises can be tested here without specific prompt. The general set-up involves two full-sized goals placed 14yards apart (use age-appropriate goals and distance). Place two cones 3 yards from each goal line beyond which players cannot venture to shoot (they may go out and collect rebounds as long as they return to their area to shoot). Players alternate shooting opportunities. Award a point for a goal and also a point for good footwork and tipping or punching. For the first portion of the game, require punted or thrown serves to create high-ball saving opportunities.
Training Session#8: Dealing with High Balls
Introduction
One of the most commonly asked questions from young goalkeepers, their coaches and parents is, “How can we help her deal with high shots?” Indeed, the height of the goal, which is usually beyond what a U9-U12 goalkeeper can jump, and the fact that young players are still developing motor skills that allow them to track and control a flighted ball both mitigate against a rapid solution to this dilemma. That said, there are basic technical cues and simple tactical exercises that can maximize young goalkeepers’ ability to control high shots.
Team Handball - 25x25 yard area with full-sized goals
Divide the group into two teams. Players pass the ball with their hands and goals are scored by throwing the ball into the goal. Defenders can use their hands to block or intercept passes. Any ball that hits the ground is a turnover and play restarts from that point. Players in possession are limited to three seconds and three steps.
High Ball Receiving in Pairs - Two lines 7 yards apart
Serves always come from the same line. The service must to be underhand and in such a way that the partner can always come forward to receive. Players change lines after each sequence. The key components to a clean save are proper approach and preparation; take off on one foot, driving the opposite knee forward and high to aid the jump; receive the ball with both hands above and in front of the head (minimizes the likelihood of a field player getting to the ball first and also of the ball getting in behind the goalkeeper); finish the save either by stabilizing the ball in front of the body or by pulling the ball down to the chest.
Receiving High Balls
One goalkeeper serves to either of the side cones while the working goalkeeper must close and make the save as early as possible. She then returns to her starting point and their roles are reversed. One additional element that is useful in this environment is requiring that the goalkeeper utilize a particular foot for take-off on each side of the grid. It is generally preferable to use the “end line” foot for take-off in pulling down high balls, so goalkeepers must be adept at working off of either foot.
Progression
• Move this exercise to the goal. The coach tosses balls for the goalkeepers to catch under the bar. At first, the tosses should be straight on at goal. Emphasize to the receiving player that her best chance to save is to be patient and wait for the ball at the line (arc of the ball). The catch should be made with both hands and slightly in front of and above the head.
• The serves are tossed first to one side and then the other. The goalkeeper shuffles along the goal line and jumps (when necessary) to catch. Emphasize the importance of keeping the toes, hips and shoulders facing the field throughout. Many young goalkeepers turn their hips and shoulders trying to reach the ball and when they do, it becomes extremely difficult to catch the ball.
• Allow punching or high tipping on balls that goalkeepers will not otherwise control.
High Shot Low Shot
With one goalkeeper in goal and one outside the 18 large box, this exercise is a simple combination of types of shot for the goalkeeper to save. The attacker shoots in two balls in each sequence, with the first shot being a chip (or punt or throw from closer distance for younger ‘keepers) up near the bar, and when the first ball is saved, she then drives a low shot at the goal. The goalkeeper has to adjust quickly to recover and save the second shot. A common use for this exercise is to allow the goalkeeper to measure her ability to play a step or two off of the line on a high shot. In general, younger goalkeepers should stay near their line when the ball is outside the large box to avoid being chipped. Older, taller, and more advanced goalkeepers can get several yards off of their lines and still recover.
Variation
• Low shot, high shot; occasionally, the shooter touches the ball inside the large box, which prompts the goalkeeper to step out and challenge. Change roles after three minutes.
Goalkeeper Wars - 2 goals 14 yards apart
This is the most popular pairs training game for goalkeepers, and it is a very good coaching environment as well, as the technical concepts introduced in many of the earlier exercises can be tested here without specific prompt. The general set-up involves two full-sized goals placed 14 yards apart (use age-appropriate goals and distance). Place two cones 3 yards from each goal line beyond which players cannot venture to shoot (they may go out and collect rebounds as long as they return to their area to shoot). Players alternate shooting opportunities. Award a point for a goal and also a point for good footwork and tipping or punching. For the first portion of the game, require punted or thrown serves to create high-ball saving opportunities.

