WORLD CLASS COACHING
Club Curriculum U11/12 Season
By Tony Englund
TABLE OF CONTENTS
Part One
INTRODUCTION
SYSTEMS OF PLAY
INDIVIDUAL TRAINING SESSIONS
Part Two
PASSING AND POSSESSION SESSIONS
Part Three
TECHNICAL SESSIONS
Part Four
ATTACKING SESSIONS
ABOUT THE AUTHOR
Introduction: The Golden Age of Soccer Learning
The starting point for any adult planning to mentor young children is to be certain to adopt the proper perspective in developing a philosophy of coaching that reflects a thorough understanding of the differences between adults and children. Simply put, coaching 11-12 year-olds carries a mandate to continue the technical development of young players while also nurturing their love of the game.
Adults must take into account the physical and psychological abilities and needs of young children in planning and also coaching activities for 11 and 12-year olds. Children at these ages have immature and growing skeletal and cardiovascular systems that influence their motor abilities. At 11 and 12 there are often considerable variations in physical maturity and ability. Psychologically, young children have a fragile and evolving self concept that needs consistent nurturing through social acceptance and adult approval of their efforts (as opposed to results), and though they are intrinsically motivated, they do not yet have the sense of competition that is present in older children and adults.
In addition to accounting for the physical and psychological needs of young children, coaches must also attempt to understand why children play soccer (or any sport), and try to design the team experience to nurture those motivations. Fun, exercise, being with their friends and skill development are all important considerations for young children in this sense.
There are numerous studies in print outlining the reasons why children quit playing sports (as many as 75% by age 13). Not surprisingly, those reasons mirror the motivational elements that draw children to participate, as not having fun or improving and not being with their friends are among the chief reasons kids stop playing.
The message, then, is a simple, but very important one: Young children have different physical and psychological needs and abilities than adults and the latter must coach to the needs of the former, not to the needs or abilities of a fully mature adult. Children generally play sports for exercise, fun and skill acquisition, not to win, and, as a mentor once explained to the author, “Coaches at this age should judge their success this year not based on wins and losses, but rather on the number of kids who sign up to play again next year.”
Given all of the requisite warnings about the philosophy of coaching the 11 and U12 years, it is also noteworthy that these two years introduce children to competitive soccer, and national coaching organizations the world over agree this period also represents the high point of what is generally referred to as the ‘Golden Age of Soccer Learning.’ Children at these ages are able to learn mentally and physically at an accelerated pace, and their skills and tactical understanding can be dramatically improved during these critical years through quality training. Therefore, coaches must be well prepared for every training session and focus on both fun and learning.
Organizing a U11/U12 practice session
One of the most important aspects of coaching is preparation. Even at the youngest ages, players and parents will recognize whether a coach has taken the time to organize his or her thoughts and create an effective, coherent practice plan.
Preparation elements:
• Practice plan: Which exercises will be used and for how much time? What are the key teaching points? The coach should have a written plan for every session.
• Equipment: What types and how many balls, vests, cones, goals, etc. will be needed? Don’t forget a ball pump!
• Safety: The coach should walk the practice area before each session, checking for items that could pose a danger to children. In addition, the coach should carry a phone with emergency numbers for all players. The coach or manager should always have a first-aid kit on site. Lastly, the coach should be the first to arrive and the last to leave training, assuring that there is adult supervision of children at play and that no child is left alone at the field. It is recommended that two adults be present at all times.
Children at these ages continue acquiring motor and mental skills, and their U11/U12 competitive experience will likely determine whether they acquire the skills and appreciation for the game that will incline them to continue playing into their teen years. Therefore, U11/U12 coaches must be well prepared, skilled trainers who can continue to challenge all team members in a fun, inclusive environment.
Training time: Roughly equal to the length of a game, and generally not more than an hour.
Composition: 1/3-1/2 (usually the final portion of practice) of every training session should be spent just letting children play soccer. The remainder of the session is used to introduce and refine skills through efficient training exercises and games, building toward the final game. It is recommended that the coach choose a theme for each session (i.e. individual attacking, defending or passing and receiving). It is important to remember that at this age, children are ready to change activities fairly quickly and it is important to give them new tasks and challenges to keep practice fun and exciting.
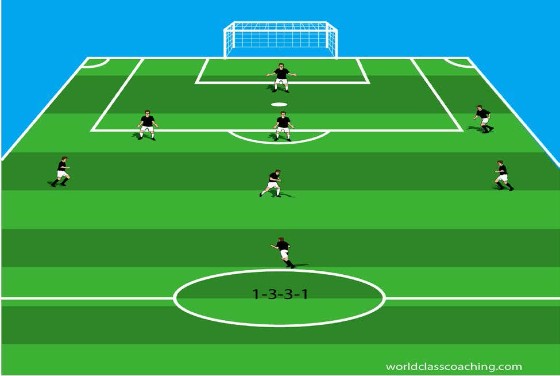
Systems of Play: 1-3-3-1
As teams at these age groups play with a goalkeeper and seven field players, coaches need to consider which tactical system or systems suit their players and style of play. This link provides an overview of the two most common systems of play and some of the key tactical considerations associated with each.
Key Considerations
This system deploys a goalkeeper, three defenders, three midfielders and a forward.
Advantages
• Similar to a 4-4-2 (just add a player at each level), the most common system utilized by U13+ teams in 11v11 games.
• Allows for three backs, which simplifies work at the back and allows for coaches to be able to teach basic covering responsibilities.
• When the team loses the ball, 6 players (all of the defender and midfielders) are available to defend.
• The team can organize well behind the ball in transition. The central midfielder has a lot of attacking options, and the three backs will outnumber the opposing team’s attackers and be available to receive support passes to build possession.
• The flank players have a lot of room to run forward and their defensive responsibilities are limited, given the small field and the fact that there is a back behind them to deal with much of the flank pressure.
• The central midfielder most often is not required to retreat deep into her defensive zone to help out, as the three backs can deal with most of the deep pressure.
Disadvantages
• The single striker is a major concern here. Depending upon how the coach decides to lay out responsibilities, the single striker can be isolated and of limited use in transition (she is often a target to receive and lay-off passes rather than a runner) and she can be hard to find if she has to roam sideline-to-sideline in search of clearing passes. In addition, if the opposition play three backs, she has a very difficult time applying pressure and the opponents can run her around without threat of losing possession. This can be very frustrating for young attackers.
• Transition can be difficult, as the single target player means that direct play can be difficult unless the wing midfielders play very high.
• Three backs can be a concern on a number of levels. First, unless well coached, the wing defenders can become simple blocking players and their ability to learn an active role in the game can be limited (they need to be used in possession if they are to develop). Second, because the field is quite narrow, the back three can become crowded together and of little use in transition.
Training Considerations
In general, the coach must emphasize the importance of transition, and the need to use the flank midfielders to stretch opposing defenses. The shape of the team allows for good, compact defense, but the forward and the midfielders must be trained to get into good attacking positions as soon as the ball is won. In addition, the back line players must be trained to fan out and provide support in transition. In addition, it is recommended that the forward move in line with the ball on defense to make play out of the back predictable.
Player Characteristics and Positional Skill Requirements
Specialized technical and physical skills and tactical understanding are necessary for players to perform well within the 1-3-3-1.
• Goalkeeper: The goalkeeper position often becomes specialized at U11 and U12, as qualified candidates are identified. Among the critical skills to be developed at this age are: Basic and consistent handling and footwork; safe and effective diving; distribution (both throwing and kicking/punting); knowledge of angle play; punting; dealing with set-pieces; organizing the defense; and the mentality of shot-stopping.
• Defenders: The coach can organize the backs as either a central defender (sweeper) set behind two backs or a “flat” three. If there is a center back, she needs to be quick, a sure tackler and able to communicate to organize the defense. She should also be strong in the air and she must long pass well. The outside backs are normally quick, good in 1v1 duels and able to pass the ball over distance. Among the key tactical requirements for the outside backs are the ability to cover for the center back and also the ability to make good decisions regarding when to engage opposing attackers.
• Wing midfielders: These players are typically quick, hard-working players who can get forward to attack flank space behind opposing defenses. Outside midfielders also need to be able to cross the ball well, combine with the central midfielder, forwards and even the outside back on their side, and they need to be able to finish crosses from the far side of the field.
• Central midfielder: This player must possess the ability to see the field well (distribute intelligently) and her ability to connect with all of the other field players is critical in transition, organizing possession, changing fields and pushing the attack. Her ability to shoot from distance can provide considerable attacking potential as well. Finally, central midfielders are typically strong 1v1 players as well.
• Forward: This player must have a very consistent work rate as she must cover a lot of ground both on defense and in the attack. A sharp change of speed will get her behind the defense on occasion, and she needs to be a talented finisher. Her ability to receive (both on the ground and in the air) is critical for the team’s transition. This player must also possess the willingness to take on defenders to create both space and attacking opportunities. She should know how to combine well with the midfielders.
In summary, while players will only perhaps possess some of the above characteristics, this information should be helpful in aiding coaches to both place players and also design training.
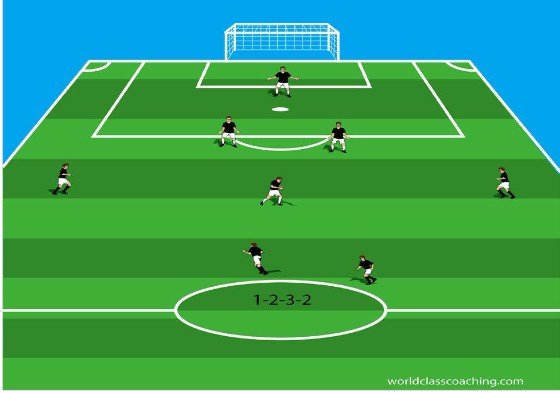
Systems of Play: 1-2-3-2
Key Considerations
This system deploys a goalkeeper, two defenders, three midfielders and two forwards.
Advantages
• Two forwards provide both balance and many more opportunities in attack.
• Transition is aided by the presence to two target players.
• It is easier to apply defensive pressure further from one’s goal with two strikers.
• The flank players have a lot of room to run forward.
• The central midfielder most often is not required to retreat deep into the defensive zone and has many good options going forward in transition.
Disadvantages
• The team is set up to defend with only 5 players (defenders and midfielders). If a team can not get transition, the backs and midfielders will be worn down playing extensively in the back third.
• The use of only two defenders is the most perilous characteristic of this arrangement. The two backs have to be very quick and have a very good understanding to deal with attackers from any area.
• Central attacks can cause considerable disruption in that the central midfielder may be dragged back to the goal to help deal with a crisis and the backs may make a mistake as to who is responsible for a runner (runs that aim to split them may cause problems).
• Consistent flank attacks against this system will tear apart its shape as either the near-side outside midfielder or the backside outside midfielder must be dragged in to track runners or provide cover. This loss of shape puts physical pressure on the flank players to run endline to endline and makes transition very difficult.
• Finally, it may be difficult to organize possession on the back line with only two backs.
Training Considerations
This system is well-suited to a team that expects to do a great deal of attacking. The coach must be confident that the goalkeeper and the two backs will be able to close down transition and attacking by the opponent. In addition, the flank players will need regular rest and consistent encouragement to work endline-to-endline. On the other hand, the opportunity to train the midfielders to link with the forwards and to train the strikers to work together makes this a lively arrangement to train and watch.
Player Characteristics and Positional Skill Requirements
Specialized technical and physical skills and tactical understanding are necessary for players to perform well within the 1-2-3-2.
• Goalkeeper: The goalkeeper position often becomes specialized at U11 and U12, as qualified candidates are identified. Among the critical skills to be developed at this age are: Basic and consistent handling and footwork; safe and effective diving; distribution (both throwing and kicking/punting); knowledge of angle play; punting; dealing with set-pieces; organizing the defense; and the mentality of shot-stopping.
• Defenders: If the team will play only two defenders, these players must be quick, and be able to make good decisions under pressure. Their ability to close down and tackle, as well as cover, will likely determine whether the team can be successful in a 1-2-3-2. They need to learn to play well in the air and they need to be vocal in organizing the defense. The ability to long pass is also essential.
• Wing midfielders: These players are typically quick, hard-working players who can get forward to attack flank space behind opposing defenses. Outside midfielders also need to be able to cross the ball well, combine with the central midfielder, forwards and even the outside back on their side, and they need to be able to finish crosses from the far side of the field. In a 2-3-2, outside midfielders also need to be able to defend well on the flank and be willing to make long defensive runs in particular.
• Central midfielder: This player must possess the ability to see the field well (distribute intelligently) and her ability to connect with all of the other field players is critical in transition, organizing possession, changing fields and pushing the attack. Her ability to shoot from distance can provide considerable attacking potential as well. Finally, central midfielders are typically strong 1v1 players as well.
• Forwards: These players must have a very consistent work rate as they must cover a lot of ground both on defense and in the attack. A sharp change of speed will get the striker behind the defense on occasion, and strikers needs to become talented finishers. The striker’s ability to receive (both on the ground and in the air) is critical for the team’s transition. These players must also possess the willingness to take on defenders to create both space and attacking opportunities. They should know how to combine well with the other striker and the midfielders.
In summary, while players will only perhaps possess some of the above characteristics, this information should be helpful in aiding coaches to both place players and also design training.
Training Session #1: Individual Attacking.
Introduction
The opening session in the series blends fun dribbling games with an emphasis on shielding the ball, before putting defensive dribbling into game situations.
Dribbling square - 20x20 yard grid
Each player needs a ball. Players dribble within the grid. Utilize the following restrictions for twenty seconds each: Dribble in place; dribble left foot only; dribble right foot only; change pace and direction with every fourth touch; dribble with one touch per step; left foot only, alternating between the inside surface and the outside surface; right foot only, alternating between the inside surface and the outside surface.
Awareness dribbling - 20x20 yard grid
Each player has a ball. Players dribble within the grid. After twenty seconds, the coach stops the exercise to explain the importance of changing the dribbling surface with purpose. Then the coach details the players to switch the ball to the outside of the away foot when they encounter pressure. Whenever the switch is made, players must also point to open space and dribble there with a sharp increase in speed. Explain that these are the building blocks to defensive dribbling and learning to keep the ball under pressure. Play for one minute.
Awareness tag - 20x20 yard grid
Each player has a ball. Players dribble in the square with the goal of tagging other players while avoiding being tagged. For a tag to count, it must be on another player’s back and the tag must be applied before the target player calls out the name of the player applying the tag. This game is designed to get players to be aware of the space all around them when they are in possession, and also to encourageplayers to be creative and even sneaky on the dribble. Play for two minutes and check scores. Re-emphasize the importance of “keeping one’s head on a swivel” in possession and then play a second game.
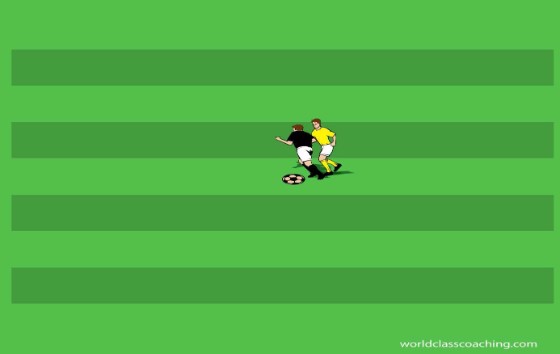
Shielding - 20x20 yard grid
Work in pairs with one ball for each group. Use one pair to demonstrate proper shielding. One player stands with the ball on the outside of one foot and her opposite shoulder into the defender (her partner). The shielding player should be shown to be able to keep the ball beyond the reach of the defender as long as she adjusts her feet, keeps a shoulder into the defender and keeps the ball on the outside of the away foot. Allow each player to practice in a stagnant setting (the defender does not try to win the ball). Then have one partner dribble and at a cue from the coach, she goes into a shielding position and her partner tries to win the ball. After five seconds of shielding, switch the ball to the other partner and play again. Give each player three opportunities to practice shielding with pressure.
Knockout - 20x20 yard grid
Every player needs a ball. Explain that the purpose of the game is to keep one’s ball (remind the players to shield the ball if under pressure) while trying to knock other players’ balls out of the grid. Explain that play will go on for two minutes and then they will be asked to subtract the number of times their ball is knocked out from the number of balls they knock out to determine a winner. When a player’s ball is knocked out, they must sprint after the ball and then complete six dribbling touches
along the perimeter of the grid before they can reenter the game.
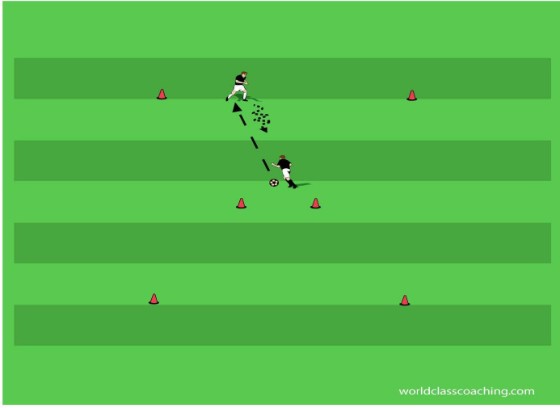
Creating attacking opportunities out of defensive dribbling situations - 20x20 yard grid
Players work in pairs in the grid with a ball for each group. The purpose of these walk-throughs is to show players moves to turn shielding situations into attacking runs. The pairs set up with one player in a shielding position and the other as a passive defender. Demonstrate the following possibilities:
• Spin off. If the defender is either forward or behind (as opposed to straight on the the shielding shoulder), the attacker can spin off using the outside of the away foot to move the ball and the shielding shoulder to keep the defender off of the ball. Emphasize that the ball can be moved while the attacker is shielding to try to create an unbalanced defensive position.
• Self-pass. If the defender maintains a balanced defensive position, the attacker can use the outside of her away foot to tap the ball 1-2 yards away from the defender and then quickly get separation from the defender to face-up (work one’s body around the ball to face the defender. The attacker is always better off to get faced up and create a better range of attacking options.
1v1 to a central goal - 12x12 yard grid
Players work in pairs in a grid with a ball and a two-yard central cone goal. Explain the purpose of the exercise is to give the attacker the opportunity to hold the ball in tight space under pressure. In this environment, both shielding and the spin-off and self pass can be practiced. Goals can be scored by either player and the attacker may dribble through the goal from either side. Play for three minutes and then check scores.
3v3 line soccer - 25x25 yard grids
Play small-sided games (ideally 3v3 or 4v4). For the first ten minutes, require a three-touch minimum for each player in possession. This will create high pressure dribbling situations and allow players to practice the defensive dribbling they practiced in this session. A point is earned by dribbling over one’s opponents endline. After ten minutes remove the restriction and allow open play.
Training Session #2: Individual Defending.
Introduction
This session reviews jockeying and block tackling, refining players’ ability to close down and dispossess opponents in tight spaces.

Cone Stealers - 25x30 yard grid
Place two lines of 8-10 tall cones at opposite ends of the playing area. Divide the team into two groups (one in scrimmage vests). Introduce soccer balls so that there are ½ as many balls as total players in the game (balls should be divided evenly between the teams). Explain that this game is similar to “capture the flag” in that the goal is to use a ball to knock down the opposing team’s cones and then return them to one’s own team’s cone supply.
As only half the players on the field have a ball at any given time, this is a good warm-up to prime players for a session on individual defending. Explain that the players with balls can knock down as many cones as possible (i.e. until they lose the ball) before carrying the cones back to their end and placing them in line with the remainder of the team’s cones. If one team captures all of the cones, that team wins the game. Otherwise, play for three minutes and then check to see which team has more cones.
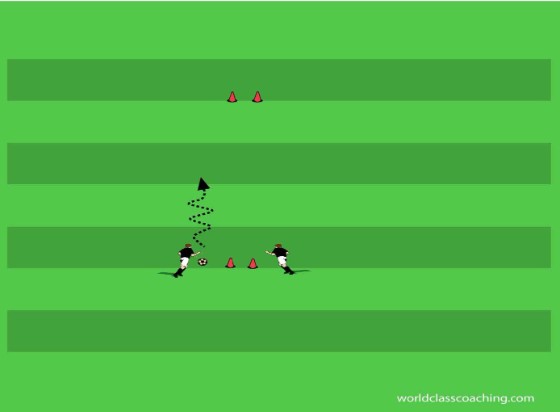
Jockey - 20x20 yard grid
Begin a progression to introduce the basic concepts involved in individual defending. Players work in pairs along the endline of the grid with one ball for two people. The attacker is on the end line with the defender two yards away and facing the ball and the attacker. Explain that the ultimate goal of the session is to create opportunities to win the ball back. Footwork is critical to setting up tackles. Jockeying is the footwork used to set up the tackle. The attacking player will dribble slowly across the grid allowing the defending player to practice drop-stepping to stay goal-side (that is, between the ball and the end line). Emphasize that the attacking player is not trying to beat the defender at this point and the defender may not tackle. Here are more concepts to introduce into this exercise as the players get comfortable.
• The defender must learn to only “show” one foot to the attacker. That is, the foot work here is staggered and a drop-step is employed to remain in good tackling position. This will help drive the attacker to one side and make play more predictable and also prevent the attacker from playing the ball between the defender’s legs.
• The defender’s attention must be on the ball. Most fakes used by attackers involve body swerves or foot movements that do not affect the path of the ball. Defenders must learn to focus on the ball.
• Defenders should adopt a semi-crouched approach to the ball. Standing upright slows reaction time and the bent approach increases focus as well.
• Can the defender channel the attacker to one side only? Attackers are taught to cross the defender by attacking their lead foot, so defenders work to contain the ball and player and avoid being crossed. If they do get crossed, defenders must learn to switch their footwork to try to contain the ball on the other side.
• Finally, pay careful attention to the spacing between the attacker and the defender. This is the most critical concept in jockeying. If the defender gets too close, the attacker can touch the ball beyond the defender and win the duel. If the defender is too far away, the attacker can look up and assess options (i.e. not enough pressure is being applied). A balance must be maintained.
Work the pairs back and forth across the grid, being sure to integrate each of the above concepts into the habits of the defenders.
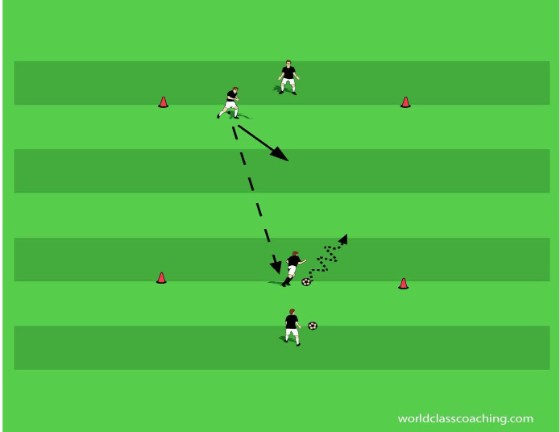
Closing down - 15x10 yard grids
Place players in grids in groups of four. Two players begin on each end of the grid (in line). Put a ball supply on one end. This exercise is designed to introduce the precursor to jockeying, which is closing down. Through a demonstration, show that the player who starts with the ball begins the exercise by passing to the first player on the other end of the grid, simulating a turnover. The receiving player is the attacker and it is her goal to dribble over her partner’s endline as quickly as possible after receiving. The defender takes the following steps to try to contain the attacker:
• Adopt a bent run to pin the attacker to one side of the grid (it is useful to start the players in opposite corners of the grid to make the bent run concept easier to adopt). Explain that by limiting the attacker’s options, the defender is making defending easier for her and for the entire team.
• The size of the steps in closing down is very important. The first few steps should be longer with an eye toward closing the space quickly. As the defender draws within about five yards, she must shorten her steps to a chop. The reason for this is that the short steps allow her to adjust to changes in the angle and speed that the ball is travelling.
• Once again, the spacing is critical here. If the defender adopts an improper angle of approach, the attacker will either not be under sufficient pressure (if the space remains more than 2-3 yards) or will be able to run past the defender, winning the duel.
• Shift to jockeying. Once the defender has closed down the attacker, then the defender jockeys the attacker, remaining goal side and working to delay the ball.
• Mentality. Explain that the defender is not allowed to tackle in this exercise. Typically players are discouraged by this restriction, so it is important to address the mentality required to be an accomplished defender. How long can the defender jockey and keep the ball in the grid? Have the defender count aloud the time she is able to delay the attacker and give her a point each successive time that she increases that time.
At the end of each duel, the players change ends of the grid and the other pair play.
Block tackle - 20x20 yard grid
There are three types of tackle in soccer: Block, poke, and slide. Block tackling will be introduced here and slide tackling will be dealt with at a later date. Demonstrate using two players with a ball between them. Here are the basic cues for block tackling:
• This tackle is typically used in tight space where it is possible to catch the ball on the foot of the attacker.
• If the attacker is about to use her right foot to touch the ball, the defender must be faced up on the attacker and she should use her right foot to effect the tackle.
• The tackle is made by trapping the ball between the attacker’s foot and the defender’s foot. The ankle of the tackling players must be locked (both to control the ball and also to avoid injury). In addition, the surface used to tackle is the inside, long surface of the foot. The heel should be just above the ground and the front of the foot needs to be held higher. This will prevent the ball rolling over the tackling foot.
• The other cues for a sound tackle include: The distance between the tackling and standing foot should be smaller than the ball so that the ball cannot be pushed between the feet in the course of the tackle; the knee of the tackling foot should be pushed slightly forward. This will help trap the ball between the two feet of the tackler and the attacker and will prevent the ball from popping up in the air.
• The final instruction is to “stay in the tackle.” The most common mistake in block tackling is that the defender walks through the tackle. It is critical that the tackler remain goal-side of both the attacker and the ball until the tackle is won.
Have players practice block tackling in pairs in a grid. The ball is placed between the players and one player says, “Go!”. The players then work to take a plant step and tackle. There is a tendency to swing the tackling foot at the ball and make a popping sound. However, swinging at the ball can create timing problems and will make it hard to disguise the tackle. The tackler should make a sharp, but controlled stab at the ball. The pairs should train the right foot for a minute and then the left foot for a minute.
Controlled block tackle - 20x20 yard grid
Give one-half of the players a ball. Players with balls dribble around the grid and those without a ball practice block tackling. Each time, the player with the ball walks through the tackle, allowing the defender to win the ball. Then the player who lost ball wins a ball off of another player. Play for two minutes, reminding players of the basic tenets of good tackling as outlined above.
1v1 continuous - 10x12 yard grids
Build enough grids to accommodate four players in each grid. Create a ball supply on one end. As in the shutting down/jockeying exercise above, two players start on each end (in lines). The player with the ball passes to the first player on the other end of the grid and proceeds to shut down and jockey with an eye toward block tackling. Players earn points by dribbling over their opponent’s end line. The duel lasts as long as the ball remains in the grid. At the conclusion of the duel, the players change ends and the resting players duel. Play for five minutes and then check scores to see who won in each grid.
3v3 to goals - 20x25 yard fields
Play a standard 3v3 game to cone goals. Reinforce strong individual defending by awarding a point for a strong tackle and two points for a goal. After five minutes, just award a point for a goal and let the players play.
Training Session #3: Individual Attacking.
Introduction
Session#3 introduces a new attacking move while also reviewing basic moves and then puts to the test the attacker’s ability to use the moves under pressure.
Crows and Cranes - 35x20 yard grid
This game is used to assess/teach speed dribbling. Get the game started first, then go back and coach. Players pair up and each player has a ball. Explain that at a signal from the coach (pointing to one end-line or the other), the players on the side the coach points to dribble as fast as they can toward the end line on the open end of the grid. Their partners leave their balls and chase their partners, trying to tag them before they cross the end line. The winner earns a point. Reverse roles and play in the other direction. Play each way three times and check scores.
Speed dribbling is used to cover open space as quickly as possible.
Here are the key teaching cues
• The first touch into space should be longer and taken with the laces. This allows the attacker to get into an explosive running rhythm.
• Subsequent touches are also with the laces and become progressively shorter as the attacker closes in on goal or another defender.
This skill needs to be practiced regularly so that players both recognize the opportunity to speed dribble and develop comfort with dribbling touches on their laces. Play the game again, this time adding the restriction that the dribbler must stop the ball on the end line to earn the point. This will compel the dribbler to shorten her touches at the end of the run.
Basic moves square - 22x22 yard grid
Divide the team into four equal groups and place them in lines (facing in) at the corners of the grid. Each player needs a ball. Explain that the purpose of this exercise is to allow players to practice basic attacking moves in a low pressure environment. The first player in each line dribbles toward the near corner of the inner grid and performs the basic attacking move before returning to the start point, where the next player enters the pattern. The coach stands in the inner grid and gives feedback to the working players.
The attacking moves and performance cues
• Inside of the foot cuts. The player dribbles to the cut point, turns her hips and shoulders and takes the ball with the inside of the lead foot, pulling the ball across the body and returning to the edge of the grid. Players need to bend their legs as they perform the move and accelerate after performing the cut. Players should alternate the foot they use to cut the ball and advanced players should check their space (by looking over their shoulder while dribbling in toward the cut point) to be sure that the space is clear for the move.
• Outside of the foot cuts. The players dribble to the cut point and turn hips and shoulders as above. The player then reaches past the ball with their lead foot, and then takes the ball with the outside of the trailing foot. As with inside cuts, the players need to check their space before the cut and accelerate after the cut to clear tight space. The most common error with outside of the foot cuts is that players fail to reach the lead foot past the ball, creating an unstable platform for the cut and also limiting the potential for the fake that can be created through quick movement with the cut foot. Rotate the cut foot.
• Pull-back. As above, the players dribble to the inner cone. This time, they remained facing the cone. A pull-back is executed by placing one foot on top of the ball (reach the toes forward and down to increase control) and pivoting, pulling the pull-back side hip and shoulder back with the ball and turning before dribbling back to the start point. A pull-back must be preceded by a check of the space behind the attacker on the way into the grid and a sharp change of speed after the move is completed. Alternate the foot used to perform the pull-back.
• Hook turn. Turn and get shoulder-on to the cone. Use the bottom of the foot closest to the cone to pull the ball across in front of the standing foot while hopping and turning back toward the start point.
1v1 to 4 cone goals - 20x20 yard grid
The above move set is designed to be both simple to learn and also to give players a means to changing directions to create space. Often these moves do not eliminate opponents, but they allow a player to move in a new direction and reset their options. This game allows players to practice the move set under pressure, and the players will find that when followed by a sharp change of speed, the moves in this set can help them eliminate a single opponent as well. Divide the team into two groups and line them up at opposite ends of the grid. Provide a ball supply for one group.
The first player in line with a ball begins the duel by passing to the first player in line at the other end of the grid. The active players then duel with an eye toward dribbling the ball through either of the goals on their opponent’s endline. The duel lasts as long as the ball stays in the grid, and players return to their group’s line and play again. The availability of multiple goals should encourage the use of the moves set practiced above. Give each team a point for every goal scored. Play for five minutes and then switch the ball supply to the other team and play again.
2v2 to 4 cone goals - 20x20 yard grid
This exercise is just an expansion of the above environment. Encourage players to use cuts and pull-backs to set up a pass to their partner and to open up the field.
3v3 to cone goals - 30x25 yard fields
Play a small-sided scrimmage without restrictions. Place small cone goals on the end lines and encourage the players to continue to practice the move set introduced in the session.
Training Session #4: Individual Defending.
Introduction
This session focuses on the individual player’s ability to close down and poke tackle an opponent.
1v1 to a cone/ball goal - 10x10 yard grids
Players work in pairs in 10x10 yard grids with two balls. Place one ball on top of a disc cone and give the other ball to one player. The attacker can start play anywhere on the perimeter of the grid. The attacker attempts to dribble the ball past the other player, who is the defender, and use her ball to knock the other ball off of the cone. Each time she does this, she earns a point. If the defender wins the ball, she must dribble to the perimeter of the grid and restart play and the roles change. Play for three minutes and check scores. It is important that the coach encourage the defender to come out and challenge the attacker and not just wait by the cone.
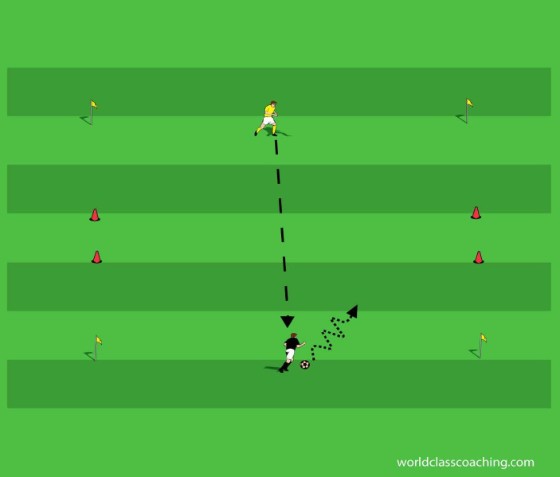
Review closing down and jockeying - 30x20 yard area
Players work in pairs with one soccer ball. Put one player with the ball on the endline and the other player starts twelve yards away (all groups should work at once and be lined up in similar fashion). At a signal from the coach, the partners without the ball make bent runs and “shut down” their partner with the ball. The partner with the ball begins to slowly dribble straight ahead, allowing the defender to practice jockeying. Do not allow either the attacker to dribble past the defender or the defender to tackle at this stage. When the players reach the far side of the grid, they change roles. Be sure to reinforce proper jockeying, changing footwork, and a focus on the ball in particular.
Fake tackle
The defender must work to force the attacker to focus on the ball and one way to keep the attacker from getting comfortable is to fake tackle. This is accomplished with a sharp step forward by the jockeying player, with a short transfer of weight to the front foot to simulate a tackling motion. The defender must be careful to do this when there is sufficient space between her and the defender so as not to jeopardize her ability to stay goal-side. Practice this action by requiring a fake tackle inside of the practice runs outlined above.
Poke Tackle - 12x12 yard grids
Remind players that there are three basic forms of tackle in soccer: Block, poke and slide. The block tackle has already been covered in an earlier session, and it is useful to begin by reminding players that block tackling requires contacting the ball simultaneously with the attacker and trapping the ball between two players. Therefore, it is often used in tight space. The poke tackle, by contrast, is set up differently and also more useful, in general, in more space.
Here are the cues for poke tackling:
• The approach (shutting down) and the use of jockeying to contain and control attackers is the same as with the block tackle.
• To poke tackle, defenders must look for a touch that moves the ball off of the foot of the attacker to a point where the defender can step in and literally “poke” the ball out of the attacker’s path.
• There is some debate as to which foot is the preferred one to use for the poke tackle. Out of the jockeying position, the front foot is easier to disguise and allows for easier recovery in case of a failed tackle, but it is also more likely to cause a foul, as it is closer to the attacker’s feet and a tangle often leads to a call against the defender. The rear foot, on the other hand, is more difficult to disguise and a miss will often put the defender in a wrong-foot position, facing up field (usually having lost goal-side position), but it is easier to avoid contact with the attacker using this foot. Most players use the front foot, but it is useful to point out both the advantages and disadvantages of using either foot to players learning the poke tackle.
Train on the poke tackle by having players set up in 12x12 grids. Put two players on one end (in line) and two on the other end. Give one group a supply of balls. The first player with a ball passes to the first player on the other end of the grid and then closes down jockies the attacker. For the first two minutes, have the attackers take a couple of short touches and then a longer touch to help set up the tackle. Once the tackle is made, the two players change ends and the other pair duel. Encourage the defenders to utilize fake tackles as well and to learn to feel the distance needed to both remain goalside and also apply pressure and make good tackles.
1v1 to a side flag goal - 10x10 yard grids
Organize players in groups of 4-6 per grid, with a ball supply at one end of the grid. Put an equal number of players in lines at each end of the grid. The lines are organized on opposite corners of the grid this time. Play is live as long as the ball remains inside the grid. The first player on the end where the balls are organized initiates re-starts by passing to the first player on the other end of the grid.
These duels teach players how to deal with a defender in limited space, changing speed and direction on the ball, jockeying and tackling skills and much more. The side flag goal can be used to introduce the idea of “goal side,” which is a reference to the need for the defender to stay between the ball and the goal. If the defender wins the ball, she still attempts to dribble out her opponent’s end of the grid for a point. For the attacker, she must now consider how to attack a more limited space and goal. After each duel, players change ends. Play for two minutes and check scores.
3v3 to cone goals - 25x30 yard fields
Continue the theme of playing small-sided games early in the training process. Play 3v3 to small endline goals. For the first five minutes, award a point for a good poke tackle and two points for a goal. If there are multiple games, rotate teams and implement tournament scoring (i.e. total points over all games played). Then simplify the rules to just grant a point for a goal and let the players play for the remainder of the session.
Training Session #5: Individual Attacking.
Introduction
Session#5 introduces speed moves that players can use to get in behind a defender. These moves are trained in isolation and then tested in game situations.
Alligator Alley - 20x20 grid
This is a fun warm-up game used to get players focused on 1v1 play. Select three “alligators” who enter the smaller, central grid (see diagram). These players do not have have soccer balls. Explain that the central grid is the “alley” and that the alligators are confined to this space. The rest of the players each have a ball and they spread out around the perimeter of the central grid.
The object of the game for the players with balls is to dribble across the alley as many times as possible without losing their ball to the alligators. Players earn one point for dribbling across the narrow length of the grid and three points for dribbling the longer length of the grid (see diagram). The alligators earn one point for each ball they kick out the grid. Players who lose their ball in the alley are not eliminated. They must sprint to get their ball and try again. Play for two minutes and then check scores. Ask players what the attackers have to do well to be successful in this game (see space; change directions and speeds; keep their ball close). Make the high scorers the new alligators and play a second game.
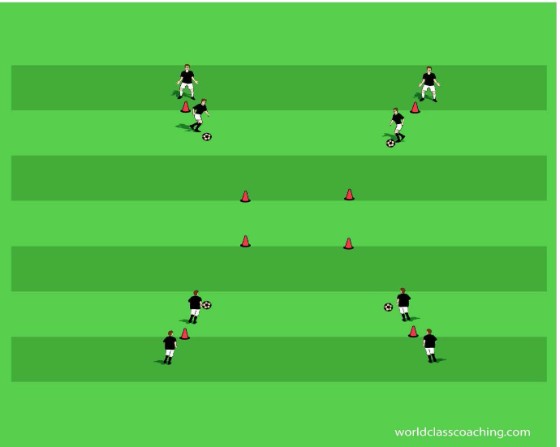
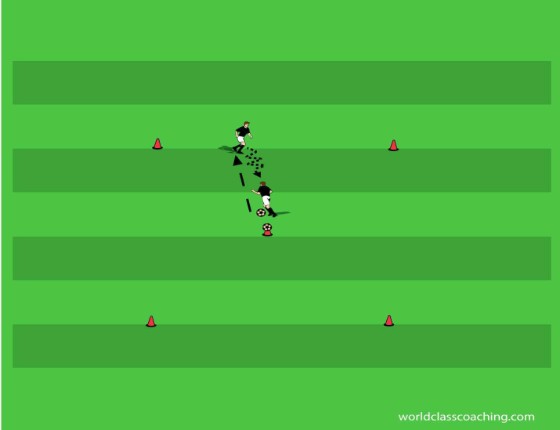
Speed moves - 30x30 yard area
Players work in fours, with each player needing a soccer ball. Place two cones ten yards apart and start the players in two lines on either side of one of the cones (the lines face the other cone – see diagram). Explain that the moves in this set are designed to be used as speed moves and this environment will allow them to train both the moves and also performing the moves at speed. In the first phase, two players work at once (one from each line and on opposite sides of the cones). The players work on performing the moves and then sharply changing speed to get out of the grid, all without defensive pressure.
Here is the move set:
• High wave. This move is simple to perform in that the ball is not affected by the fake and the quality of the move is dependent only on the quality of the leg fake. The player dribbles between the cones and at the mid-way point, pushes the ball forward with the away foot and then lifts that foot as if to step on the ball, but then quickly explodes forward past the far cone. The idea here is that the movement to step on the ball must be convincing so that the defender pauses, allowing the attacker to pull away with a burst of speed. Players should practice one foot and then the other as they move back to the start point.
• Step- on and go. This move is similar to the high wave except that the attacker actually does step on the ball with away foot. Then, in quick succession, the player quickly pulls the foot back behind the ball and explodes forward. Once again, the rationale is that stepping on the ball will momentarily freeze the defender, allowing the attacker to break away. As with the high wave, players should practice the move with the away foot moving across the grid and then change the step-on foot on the way back to the starting point.
• Double cut. Here the attacker dribbles half-way to the far cone before cutting the ball with the inside of the foot, and after rotating the hips and shoulders and taking a step, the attacker cuts the ball with the inside of the foot again and accelerates to the far cone. This move is designed to get the defender to react to the first cut and then lose her with the second cut. It is important to note that this move can be performed both facing the defender and facing away from the defender.
• Behind the heel cut. This move is similar to an inside of the foot cut. The attacker pushes the ball into the grid and at the midpoint between cones, turns hips and shoulders to face the defender (use the other working player as the defender in this case). Then the attacker plants the trailing foot behind the ball but far enough forward so that the ball can pass behind it. It is critical that the trailing (plant) foot be pointed at the defender, as this maximizes the fake. The lead foot then reaches around the ball and using the inside surface, pulls the ball behind the standing foot. Then the player accelerates back to the starting point in the grid. This move is best when it is well “sold.” The lead foot should be raised heel first to accentuate its movement and create the impression that the ball will be kicked before the pull behind the standing foot is made. Players need to practice this move a great deal to make it effective, but it is very useful as the ball is not exposed to the defender during the cut. The pairs should work on the move using one foot for three minutes and then change sides so that they can train the other foot.
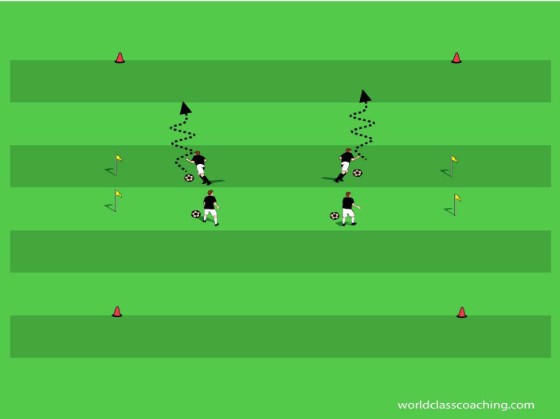
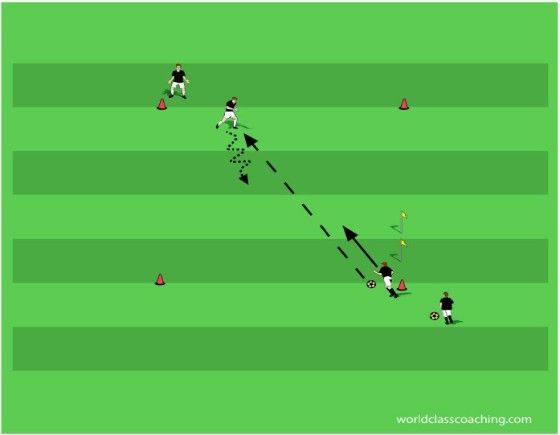
Mirrors speed moves - 30x30 yard area
Using the same set-up, now allow the players to practice the move set with light pressure. Players line up as before, but now only one player has a ball (her partner is on the other side of the cones without a ball). The player with the ball dribbles forward between the cones. The player without the ball shadows her movements. The players must remain on their own side of the cone line (no tackling) and the object for the attacker is to use the speed move set to wrong-foot the defender and then run past either cone before the defender can get to that same cone.
After the duel is done, the resting pair play and the players alternate roles. Encourage players to be creative and to combine the speed moves to wear down and defeat the defender. The attackers earn a point only if they dribble beyond the cone before the defender can race beyond that same cone. The defender must mirror the attacker’s movements until the attacker decides to make a run to get beyond either cone. Play for five minutes and check scores.
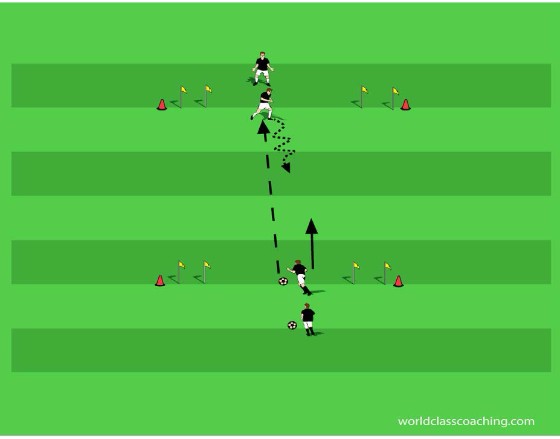
1v1 speed duels - 10x20 yard grids
Players begin on opposite sides of the grid as pictured. The defender passes to the attacker and the attacker tries to dribble through either end goal. Encourage players to experiment with speed moves in the wide grid. If the defender wins the ball, she tries to score in the same fashion. Play until the ball leaves the grid and then change roles.
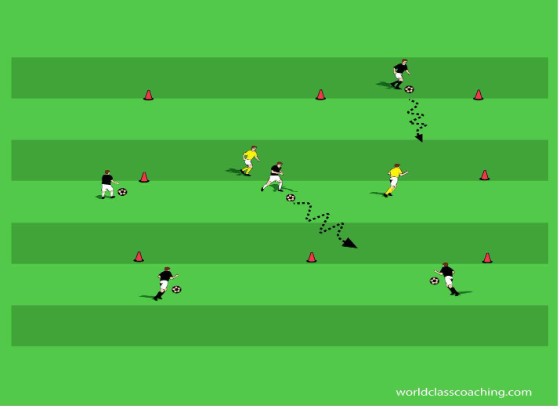
4 goal soccer - 30x35 yard fields Play 3v3 four-goal soccer.
Place goals on the end lines near the corners of a 30x35 yard field. This area is big for the numbers and the placement of goals in the corners will create situations where the attackers will need to run the ball forward and use speed moves to beat opponents. Encourage players to use the moves by awarding one point for a sharp speed move and two points for a goal. After ten minutes, remove the reward for the moves and just give one point per goal. If there are multiple games, play in a tournament (i.e. total points), rotating the teams through several games. At the end of the session, check to see which team compiled the most points.

