During the month of June I highlighted my four favorite 1 v 1 training methods. In July I'll thought I'd go through the progression I use for shooting. The exercises are normally part of a complete session but are shown here on their own to focus on them.
The first time I work on shooting with a team I start with a static exercise to see what their technique looks like. It is also a good teaching tool for younger or less experienced player.
The complex my club uses for practice has a lot of teaching advantages. One of which is a fence or wall at the end of each field that are great for working on shooting and passing technique. I have the players place their ball on the end line and take shoots into the fence or wall. For the first few minutes I just watch and see how the players do without any instruction.
There three things that I'm looking for specifically: Where is their plant foot in relation to the line/ball, Are they locking their ankle with the toes down and are the players following through the ball and landing on their shooting foot. The line makes it easy to see if the players are planting too far away from the ball. It also provides a great visual reference for the players.
Using this method allows all of the players to shoot at the same time while I move up and down the line coaching those that help. Making sure that the players understand the key factors involved with shooting ensures that they'll get the most out of the subsequent drills, exercises and small-sided games. It's also a good warm-up for the rest of the session. I'll generally use this to start the first two or three shooting sessions depending on the age and ability level of the players.
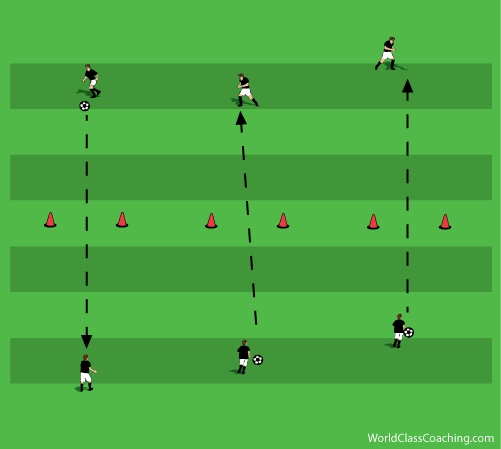
In the next phase of training I teach the players a game called, 'Wall Ball'. Originally, the game was played indoor and looks a lot like racquetball. Outdoor the game is more like tennis with one player on each side of a cone 'goal'. The rules of the game start out very simple and become more complex as the players become more proficient.
To begin with the only rules are that the players shoot the ball back and forth between the cone goal. If a player misses wide or hits the ball above the other players head, a point is awarded to the other player. If a shot passes between the cones and below the players' heads and goes past the receiving player then the shooter receives a point. The fact that it's a game engages the players but my focus is on how they are striking the ball.
At the end of two minutes the winning player moves up one goal (except in the final goal) and the player who lost moves down one goal (except for at the first goal). The object is to move up through each level to eventually reach the final.
They can take as many touches as they like to set up their shot and are encouraged to hit a still ball initially. I add rules to focus the players on a
certain aspect of technique. The first rule is that the ball must be struck with the laces. Any time the ball is struck with the toe or inside of the foot, the other player receives a point. This encourages the players to focus on how their opponent is striking the ball so that they can claim a point if the opponent makes a mistake. It also focuses the players on their own technique because they doen't want to loose a point.
Other Rules Include:
- You must land on your shooting foot after each shot
- The ball must be moving when you strike it
- You are only allowed two touches, one to settle and one to shoot
- After your first two you have two seconds (one-one thousand, two-one thousand) to take your shot
This exercise is really more about ball striking than actually shooting and finishing on goal but it provides the foundation for every other shooting and finishing session you will do with a team.
How do you provide your players with an understanding of the basic ball striking and shooting techniques? Please leave your ideas in the comments for other coaches to learn from.


