By Sean Pearson
Area Size: 2 x 18 yard area with 5 yard neutral zones
Teams: 6 v 6 (+ 4)
Time: 20 Minutes
Objectives
- To get the ball out wide as quickly and as often as possible
- Decide which cross is best for the situation
- For the attacking team to make positive attacking runs to disorientate the defense
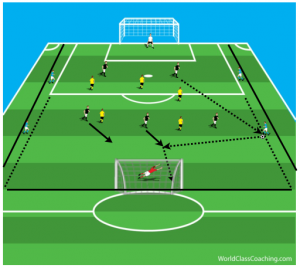
This session focuses on 3 types of crosses, why to use them and when. The first one is if a defense is high and there is space behind them and in front of the GK. To facilitate this you can set up a halfway line in which the two teams can’t cross until the ball has gone wide to the neutral. Each team aims to pass the ball to the neutral furthest up the field when they are attacking.
The first cross we will look at is when the defense is high we cross the ball on the ground into the space for the attacking team to run onto, often the pass will have to beat a defender first. We play the pass on the ground because it is easier for the attackers to control and the crosser does not have to lift the ball over anybody. As the attacker arrives they can either control and shoot or shoot first time.
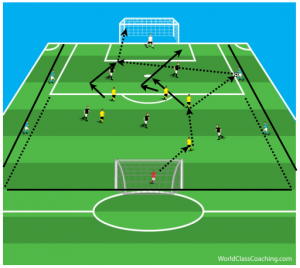
The second cross we will look at is when there is no space behind the defense and bodies populate the 18 yard area. Here the crosser has to lift the ball and aim for and attackers head. Below you can see two attackers making runs away from defenders and then towards goal. This is so they do not run in straight lines and are easier to mark, this helps the attacker come out of the defender’s vision. If the defender continues to look at them, then they lose sight of the ball, so the attacker has an advantage. The crosser picks out a player, who attacks the ball. The 3rd attacker moves to the penalty spot if the ball drops in that area they are ready to attack it.
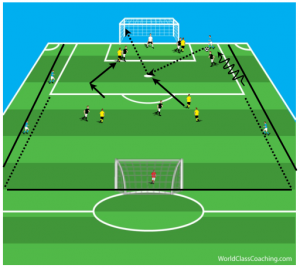
Lastly we will look at a pullback cross. Encourage your wingers when they receive the ball now they must dribble with it to the end line and they are allowed to enter the middle area of the field. If no-one defends this run allow them to shoot. Eventually defenders will have to press the runner. At the same time have the central attacker run across the face of the goal to take a defender away from the middle. Likewise with the back post, have them take another player away with their run. This leaves an open space in the middle of the goal, the 3rd attacker should arrive as the winger reaches the end line and is pressed by the defenders. The reason we know pull the ball back is because the 6 yard area is too congested and with the runs made from other players it has opened up the middle of the field for the arriving attacker to score.
Coaching Points
- Get the ball to the wingers as fast and as often as possible
- Wingers need to identify which option is best to give the attackers the best scoring chance
- Attackers need to understand what their role is on any given situation to allow themselves or a teammate to score – when to make runs, how and when.
Variations
- Put an offside line in or play offside for everyone including the wingers
- Have to score with a one time attempt
- Defenders can tackle the winger in the wide zone.
By Sean Pearson. Sean is also the author Coaching Team Shape in the 3-3-1, Coaching Team Shape in the 4-2-3-1 and Coaching Team Shape in the 4-3-3

