WORLD CLASS COACHING
Club Curriculum U9/10 Season
By Tony Englund
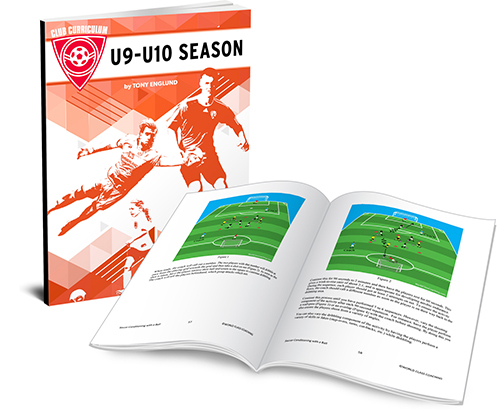
TABLE OF CONTENTS
Part Two
TECHNICAL SESSIONS
Training Session #1: Comfort on the ball.
Introduction: The first two training sessions in the U9-U10 curriculum focus on maximizing touches on the ball for players while also creating a fun environment in which to gain more confidence on the ball. This session features fun games and also introduces both a foundation set of touches that should be performed on a frequent basis and the basic 1v1 duel, which is critical to the success of young players and teams in particular.
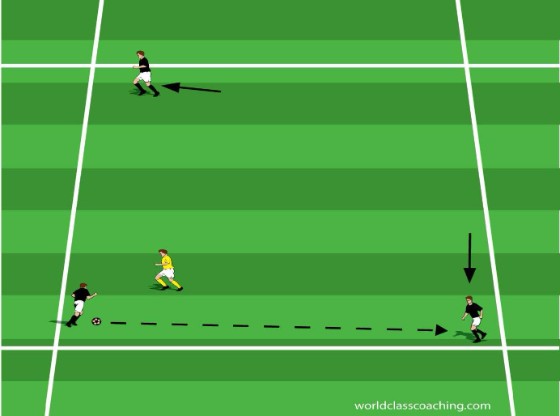
Hospital Tag - 15x15 yard grid
Each player has a ball. Players spread out around the grid. The purpose of this exercise is to dribble the ball around the area, trying to tag other players while avoiding being tagged. Demonstrate that when one is tagged, one must cover the “wound” with one hand. When one is tagged a second time, one must cover both wounds, and one is no longer able to tag other players. Upon being tagged a third time, a player must dribble her ball to the perimeter of the grid (the “hospital”) and complete six stationery dribbling touches. The player is then clear (“healed”) to re-enter play. Explain that players may only tag others on their back, shoulders, arms or legs. This is a fun warm-up game that improves dribbling skills, agility and awareness. Play for four minutes.
Foundation - 15x15 yard grid
Each player has a ball. Players find space in the grid. This series of touches and dribbling exercises is designed to give players intensive touch work with both feet and all surfaces. Each stationery exercise should be performed for twenty seconds and each moving exercise should be performed for thirty seconds. If players begin to master the exercises, encourage them to work at maximum speed and to get their eyes up off of their ball as they work. Although the sequence appears lengthy here in print, the foundation touches and dribbling only require about five minutes to complete and should become a regular feature of training at this age level.
• dribble in place. Players push the ball back-and-forth between the balls of their feet, with the focus being on both consistent and quick touches.
• no-touch dribbling. Players dribble around the area with the goal of moving quickly, but also avoiding any contact with other players or their soccer balls.
• touches on top of the ball. Players work on the balls of their feet, alternating the foot that they use to tap on top of the ball. Encourage players to make light, consistent taps and to avoid moving the ball.
• inside/outside dribbling. Players use a single foot (left for fifteen seconds and then right for fifteen seconds) to dribble around the area. Require players to alternate between the inside and outside of the foot with each touch. Another useful tip here is for players to push the ball in a zig-zag fashion, emphasizing side-to-side movement (as opposed to forward) of both the ball and their bodies.
• pendulum dribbling. Players dribble in place, in the process trying to reach their legs and feet out as far to each side as possible while still working to keep control. This exercise increases both touch and agility.
• one-touch per step dribbling. Players dribble around the area, taking one touch for each step as they move. It is easiest to start by dribbling in place for a few seconds and then push into the dribbling movement.
• laces. Players stand on one foot and tap the ball forward using their laces to contact the ball. As the ball moves forward, the player uses the bottom of the tapping foot to step on the ball and pull it back. Be sure to encourage players to lock the ankle on the tapping foot and to point their toes toward the ground to ensure that they get contact with their laces with each touch.
• change of speed dribbling. Players change speed with every fourth touch of the ball. Encourage players to sharply alter their speed, getting accustomed to both dribbling at high and then lower speeds.
• triangles. Players place the ball in front of one foot. Using the bottom surface of that foot, they pull the ball back and control the ball with the inside of the same foot. Then they tap the ball across to the inside of the other foot. Finally, the ball is passed back to the starting point and the sequence continues. Change the starting foot after twenty seconds.
• change of surface dribbling. Players dribble, changing surface with every touch. Explain that players can use the inside, the outside, the bottom and the laces surfaces of each foot.
• roll and step. Players place the ball inside of the right foot. Using the inside surface to keep pressure on the ball, players then drag the right foot over the ball, pulling the ball across their bodies. The ball is then released to travel across the front of the body as the player’s right foot crosses over in front of the standing foot. Finally, the player moves to the left and stops the ball with the inside of the left foot. Then the sequence continues in the opposite direction, beginning with the left foot learning to roll the ball.
• change of speed and surface dribbling. Here players learn to mix surfaces and speeds. Encourage the players to be creative and to use the entire range of foundation touches.
Stoplight dribbling - 15x15 yard grid
Each player has a ball. Players dribble around the area, listening for the coach to call out a color. “Red” indicates stop. “Green” indicates go. Yellow, for purposes of this game, is the call to speed up. Encourage the players to keep the ball very close throughout the exercise and to avoid contact with other players and their soccer balls. Reinforce the importance of using multiple surfaces as they play, and also their ability to change speed and stop sharply with each command. Play for two minutes.
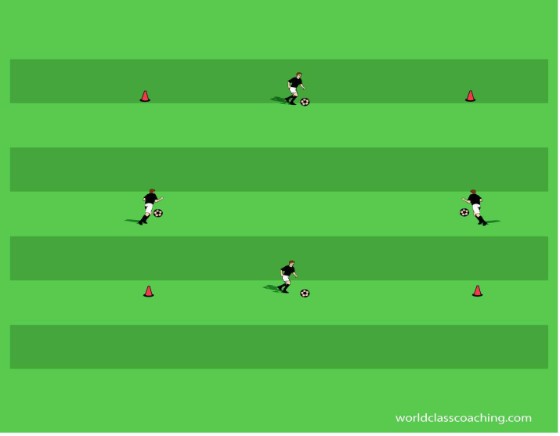
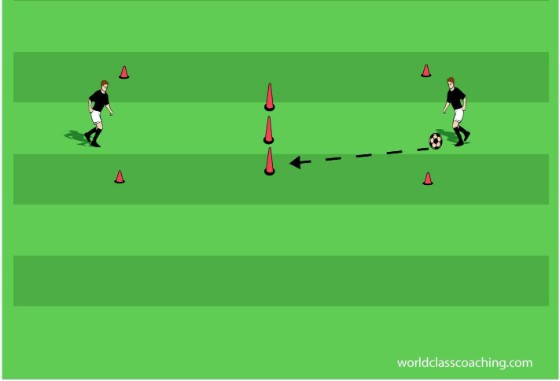
Basic moves in a square - 10x10 yard grids
Every player has a ball. Players each work on a side of the perimeter of a 10x10 yard grid. At a command from the coach, they work through the following sequence of basic moves on the ball. Note that players work on one side of the perimeter only (see diagram). Encourage players to stay on the perimeter line as they work and require that they alternate the foot used to perform each move as they reach the cone on each end.
• inside of the foot cuts. The player dribbles to the cut point, turns her hips and shoulders and takes the ball with the inside of the lead foot, pulling the ball across the body and returning to the edge of the grid. Players need to bend their legs as they perform the move and accelerate after performing the cut. Players should alternate the foot they use to cut the ball and advanced players should check their space (by looking over their shoulder while dribbling in toward the cut point) to be sure that the space is clear for the move.
• outside of the foot cuts. The players dribble to the cut point and turn hips and shoulders as above. The player then reaches past the ball with their lead foot, and then takes the ball with the outside of the trailing foot. As with inside cuts, the players need to check their space before the cut and accelerate after the cut to clear tight space. The most common error with outside of the foot cuts is that players fail to reach the lead foot past the ball, creating an unstable platform for the cut and also limiting the potential for the fake that can be created through quick movement with the cut foot. Rotate the cut foot.
• pull-back. As above, the players dribble to the inner cone. This time, they remained facing the cone. A pull-back is executed by placing one foot on top of the ball (reach the toes forward and down to increase control) and pivoting, pulling the pull-back side hip and shoulder back with the ball and turning before dribbling back to the start point. A pull-back must be preceded by a check of the space behind the attacker on the way into the grid and a sharp change of speed after the move is completed. Alternate the foot used to perform the pull-back.

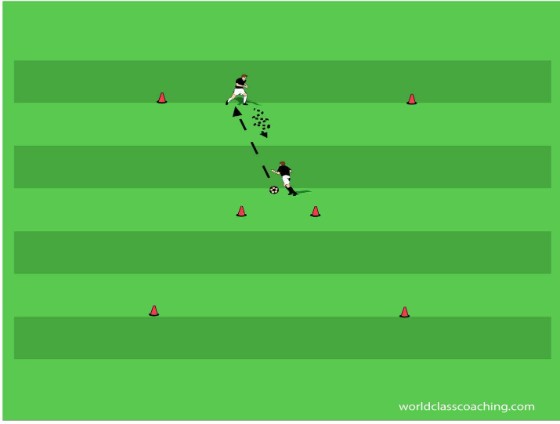
1 vs. 1 to three cone goals - 12x12 yard areas
Play 1 vs. 1 to three cone goals. The goals should be one yard wide and arranged in a triangle in the area. The two active players stand back-to-back in the center of the area with a ball trapped between their lower backs. At a signal from the coach, they allow the ball to hit the ground and then play, with the purpose of winning the ball and dribbling through any of the three goals. Once a player has dribbled through a goal, play stops and the next pair enters the triangle. Encourage players to change speeds and directions when they have the ball and to utilize the moves outlined above to create space. Players earn a point each time they win a duel. Play for ten minutes.
3 vs. 3 to cone goals - 20x20 yard fields
Play 3 vs. 3 to small cone goals. Encourage players to try the moves trained in the course of the session and also to utilize different surfaces and speeds in possession.
Training Session #2: Comfort on the ball.
Introduction: This is the second of the sessions which are designed around fun and learning confidence on the ball. This practice reviews the foundation touches introduced in the first session and also provides a series of fun games that introduce a bit of pressure into the notion of single player possession.
Dribbling Races around a grid - 12x12 yard grid
Put players in pairs and each person has a ball. Assign a cone to each of the pairs, and have one player (the resting player) place her ball on top of the cone. The resting players step back so that they are three yards away from the cone. The active players start next to their team’s cone with a ball. Explain that the goal of the game is to dribble around the perimeter of the grid and upon arriving back at their team’s cone, use their soccer ball to knock their partner’s ball off of the cone. All players dribble in the same direction. The first player to dribble all of the way around the grid and then knock the ball off of the cone wins, earning a point for their team.
Players then change roles.
Variations:
• dribble in the opposite direction.
• at each corner, the dribbling player must tap the ball around the inside of the standing ball/cone belonging to each of the other teams and then run around the outside of the cone to catch up with their ball. Run this race in both directions as well.
Foundation - 15x15 yard grid
Each player has a ball. Players find space in the grid. This series of touches and dribbling exercises is designed to give players intensive touch work with both feet and all surfaces. Each stationery exercise should be performed for twenty seconds and each moving exercise should be performed for thirty seconds. If players begin to master the exercises, encourage them to work at maximum speed and to get their eyes up off of their ball as they work. Although the sequence appears lengthy here in print, the foundation touches and dribbling only require about five minutes to complete and should become a regular feature of training at this age level.
• dribble in place. Players push the ball back-and-forth between the balls of their feet, with the focus being on both consistent and quick touches.
• no-touch dribbling. Players dribble around the area with the goal of moving quickly, but also avoiding any contact with other players or their soccer balls.
• touches on top of the ball. Players work on the balls of their feet, alternating the foot that they use to tap on top of the ball. Encourage players to make light, consistent taps and to avoid moving the ball.
• inside/outside dribbling. Players use a single foot (left for fifteen seconds and then right for fifteen seconds) to dribble around the area. Require players to alternate between the inside and outside of the foot with each touch. Another useful tip here is for players to push the ball in a zig-zag fashion, emphasizing side-to-side movement (as opposed to forward) of both the ball and their bodies.
• pendulum dribbling. Players dribble in place, in the process trying to reach their legs and feet out as far to each side as possible while still working to keep control. This exercise increases both touch and agility.
• one-touch per step dribbling. Players dribble around the area, taking one touch for each step as they move. It is easiest to start by dribbling in place for a few seconds and then push into the dribbling movement.
• laces. Players stand on one foot and tap the ball forward using their laces to contact the ball. As the ball moves forward, the player uses the bottom of the tapping foot to step on the ball and pull it back. Be sure to encourage players to lock the ankle on the tapping foot and to point their toes toward the ground to ensure that they get contact with their laces with each touch.
• change of speed dribbling. Players change speed with every fourth touch of the ball. Encourage players to sharply alter their speed, getting accustomed to both dribbling at high and then lower speeds.
• triangles. Players place the ball in front of one foot. Using the bottom surface of that foot, they pull the ball back and control the ball with the inside of the same foot. Then they tap the ball across to the inside of the other foot. Finally, the ball is passed back to the starting point and the sequence continues. Change the starting foot after twenty seconds.
• change of surface dribbling. Players dribble, changing surface with every touch. Explain that players can use the inside, the outside, the bottom and the laces surfaces of each foot.
• roll and step. Players place the ball inside of the right foot. Using the inside surface to keep pressure on the ball, players then drag the right foot over the ball, pulling the ball across their bodies. The ball is then released to travel across the front of the body as the player’s right foot crosses over in front of the standing foot. Finally, the player moves to the left and stops the ball with the inside of the left foot. Then the sequence continues in the opposite direction, beginning with the left foot learning to roll the ball.
• change of speed and surface dribbling. Here players learn to mix surfaces and speeds. Encourage the players to be creative and to use the entire range of foundation touches.
Awareness dribbling - 15x15 yard grid
Each player has a ball. Players dribble around the area with the following progressive restrictions.
• players point to open space and then dribble there as quickly as they can. Play for two minutes.
• players attempt to place the ball on the outside of the foot farthest away from another player as they get close to any of their teammates in the grid. Explain that this restriction is designed to put the ball where it will be difficult for an opponent to reach and tackle. Play for one minute.
• combine the two restrictions, asking players to put the ball on the away foot and then point to and dribble to open space.
Awareness tag dribbling - 15x15 yard grid
Each player has a ball. The goal of the exercise is to dribble around and tag other players on their backs. The only way the tag counts, however, is if the target player does not call out the color of the tagging player’s shirt before the tag is applied. Thus, this game will improve both dribbling skills and also awareness, as the players must pay careful attention to the space around them if they are to be successful. Play for two minutes and then check scores.
Knockout - 15x15 yard grid
This is a fun and challenging game that builds upon the awareness and shield-ing skills introduced in this session. Each player has a ball. Players dribble around the grid, protecting their ball and attempting to knock any of the other players’ balls out of the grid area. If their ball gets knocked out, the player must run after and retrieve their ball. Then they complete ten stationary dribbling touches and they are allowed to return to play (no elimination!). Play for three minutes.
3 vs. 3 to cone goals - 20x20 yard fields
Play 3 vs. 3 to small cone goals. Encourage players to try the moves trained
in the course of the session and also to utilize different surfaces and speeds in possession.
Training Session #3: Passing and receiving.
Introduction: Session #3 is the first of two consecutive sessions designed to introduce passing and receiving the ball. In addition to a base progression for teaching passing and receiving, the session also features several fun games that focus on passing the ball for accuracy. Coaches should pay careful attention to the technical details involved in each skill, as the habits formed in these exercises will serve players for the duration of their playing years.
Cue ball - 22x20 yard area
Place two distinctively-colored balls in the middle of the central grid. Divide the players into two teams and put each team in an end grid. Each player has a ball. Explain that the goal of the game is to pass one’s soccer ball in an attempt to hit the target balls, knocking them into the opponents’ end grid. Players must pass from their own zone and may only leave their zone to retrieve a ball. Players may use any ball. Players may use their pass defensively to strike a ball that is rolling toward their zone. If a target ball rolls into their zone, the defending team picks up the ball and runs it back to the middle of the central grid and play continues. Play for five minutes,using the time to assess players’ passing ability.
Pairs passing and receiving - 20x20 yard area
Line players up in pairs with one soccer ball along a line on the field. One player stands on the line while her partner stands four yards away and facing her.
First, review the key technical points for short passing:
• find a comfortable, yet locked position for the knee and ankle of the passing foot before striking the ball (i.e. use the hip as the point of rotation). This creates both power and consistency.
• the plant foot should face the target. This allows for more fluid motion and also more accurate passing.
• the striking surface is the long inside of the foot. The toes should be slightly elevated and the heel is lowered. This posture creates a better controlling surface.
• the striking point on the ball is the center back. Players should diagnose the missed strikes by watching the path and spin of the ball. If the ball hops off the ground, the striking point is too low. If the ball skids unevenly along the ground, then the player topped the ball, striking too high. Similarly, side spin on the ball indicates that the player struck inside or outside of center on the back of the ball.
• the follow-through is a critical component of accurate passing. Players must learn in this isolated technical work to “hold” their foot at the very end of the strike on the follow through. This hold reinforces a proper striking form and also the idea offollowing through with an eye toward pointing the striking foot at the target.
Players pass and receive with a focus on proper striking of the ball. Insist that players alternate the foot they use to pass the ball. Play for one minute. At this early point in the progression, encourage the players to stop the ball as they receive so that they are striking a standing ball.
Now review the key technical cues for receiving. It is useful to look at receiving as being the reverse of passing.
• as in passing, the ankle and knee are locked, although suppleness in receiving requires a softer posture than striking. The hips and shoulders must be “open” (facing) the ball as it arrives.
• begin with the follow-through used to strike the ball in passing. Here, one presents one’s foot in front of the body to “welcome” the ball.
• once again, the receiving foot must be presented as a low heel and elevated toes to allow for a surface that will prevent the ball from bouncing.
• as the ball is received, players must learn to cushion it and take speed out of the ball without actually stopping it (see cue #5).
• in good soccer, it is said, the ball never stops. Ideally, the ball must be prepared for release in a single touch. If players stop the ball between their feet, they will need two more touches to release the ball, allowing defenders time to close and tackle. Therefore, players must learn to use their first touch to push the ball forward and outside of their hips and shoulders so that the next touch can be a pass if needed. This is done by sharply turning the hips in particular at the moment of reception. This change of angle allows players to avoid pressure and eventually prepare the ball in the direction they are planning to play.
Players return to passing with their partner. Observe their ability to maintain good technical form in both passing and receiving. Play for two minutes, emphasizing that all players need to alternate the foot they use both for passing and receiving.
Bowling! - 5x14 yard grids
Players work in pairs with one soccer ball. This activity is a very useful way to get players to focus on accuracy and quality in their passing. Place three tall cones at the center of each grid (“alley”). Players stand on either end of the alley. They alternate passing the ball to each other, attempting to knock down the cones. If one player knocks down two cones, they win the game and they stand up the cones and play resumes. Adjust the length of the alley to be both challenging and also to assure success for each pair. Play for three minutes and then compel the players to play with their off foot. After playing one round, players change partners and play again.
Alligator Alley - 5x20 yard area
Select 2-3 players to serve as “alligators.” These players stand (without soccer balls) in the long, narrow grid. Explain that the alligators may not leave the “alley” during the game, and they each earn a point for each pass they intercept in the course of play. Give ½ of the remaining players soccer balls and place half of the players outside of each of the long sides of the alley. The players on the outside attempt to pass the ball across the alley to any player on the other side. They earn a point for every successful pass they make across the alley. There is no penalty for a pass intercepted by the alligators.
When the alligators pick off a pass, they step on the ball to verify possession and then return the ball to any player on the outside. Outside players can enter the grid to retrieve a ball (and prevent the alligators from establishing possession) but only receive points for passes played from the perimeter. Play for three minutes and then rotate the alligators, playing sufficient rounds of the game to allow all players to serve in the alley. Players keep their score throughout the games. Compare scores at the end of the exercise.
3 vs. 3 scrimmages - 20x20 yard areas
Play a standard 3 vs. 3 scrimmage to small cone goals. Require a pass each time a team gains possession before a goal can be scored. After five minutes, remove the restriction and allow open play, still complimenting the players when they make a good pass.
Training Session #4: Passing and receiving.
Introduction: This is the second of the two sessions designed to introduce passing and receiving to young players. In addition to reviewing the basic foundation of technical passing and receiving, this session introduces fun games that continue to challenge players to be accurate and also to think about the weight of their pass. Finally, this practice also introduces a tactical element (3 vs. 1 passing) that compels players to begin to think about the decisions they make with every pass and also how to run off of the ball to receive a pass.
Keep your yard clean - ½ field
Divide the area in half with a cone line. Each player has a ball. Create two equal teams and put one team in each half of the area. Explain that the purpose of the game is to keep as many balls as possible in the other team’s area. Thus the two teams work to pass balls out of their area and into their opponents’ area. Play for two minutes and then check the score. Then instruct players to think about the importance of passing the ball to areas where there are no opponents and/or where it will be difficult to play a speedy return pass. Play a second game for two minutes and check scores.
Marbles - ½ field
Players work in pairs. Each player has a soccer ball. Demonstrate with one pair. Players start ten yards apart. One partner passes her ball in an effort to hit her partner’s ball. If she is unsuccessful, her partner passes her ball with the same intent once the first pass has rolled to a stop. When a player is successful in striking their partner’s ball, the two players re-create the ten yard distance and play is restarted. Players continue to alternate passing turns for five minutes, earning a point with each successful strike.
Check scores at the conclusion of the exercise.
Pairs passing and receiving 20x20 yard area
Line players up in pairs with one soccer ball along a line on the field. One player stands on the line while her partner stands four yards away and facing her.
First, review the key technical points for short passing:
• find a comfortable, yet locked position for the knee and ankle of the passing foot before striking the ball (i.e. use the hip as the point of rotation). This creates both power and consistency.
• the plant foot should face the target. This allows for more fluid motion and also more accurate passing.
• the striking surface is the long inside of the foot. The toes should be slightly elevated and the heel is lowered. This posture creates a better controlling surface.
• the striking point on the ball is the center back. Players should diagnose the missed strikes by watching the path and spin of the ball. If the ball hops off the ground, the striking point is too low. If the ball skids unevenly along the ground, then the player topped the ball, striking too high. Similarly, side spin on the ball indicates that the player struck inside or outside of center on the back of the ball.
• the follow-through is a critical component of accurate passing. Players must learn in this isolated technical work to “hold” their foot at the very end of the strike on the follow through. This hold reinforces a proper striking form and also the idea of following through with an eye toward pointing the striking foot at the target.
Players pass and receive with a focus on proper striking of the ball. Insist that players alternate the foot they use to pass the ball. Play for one minute. At this early point in the progression, encourage the players to stop the ball as they receive so that they are striking a standing ball.
Now review the key technical cues for receiving. It is useful to look at receiving as being the reverse of passing.
• as in passing, the ankle and knee are locked, although suppleness in receiving requires a softer posture than striking. The hips and shoulders must be “open” (facing) the ball as it arrives.
• begin with the follow-through used to strike the ball in passing. Here, one presents one’s foot in front of the body to “welcome” the ball.
• once again, the receiving foot must be presented as a low heel and elevated toes to allow for a surface that will prevent the ball from bouncing.
• as the ball is received, players must learn to cushion it and take speed out of the ball without actually stopping it (see cue #5).
• in good soccer, it is said, the ball never stops. Ideally, the ball must be prepared for release in a single touch. If players stop the ball between their feet, they will need two more touches to release the ball, allowing defenders time to close and tackle. Therefore, players must learn to use their first touch to push the ball forward and outside of their hips and shoulders so that the next touch can be a pass if needed. This is done by sharply turning the hips in particular at the moment of reception. This change of angle allows players to avoid pressure and eventually prepare the ball in the direction they are planning to play.
Players return to passing with their partner. Observe their ability to maintain good technical form in both passing and receiving. Play for two minutes, emphasizing that all players need to alternate the foot they use both for passing and receiving.
Two-touch contest - Touchline area
Players work in pairs with one soccer ball. One player stands just outside the touchline and her partner stands on the other side of a cone line laid four yards inside the touchline. The pairs work on two-touch passing for thirty seconds. For less experienced players, they may stop the ball with their first touch and pass with their second touch. For more advanced training, the players should focus on receiving the ball with the inside ofone foot (the ball is kept moving) and playing the ball across the body with the first touch to play a pass with the other foot on their second touch. Once the pairs develop some rhythm, stop the exercise and initiate a contest. The pairs count their passes for thirty seconds and check scores.
One-touch contest - Touchline area.
The set-up and sequence are the same as above, except that players play with one touch when possible. Players must alternate the playing foot with each touch.
3v1 passing in a grid - 12x12 yard grids
Build grids so that there are enough to place groups of four with one soccer ball. Start with players on three of the corner cones and one player, the defender, in the middle. Demonstrate with one group. Explain that in this environment, players must pass only to the corner cones and that all passes must travel along the perimeter of the grid. Similarly, the attackers may only move along the perimeter of the grid. The defender may move freely within the area of the grid. Start the ball in a corner with one of the attackers.
Show that the attacker must always have two passing options available by moving the attackers not in possession to the adjacent corners of the grid. Begin the exercise by having the defender work at ½ speed so that the attackers get a rhythm and lots of repetition. If the defender wins the ball, have her return it to any of the attacking players. Rotate the defender every minute. After every player has taken a turn at the defender role, play through again, this time with the defender playing full speed after the first pass. Once again, if the defender wins the ball, she should return it to one of the perimeter players to restart play. This exercise is useful both to give some technical pressure to both passing and receiving, and also to begin the tactical building blocks of movement off of the ball and creating useful passing angles.
3v3 game to cone goals - 20x25 yard fields
Play 3v3 games. For the first five minutes require teams in possession to complete two consecutive passes before they can score. Then remove the restriction and let the players play.
Training Session #5: Individual Attacking.
Introduction: Session#5 challenges players to begin to think about dueling with another player to gain a better position on the field. Through the introduction of basic moves to beat opponents and release pressure, and the use of several environments that encourage players to take on an opponent, players will learn to understand the dynamics of using moves and changes of speed and direction under pressure to defeat a single opponent.
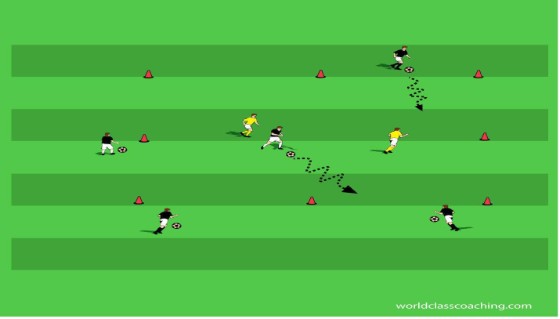
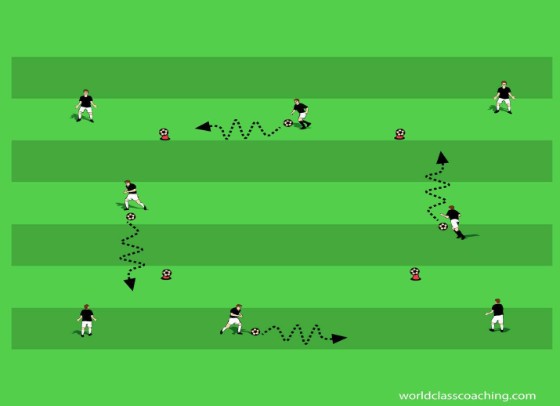
Alligator Alley - 20x20 grid
This is a fun warm-up game used to get players focused on 1v1 play. Select three“alligators” who enter the smaller, central grid (see diagram). These players do not have soccer balls. Explain that the central grid is the “alley” and that the alligators are confined to this space. The rest of the players each have a ball and they spread out around the perimeter of the central grid. The object of the game for the players with balls is to dribble across the alley as many times as possible without losing their ball to the alligators.
Players earn one point for dribbling across the narrow length of the grid and three points for dribbling the longer length of the grid (see diagram). The alligators earn one point for each ball they kick out the grid. Players who lose their ball in the alley are not eliminated. They must sprint to get their ball and try again. Play for two minutes and then check scores. Ask players what the attackers have to do well to be successful in this game (see space; change directions and speeds; keep their ball close). Make the high scorers the new alligators and play a second game.
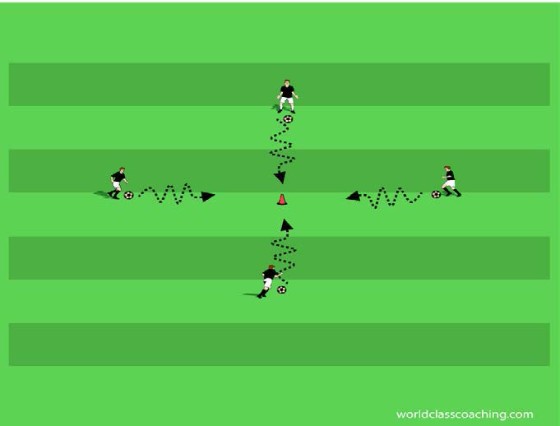
Cut Circles - ¼ field
Put players in groups of 4-6. Each player has a ball and they form a circle, each player facing toward the center of the circle. Appoint a leader for each group. The leader makes sure that all players have returned to their starting point before restarting the exercise. Players dribble (all at once) toward the center of the circle and then perform the moves outlined below before returning to their starting point. Each time the players perform the moves, they should alternate the foot that they use. Emphasize close control of the ball and a sharp change in speed after players perform the moves.
• he inside of the lead foot, pulling the ball across the body and returning to the edge of the grid. Players need to bend their legs as they perform the move and accelerate after performing the cut. Players should alternate the foot they use to cut the ball and advanced players should check their space (by looking over their shoulder while dribbling in toward the cut point) to be sure that the space is clear for the move.
• outside of the foot cuts. The players dribble to the cut point and turn hips and shoulders as above. The player then reaches past the ball with their lead foot, and then takes the ball with the outside of the trailing foot. As with inside cuts, the players need to check their space before the cut and accelerate after the cut to clear tight space. The most common error with outside of the foot cuts is that players fail to reach the lead foot past the ball, creating an unstable platform for the cut and also limiting the potential for the fake that can be created through quick movement with the cut foot. Rotate the cut foot.
• pull-back. As above, the players dribble to the inner cone. This time, they remained facing the cone. A pull-back is executed by placing one foot on top of the ball (reach the toes forward and down to increase control) and pivoting, pulling the pull-back side hip and shoulder back with the ball and turning before dribbling back to the start point. A pull-back must be preceded by a check of the space behind the attacker on the way into the grid and a sharp change of speed after the move is completed. Alternate the foot used to perform the pull-back.
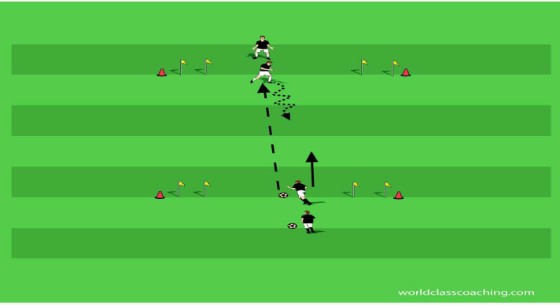
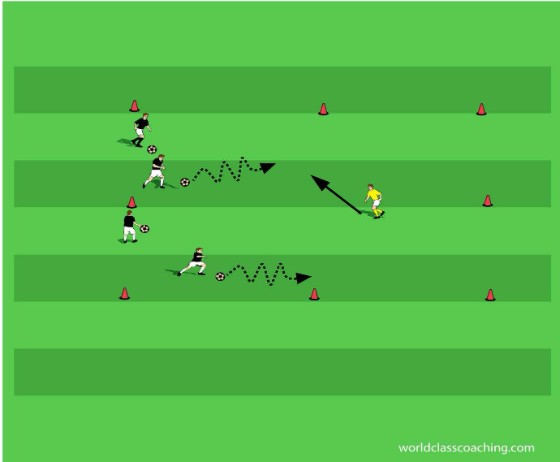
1v1 to 4 cone goals - 20x20 yard grid
The above move set is designed to be both simple to learn and also to give players a means to changing directions to create space. Often these moves do not eliminate opponents, but they allow a player to move in a new direction and reset their options. This game allows players to practice the move set under pressure, and the players will find that when followed by a sharp change of speed, the moves in this set can help them eliminate a single opponent as well.
Divide the team into two groups and line them up at opposite ends of the grid. Provide a ball supply for one group. The first player in line with a ball begins the duel by passing to the first player in line at the other end of the grid. The active players then duel with an eye toward dribbling the ball through either of the goals on their opponent’s end line. The duel lasts as long as the ball stays in the grid, and players return to their group’s line and play again. The availability of multiple goals should encourage the use of the moves set practiced above. Give each team a point for every goal scored. Play for five minutes and then switch the ball supply to the other team and play again.
Numbered duels - 20x20 yard grid
Split the group into two teams. Number each player so that there are identical numbers on each team. Place each team on an endline and create a cone goal on each end line as well. The coach is positioned at the side of the grid with a ball supply. When the coach calls a player’s number and plays a ball into the grid, the duel begins. Players attempt to beat their opponent and score through the end line goal. Keep track of the score and encourage players to use the moves set outlined above to create an advantage in their attacking. The coach can expand the game by calling multiple numbers for each duel.
3v3 to cone goals - 30x25 yard fields
Play a small-sided scrimmage without restrictions. Place small cone goals on the endlines and encourage the players to continue to practice the move set introduced in the session.
Training Session #6: Individual Defending.
Introduction: This session introduces young players to basic defending concepts, including controlling an attacker through jockeying and also use of a block tackle to take the ball off of an attacker. The understanding of these concepts is then tested in dueling and playing environments. Encourage players to be both aggressive and technically-sound in their defending.
Knee tag - ¼ field
Players work in pairs (no soccer balls). This is a fun warm-up game that also highlights the posture and footwork essential to quality jockeying, a building block for defending. Partners stand arms’ length away. Demonstrate with one group. Explain that the goal of the game is to tag one’s partner on the knee as many times as possible during play. At the same time, one tries not to allow one’s partner to tag her knees. Play for thirty seconds and then check scores and change partners.
Coaching cues for the second round:
• players must adopt a crouched stance.
• to be able to move quickly, keep the weight on the front half of one’s feet.
• players should neither run away nor stand still, but rather constantly shift their feet to make it difficult for their partner to tag their knees.
• in the second and later rounds, compel players to alternate the knee that they tag on their partners. This restriction will create an advantage for players who adopt the closed stance that is central to proper jockeying.
• demonstrate the utility of faking to jump to tag, which will also be useful in duels for the ball.
Play four games, checking scores and changing partners with each restart.
Jockey - 20x20 yard grid
Begin a progression to introduce the basic concepts involved in individual defending.
Players work in pairs along the endline of the grid with one ball for two people. The attacker is on the endline with the defender two yards away and facing the ball and the attacker. Explain that the ultimate goal of the session is to create opportunities to win the ball back. Footwork is critical to setting up tackles. Jockeying is the footwork used to set up the tackle. The attacking player will dribble slowly across the grid allowing the defending player to practice drop-stepping to stay goal-side (that is, between the ball and the endline). Emphasize that the attacking player is not trying to beat the defender at this point and the defender may not tackle. Here are more concepts to introduce into this exercise as the players get comfortable.
• the defender must learn to only “show” one foot to the attacker. That is, the foot work here is staggered and a drop-step is employed to remain in good tackling position. This will help drive the attacker to one side and make play more predictable and also prevent the attacker from playing the ball between the defender’s legs.
• the defender’s attention must be on the ball. Most fakes used by attackers involve body swerves or foot movements that do not affect the path of the ball. Defenders must learn to focus on the ball.
• defenders should adopt a semi-crouched approach to the ball. Standing upright slows reaction time and the bent approach increases focus as well.
• can the defender channel the attacker to one side only? Attackers are taught to cross the defender by attacking their lead foot, so defenders work to contain the ball and player and avoid being crossed. If they do get crossed, defenders must learn to switch their footwork to try to contain the ball on the other side.
• finally, pay careful attention to the spacing between the attacker and the defender. This is the most critical concept in jockeying. If the defender gets too close, the attacker can touch the ball beyond the defender and win the duel. If the defender is too far away, the attacker can look up and assess options (i.e. not enough pressure is being applied). A balance must be maintained.
Block tackle - 20x20 yard grid
There are three types of tackle in soccer: Block, poke, and slide. Block tackling will be
introduced here and slide tackling will be dealt with at a later date. Demonstrate using two players with a ball between them.
Here are the basic cues for block tackling:
• this tackle is typically used in tight space where it is possible to catch the ball on the foot of the attacker.If the attacker is about to use her right foot to touch the ball, the defender must be faced up on the attacker and she should use her right foot to effect the tackle.
• the tackle is made by trapping the ball between the attacker’s foot and the defender’s foot. The ankle of the tackling players must be locked (both to control the ball and also to avoid injury). In addition, the surface used to tackle is the inside, long surface of the foot. The heel should be just above the ground and the front of the foot needs to be held higher. This will prevent the ball rolling over the tackling foot.
• the other cues for a sound tackle include: The distance between the tackling and standing foot should be smaller than the ball so that the ball cannot be pushed between the feet in the course of the tackle; the knee of the tackling foot should be pushed slightly forward. This will help trap the ball between the two feet of the tackler and the attacker and will prevent the ball from popping up in the air.
• the final instruction is to “stay in the tackle.” The most common mistake in block tackling is that the defender walks through the tackle. It is critical that the tackler remain goal-side of both the attacker and the ball until the tackle is won.
Have players practice block tackling in pairs in a grid. The ball is placed between the players and one player says, “Go!”. The players then work to take a plant step and tackle. There is a tendency to swing the tackling foot at the ball and make a popping sound. However, swinging at the ball can create timing problems and will make it hard to disguise the tackle. The tackler should make a sharp, but controlled stab at the ball. The pairs should train the right foot for a minute and then the left foot for a minute.
Controlled block tackle - 20x20 yard grid
Give one-half of the players a ball. Players with balls dribble around the grid and thosewithout a ball practice block tackling. Each time, the player with the ball walks through the tackle, allowing the defender to win the ball. Then the player who lost ball wins a ball off of another player. Play for two minutes, reminding players of the basic tenets of good tackling as outlined above.
1v1 to a central cone goal - 12x10 yard grids
Players work in pairs in 10x10 yard grids with a 2-yard central cone goal. Demonstrate with one pair. The attacking player starts on any part of the perimeter of the grid. She may score by dribbling through the central goal from either direction. Show the defender how to work to remain goal-side (between the attacker and the goal) of the attacker at all times and then remind the defender that her goal is to jockey and then block tackle the attacker. If the attacker scores, she give the ball to her partner, who restarts play from the perimeter. If the defender wins the ball, she must dribble to the perimeter then roles change and play restarts. Play for three minutes and then check scores. Assign new partners/grids and play a second and third round.
3v3 to goals - 20x25 yard fields
Play a standard 3v3 game to cone goals. Reinforce strong individual defending by awarding a point for a strong tackle and two points for a goal. After five minutes, just award a point for a goal and let the players play.
Training Session #7: Individual Defending
Introduction: Session#7 in the U9-U10 curriculum continues the theme of introducing and refining individual defending concepts. This session features the introduction of the poke tackle and a series of fun 1v1 environments in which players learn to control the attackers’ options and set up the tackle.
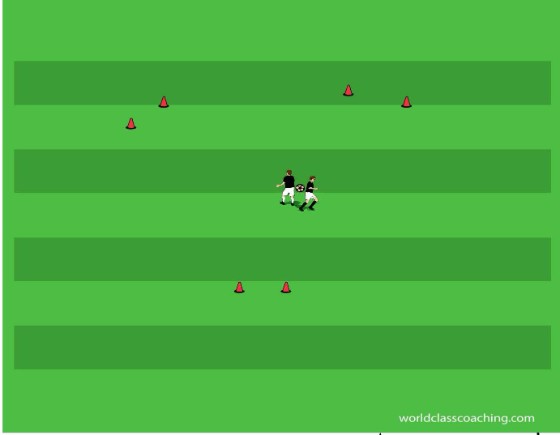
1v1 to 3 cone goals - 15x15 yard areas
Players work in pairs with three small cone goals set up in a triangular shape around thearea. Two players stand back-to-back in the center of the area. Instruct the players to pin a ball between their lower backs and to wait for a signal from the coach. At the signal, the players step away, allowing the ball to drop and then they try to win the ball and dribble it through one of the goals.
Then the next players step in and the cycle continues. Players earn a point for each duel they win. Arrange the game so that players get to duel against different opponents each time. After playing for five minutes, check scores and then alter the rules to require players to dribble through two separate goals in a turn to win a point. In other words, if player X wins the ball and dribbles through a goal but then gets stripped by player Z and Z dribbles through a goal, then the next player to dribble through a goal (assuming they have not dribbled through that goal in this duel) wins the point. Play for five minutes and check scores again. This is a fun and competitive way to start a session on 1v1 play.
Poke Tackle - 12x12 yard grids
Remind players that there are three basic forms of tackle in soccer: Block, poke and slide. The block tackle has already been covered in an earlier session, and it is useful to begin by reminding players that block tackling requires contacting the ball simultaneously with the attacker and trapping the ball between two players. Therefore, it is often used in tight space. The poke tackle, by contrast, is set up differently and also more useful, in general, in more space.
Here are the cues for poke tackling:
• the approach (shutting down) and the use of jockeying to contain and control attackers is the same as with the block tackle.
• to poke tackle, defenders must look for a touch that moves the ball off of the foot of the attacker to a point where the defender can step in and literally “poke” the ball out of the attacker’s path.
• there is some debate as to which foot is the preferred one to use for the poke tackle. Out of the jockeying position, the front foot is easier to disguise and allows for easier recovery in case of a failed tackle, but it is also more likely to cause a foul, as it is closer to the attacker’s feet and a tangle often leads to a call against the defender. The rear foot, on the other hand, is more difficult to disguise and a miss will often put the defender in a wrong-foot position, facing up field (usually having lost goal-side position), but it is easier to avoid contact with the attacker using this foot. Most players use the front foot, but it is useful to point out both the advantages and disadvantages of using either foot to players learning the poke tackle.
Train on the poke tackle by having players set up in 12x12 grids. Put two players on one end (in line) and two on the other end. Give one group a supply of balls. The first player with a ball passes to the first player on the other end of the grid and then closes down and jockies the attacker. For the first two minutes, have the attackers take a couple of short touches and then a longer touch to help set up the tackle. Once the tackle is made, the two players change ends and the other pair duel. Encourage the defenders to utilize fake tackles as well and to learn to feel the distance needed to both remain goal-side and also apply pressure and make good tackles.
No one’s land - 20x25 yard grid
Select a defender to stand in the middle of the grid. The remaining players line up across one end line of the grid, each with a ball. At a signal from the coach, the end line players attempt to dribble across “no one’s land” to the other side of the grid. The defenders try to poke tackle the ball off of the runners and knock the ball out of the grid. Players who lose their ball join the defenders and play continues until all runners have been stripped of their soccer balls. This is a fun exercise and the coach can determine how strict the poke tackling rule should be enforced (it is probably best to apply the rule very loosely to begin).
Variations:
• start with two defenders and allow players who successfully poke tackle an opponent to then get their ball and join the attackers. The player losing the ball becomes a defender until they win a ball. This restriction both prolongs the game and also adds incentive to the poke tackling emphasis.
• for a player to lose their ball and join the defenders, a defender must win the ball and dribble it out the end of the grid where the run started. In this variation, there is emphasis for both groups to work in transition as well. If the defender simply knocks the ball out of the grid, the attacker retrieves the ball and joins the next attacking run.
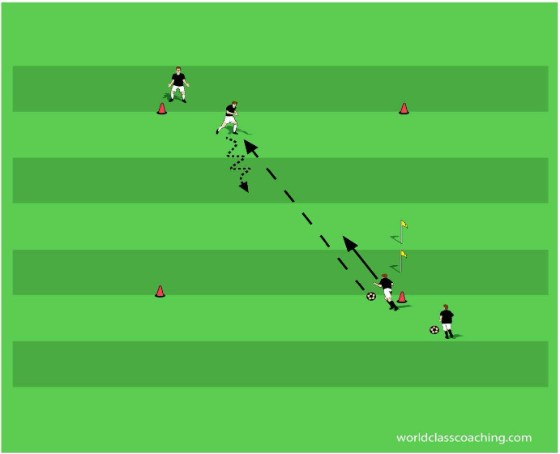
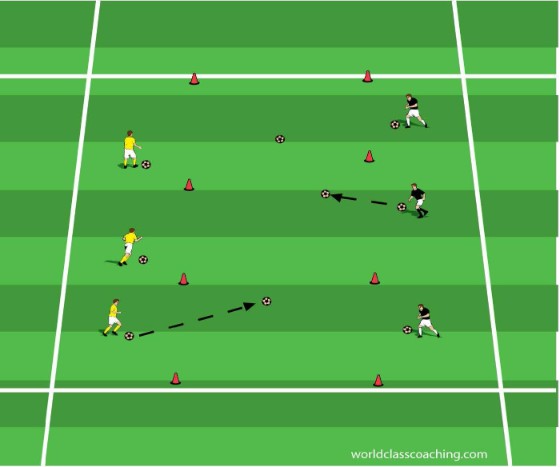
1v1 to a side cone goal - 12x12 yard grids
Use the same set-up as the above exercise. Add a cone goal along the side of the grid near where the defenders serve (see diagram). Now explain to players that they may play full out. The exercise is also different in that the attacking player can earn a point only by dribbling through the cone goal. The defender earns a point by poke tackling the ball off of the attacker.
The placement of the cone goal near the corner aids the defender by creating a logical lane for the attacker to play in, which also creates more opportunities to poke tackle for the defender. The defender must also understand that the angle of approach becomes very critical in this environment. Specifically, as the attacker is taught to “cross” the defender, the latter needs to blend a high approach with the necessity of remaining goal-side to contain and press the attacker. Watch players work and check to see that they are cognizant of the two variables (as well as the speed of individual attackers) as they close down and jockey. After each duel, players change ends. Play for five minutes and check scores.
3v3 to cone goals - 25x30 yard fields
Continue the theme of playing small-sided games early in the training process. Play 3v3 to small endline goals. For the first five minutes, award a point for a good poke tackle and two points for a goal. If there are multiple games, rotate teams and implement tournament scoring (i.e. total points over all games played). Then simplify the rules to just grant a point for a goal and let the players play for the remainder of the session.

