WORLD CLASS COACHING
Club Curriculum U9/10 Season
By Tony Englund
TABLE OF CONTENTS
Part Three
TECHNICAL SESSIONS
Training Session #8: Striking the Ball
Introduction: This session helps the players differentiate between the simple passing surface (the long inside surface of the foot) and the striking surface along the top of the foot (laces). Once again, the habits formed by players at this age will serve them for the remainder of their playing careers, and the coach must take the time to reinforce the importance of proper technique in striking so that the players have a good understanding and feel for striking the ball with power and technique.
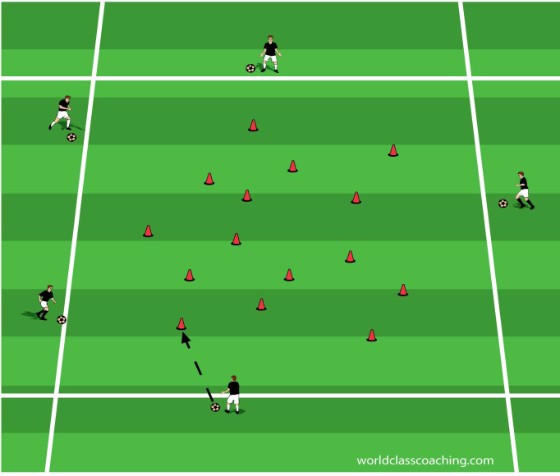
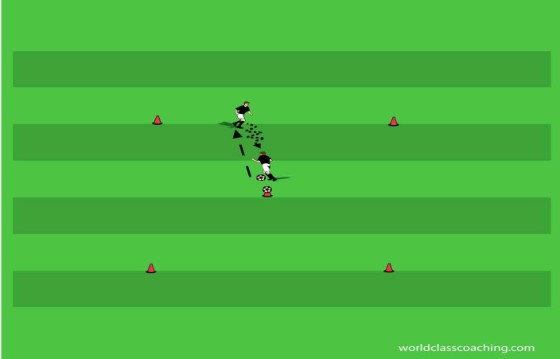
The great cone shoot-out - 15x15 yard grid
Each player needs a ball. Spread a large number of tall cones around the interior of the grid. The players spread out around the perimeter of the grid. At a signal from the coach, the players strike their ball in an effort to knock down a cone. Then they chase their ball, being careful to avoid other players’ balls and the cones. They also pick up any cone they knocked over with their strike and carry the cone(s).
Once they have recovered their ball and any cones, they go to the perimeter of the grid and strike the ball again. This is a fun game that lets the players experiment with their striking technique. When all cones are down, see who has knocked down the largest number and reset the game. The key coaching points are to use either the laces or the inside of the foot, lock the ankle, and point the standing foot at the target.
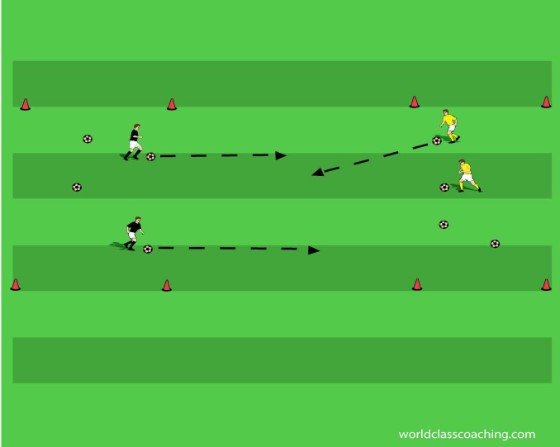
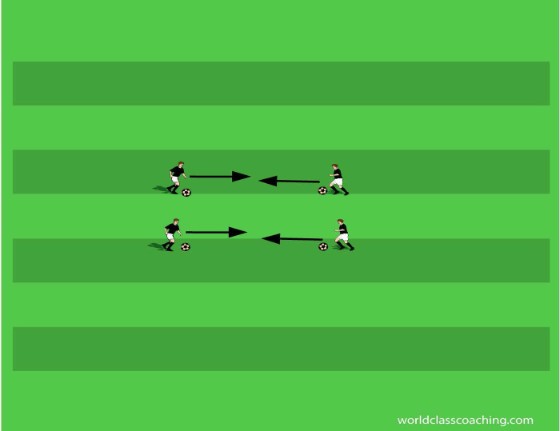
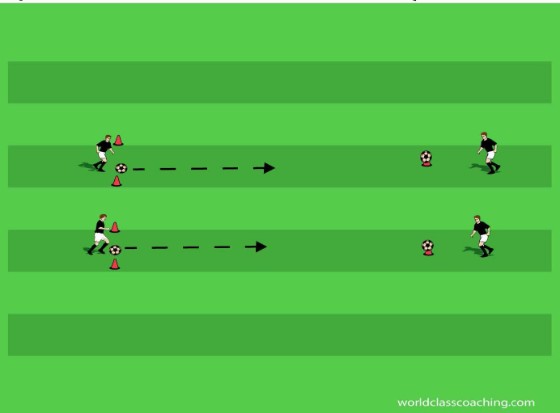
Pairs passing and shooting progression - ¼ field
Players work in pairs with one soccer ball per pair and along the touch-line. Instruct each pair to start and stay four yards apart. The following progression is designed to both give players numerous striking touches and also provide them with a useful tutorial in learning to select a finishing surface. Play each sequence for two minutes, focusing upon proper technique, accuracy and also assuring that players alternate the striking foot each time they play.
• two-touch passing. Using the inside of the foot, players ping the ball back and forth with their partner. Emphasize speed and quality of footwork and striking.
• one-touch. Using the inside of the foot again, players knock the ball back and forth with their partner, alternating the striking foot with each touch. Players use one touch where possible and two touches when necessary to sustain the exercise.
• laces striking: Short distance. Demonstrate with one pair proper use of the laces surface to strike the ball. Explain that this surface allows for the greatest striking power, but also creates more room for error, as the laces surface is more narrow and inherently less stable than the inside surface of the foot. Therefore, players must work very hard to develop consistency in striking with their laces. The technical cues for striking with the laces are:
1. lock the ankle with the toes pointed at the ground.
2. place the plant foot next to the ball, below the shoulder, assuring that the toes of the plant foot point in the direction of the target.
3. encourage players to put their knee in a firm position as well and consider their hip as the point of rotation. Players should practice this striking motion without a ball to begin, holding their foot on the follow-through to check their form.
• laces striking: Medium distance. Move the players back so that the pairs are working with ten yards between them. Players continue to strike the ball with their laces, alternating feet with each strike. Continue to emphasize accuracy and proper technique.
The most common technical errors are:
• the ball pops up in the air. This indicates that the player is striking the ball at a low point, causing the ball to fly upward off of her foot. This player needs to strike the middle-back of the ball to keep it traveling on the ground.
• the ball consistently travels wide of the target. Here, the player is typically either playing with the plant foot pointed away from the target or failing to strike the ball on the center back, so that the ball spins off of the laces to one side.
• the ball does not travel the distance. Here the player is typically failing to lock her ankle and/or knee or she is not striking the ball with sufficient force.
Keep your yard clean - (2) 20x20 yard grids
Each player needs a ball. Put half of the team in each grid. This is a simple exercise designed to give players the opportunity to practice striking the ball. The goal of the exercise is to keep as many balls as possible in the other team’s “yard.” Require players to stop the ball before striking it. Play for one minute and check the number of balls in each grid before restarting play. The coach should emphasize using the inside of the foot or the laces to strike the ball and also locking the foot. The nice part of this exercise is that accuracy is not particularly important, so players can just focus on striking the ball.
Crab soccer to goal - ½ field
Divide the group into two teams. Set up a zone outside the goal box where one team is spread out and seated in the crab position. The other team gathers beyond this area, each with a soccer ball. Explain that the attackers must dribble through the “crab” zone and into the goal box before shooting the ball at goal with their laces to score for their team. Once their shot is taken, players run to the goal, retrieve their ball and then dribble around the playing area back to the starting point where they try to dribble through and score again. Emphasize that safety is critical and that no shots may be taken before the goal box is entered. Players must also be careful in removing their ball from the goal as their teammates will be shooting at the same time. The members of the “crab” team must remain in their box and in the crab position. They may move around and should try to knock the balls out of the attackers’ possession and out of the box. Attackers who lose their soccer balls simply retrieve them and try to cross the “crab” zone again. Play for two minutes and then the teams change roles. The coach should adjust the “crab” zone to create success for both the attackers and the defenders.
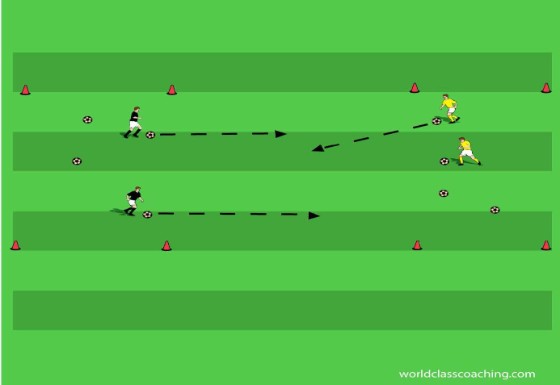
Multiple balls game with no goalkeeper - ½ field
Divide the group into two teams. Explain that either team may score in either of two goals at the ends of the field. The ball remains live while it is within the grid. All re-starts should come from the coach, who keeps a ball supply along the perimeter near the center of the field. The coach should keep at least two balls in play at all times. Encourage players to both play defense when the other team has the ball and also to attack either goal and shoot whenever they have the opportunity. Keep track of goals scored and play for five minutes.
3 vs. 3 to goals - 20x20 yard fields
Play 3 vs. 3 to cone goals. Encourage players to use their laces to finish as in previous exercises. The goals should be full-sized despite the relatively small fields, so that there is frequent opportunity to shoot and to score. Play without goalkeepers and keep score.
Training Session #9: Individual Attacking.
Introduction: Session#9 revisits the role of the individual as an attacker through exercises that mix fun with maximum touches on the ball and reinforcement of the learning of basic attacking moves.
Subway dribbling (2) - 12x12 yard grids Each player has a ball. Players are placed in equal numbers in the two grids. Players dribble around varying speed and surfaces used to dribble. As the game progresses, players are required to practice inside and outside cuts and pullbacks in the grid areas as they dribble. At a signal from the coach, the players dribble out of their grids and through either ‘subway’ to the other grid, where play continues.
Variations:
• use only one foot in the subway.
• change speeds in the subway.
• coach uses a visual signal to initiate move to subway.
• race: Which team can get through the subway and into the other grid first?
• add a ball thief in the middle of the subway. Anyone who loses their ball gets it back right away and continues.
Mirrors - 10x20 yard area
Each player has a ball. Players are paired up and facing one-another as shown in the diagram. Players work in short, intensive spurts on the touch routine listed below. When the coach calls out, “Go!” the players exchange spots (and balls) with their partners. Perform each of the touch exercises for 30 seconds.
Progression:
• dribbling in place.
• touches on top of the ball.
• 4-touch (touch outside with the outside of the left; touch inside with the inside of the left foot; touch outside with the outside of the right foot; touch inside with the inside of the right foot and repeat).
• triangles (start with the ball in front of the right foot. Pull the ball back using the bottom of the foot; stop the ball with the inside of the right foot; tap the ball across to the inside of the left foot; use the inside of the left foot to tap the ball back to the starting position). When players change balls, they should alternate the start foot.
Shark Attack - 20x20 yard grid
Select two sharks (1 for teams of 8 or less). All of the other players have a ball and dribble around the “shark tank” (the grid). The shark(s) run around the perimeter of the grid and then holler, “shark attack!” and charge into the grid. The sharks attempt to knock balls out of the grid. When a player loses her ball, she retrieves it and waits outside the shark tank. The coach should time the game to see how long it takes the shark to clear all balls from the tank. Select a new shark and see which shark requires the shortest time to clear the grid.
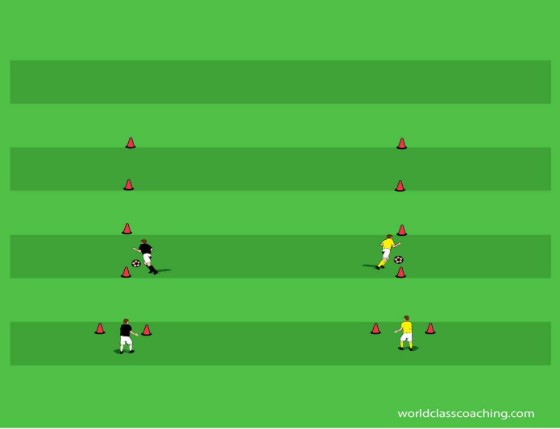
1v1 continuous - 10x10 yard grids
Organize players in groups of 4-6 per grid, with a ball supply at one end of the grid. Put an equal number of players in lines at each end of the grid. This is a simple, but very effective training environment designed to improve one vs. one play on both sides of the ball. Explain that the goal of the exercise is to dribble the ball over the opponents’ endline. Play is live as long as the ball remains inside the grid. The first player on the end where the balls are organized initiates re-starts by passing to the first player on the other end of the grid. These duels teach players how to deal with a defender in limited space, changing speed and direction on the ball, jockeying and tackling skills and much more. Play for two minutes and check scores. Be sure to have players switch lines after each duel.
3v3 to cone goals - 30x25 yard fields
Play a small-sided scrimmage without restrictions. Place small cone goals on the end lines and encourage the players to focus on the quality of their attacking in duels inside of the game.
Training Session #10: Group Play.
Introduction: This session introduces the idea of structured group play. One of the most challenging aspects of coaching U9 and U10 players is the tendency of young players to bunch up. While teaching team shape is an evolutionary process, the following session is designed to begin to give players an understanding of shape and roles in a 6 vs. 6 playing environment.
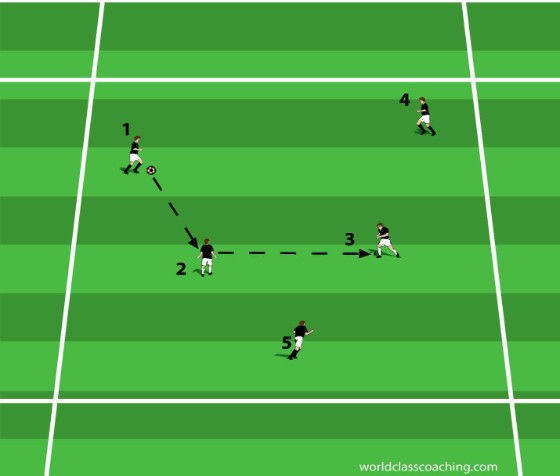
Sequenced Passing - 20x20 yard grid
Give each player a number (U8+). Use one ball. Player #1 dribbles the ball until player #2 approaches and then she passes the ball to her. Player #2 finds player #3 and play continues. The highest number plays to #1. Emphasize movement and communication. To add some fun, count to see how many passes can be completed in one minute and then see if the team can beat that score in the second minute.
Monkey (3) - 17x10 yard grids Divide the group into three teams and put one team in each section. The end teams pass the ball back and forth and the middle team attempts to win the ball. When the middle team gains control of the ball, the team they won it from takes their place in the middle. Encourage the teams in the end grids to dribble and pass the ball within their grids to create an angle from which they can safely pass the ball to the other grid. If one team gets stranded in the middle for more than a minute, rotate them out so that everyone gets to work on playing through occupied space to a target.
4-Goal Soccer - ½ Field
Play 4-goal soccer on ½ field. Place small cone goals in the corners of the field. Each team attacks the two goals on the opposite end of the grid. This game is useful to demonstrate the importance of changing fields and also learning to read the shape of the defense. Because the goals are very small, teams will need to learn to maintain an option and a sense for changing the direction of the attack. The coach can use “freeze!” calls to show the need to expand the team’s shape and also to point out
options for the attackers.
Zone Soccer - ½ field
Play a regular game with players required to stay in their respective zones. Place at least one player from each team in each zone. This restriction teaches players the importance of discipline in shape and passing. The zone can be drawn horizontally as shown or vertically (or both with larger numbers). Because this can be a bit frustrating for some players, only practice this restriction for a few minutes at a time.
Training Session #11: Individual Attacking.
Introduction: This session puts players on the ball and under time and opponent pressure as they continue to learn to feel confident in possession.
River Dribbling - 20x25 yard grid.
Each player has a ball. Players begin on one ‘bank.’ At a signal from the coach, players dribble with their ‘fish’ (ball) across the bank, through the river and across the bank on the other side. The coach should indicate any dribbling restrictions (i.e. one foot only; stop and go on command; one touch for each step, etc.).
Variations:
• vary the technique to be performed in the river.
• pass the ball from the edge of the bank to the river and run onto it before dribbling across the other bank.
• place ‘rocks’ (cones) in the river. Players must dodge rocks while dribbling.
• place crabs (seated or standing) in the river who try to win a ball from the dribblers. If they succeed, the two change roles.
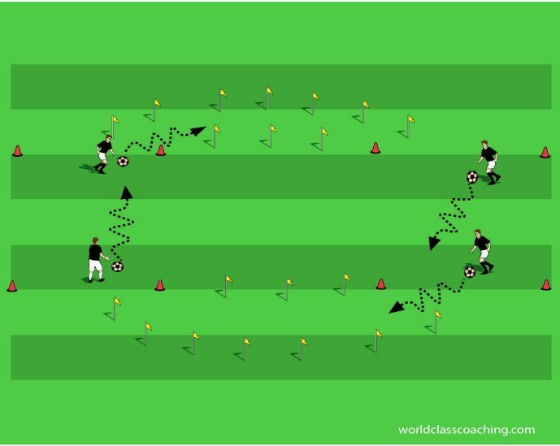
Dribbling and moves - 20x20 yard grid with a 5x5 yard small interior grid
Divide players into four groups. Each group forms a line facing into the grid at one of the corners. Each group has a ball. Demonstrate with one player. The player dribbles to the nearest cone on the small interior grid before cutting the ball with the inside of the foot and dribbling back to her starting point, where the next player in line takes the ball and repeats the run and move. Players should be encouraged to dribble in a straight line both on their way into the grid and also after they perform the move. Each time the players enter the grid, they should alternate the foot they use to perform the move.
After performing the move, the players should work to get out of the grid as quickly as possible (simulate running away from tight space after performing a move). Finally, compel players to check the space that they are about to move into (by looking over their shoulder) before performing the move. This is a challenging instruction for young players, but it also helps form good habits under pressure. After two minutes, move on to cuts with the outside of the foot and then simple pull-backs for the final two minutes. A competitive element can be added by keeping track of how many times each group can complete the moves and runs (1 point for each completed run). Finally, the coach may find it useful to locate herself in the small grid, where she can simulate pressure on the runners and also give constructive feedback while watching the runs and moves.
Relay races - ¼ field
Players work in pairs or larger numbers, depending on the preference of the coach. Relays can take many forms, but in essence involve a sense of team purpose and time pressure.
Examples:
• players dribble around a cone or series of cones and back to the start point.
• players dribble around a cone their first run, then a more distant cone on their second run, etc.
• players dribble a complete circle around each cone.
• players weave through a set of cones and run back to the start.
• players perform a simple move at each cone (i.e. turn the ball with the inside of the foot or use a pull-back to change directions.
More variations can involve restrictions regarding the foot used to dribble or the surface (inside/outside) to be used.
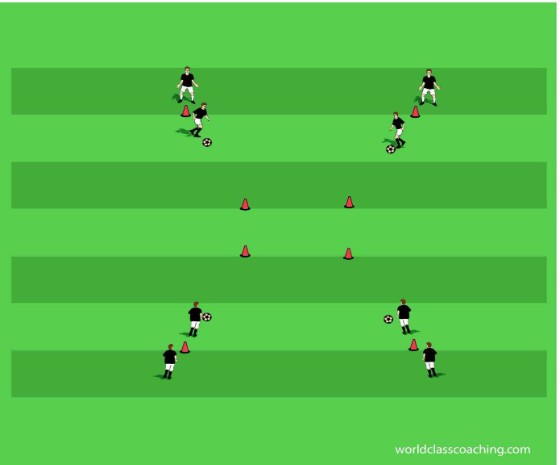
1v1 to 4 goals - 15x15 yard grids
Organize players in groups of 4-6 per grid, with a ball supply at one end of the grid. Put an equal number of players in lines at each end of the grid. This is a simple, but very effective training environment designed to improve one vs. one play on both sides of the ball. Explain that the goal of the exercise is to dribble the ball through either of the the oppo-nents’ cone goals. The presence of two goals encourages players to change directions. Play is live as long as the ball remains inside the grid. The first player on the end where the balls are organized initiates re-starts by passing to the first player on the other end of the grid. These duels teach players how to deal with a defender in limited space, changing speed and direction on the ball, jockeying and tackling skills and much more. Play for two minutes and check scores.
3v3 to cone goals - 30x25 yard fields
Play a small-sided scrimmage without restrictions. Place small cone goals on the end-
lines and encourage the players to focus on the quality of their attacking in duels inside of the game.
Training Session #12: Striking the Ball.
Introduction: Session#12 revisits the concept of striking the ball through a pair of fun games and also a technical progression that isolates the skill. This session also introduces the concept of striking the ball at goal through a fun and fast finishing exercise (Shoot-Keep-Retrieve).
Keep your yard clean - (2) 20x20 yard grids
Each player needs a ball. Put half the team in each grid. This is a simple exercise designed to give players the opportunity to practice striking the ball. The goal of the exercise is to keep as many balls as possible in the other team’s “yard.” Require players to stop the ball before striking it. Play for one minute and check the number of balls in each grid before restarting play. The coach should emphasize using the inside of the foot or the laces to strike the ball and also locking the foot. The nice part of this exercise is that accuracy is not particularly important, so players can just focus on striking the ball.
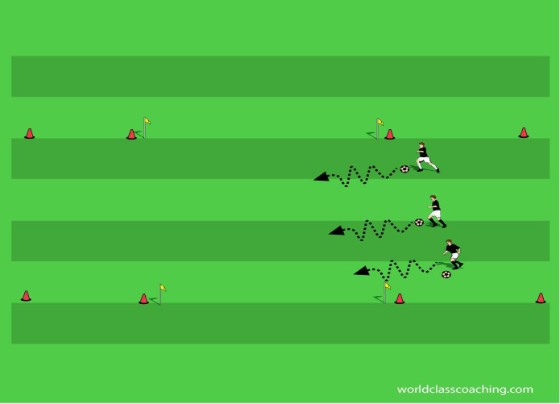
Pairs passing and shooting progression - ¼ field
Players work in pairs with one soccer ball per pair and along the touch-line. Instruct each pair to start and stay four yards apart. The following progression is designed to both give players numerous striking touches and also provide them with a useful tutorial in learning to select a finishing surface. Play each sequence for two minutes, focusing upon proper technique, accuracy and also assuring that players alternate the striking foot each time they play.
• two-touch passing. Using the inside of the foot, players ping the ball back and forth with their partner. Emphasize speed and quality of footwork and striking.
• one-touch. Using the inside of the foot again, players knock the ball back and forth with their partner, alternating the striking foot with each touch. Players use one touch where possible and two touches when necessary to sustain the exercise.
• laces striking: Short distance. Demonstrate with one pair proper use of the laces surface to strike the ball. Explain that this surface allows for the greatest striking power, but also creates more room for error, as the laces surface is more narrow and inherently less stable than the inside surface of the foot. Therefore, players must work very hard to develop consistency in striking with their laces. The technical cues for striking with the laces are:
1. lock the ankle with the toes pointed at the ground.
2. place the plant foot next to the ball, below the shoulder, assuring that the toes of the plant foot point in the direction of the target.
3. encourage players to put their knee in a firm position as well and consider their hip as the point of rotation. Players should practice this striking motion without a ball to begin, holding their foot on the follow-through to check their form.
• laces striking: Medium distance. Move the players back so that the pairs are working with ten yards between them. Players continue to strike the ball with their laces, alternating feet with each strike. Continue to emphasize accuracy and proper technique. The most common technical errors are:
1. the ball pops up in the air. This indicates that the player is striking the ball at a low point, causing the ball to fly upward off of her foot. This player needs to strike the middle-back of the ball to keep it traveling on the ground.
2. the ball consistently travels wide of the target. Here, the player is typically either playing with the plant foot pointed away from the target or failing to strike the ball on the center back, so that the ball spins off of the laces to one side.
3. the ball does not travel the distance. Here the player is typically failing to lock her ankle and/or knee or she is not striking the ball with sufficient force.
Pineapple Drop - 10x15 yard areas
Divide the group into teams of 3-4. One player puts her ball atop the group’s cone and then steps behind to monitor and retrieve errant shots. The other players form a line and proceed to pass/strike their balls (one at a time) in an effort to knock the ‘pineapple’ off of the cone. When a successful shot is made, the shooter puts her ball atop the cone and becomes the monitor.
Play for two minutes and check scores.
Variations:
• players must use their off foot to strike the ball.
• vary the length of the shot area.
• players must hit a moving ball.
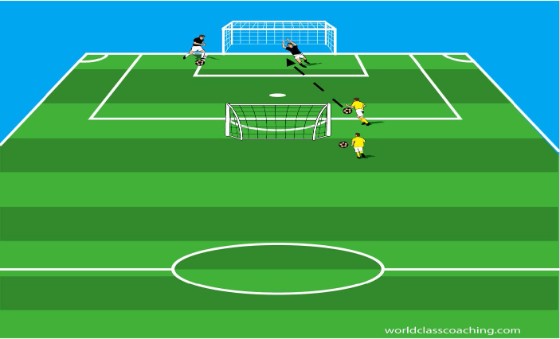
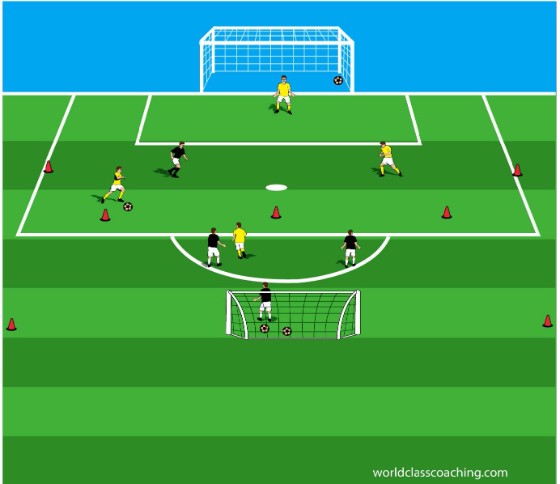
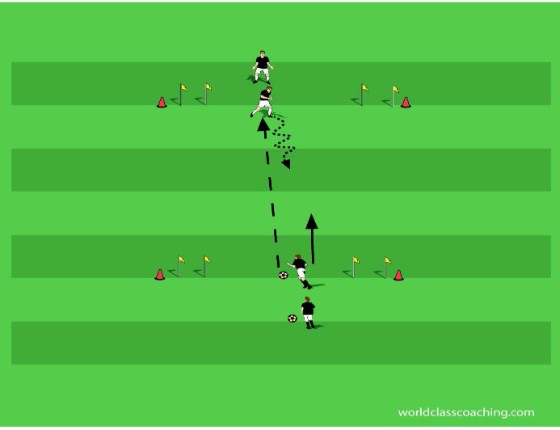
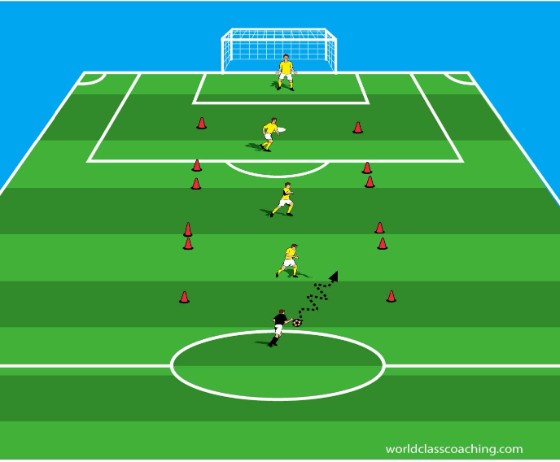
Shoot-keep-retrieve.
Divide the team into two groups. Put each group at the side (opposite sides – see diagram) of a goal. Players take turns shooting the ball at the other goal, then playing goalkeeper for one turn and then getting a ball and getting back in line. Players may not cross the center line between the goals before shooting. Adjust the grid size to be sure that players are not too close (for safety reasons) or too far away (shots are not reaching the goals). For U8 players, the goals should be about 10 yards apart and 3 yards in width. Encourage players to shoot on the ground and to use their laces or the inside of their foot to strike the ball.
3 vs. 3 to goals - 20x20 yard fields
Play 3 vs. 3 to cone goals. Encourage players to use their laces to finish and to practice good technique in passing as well. The goals should be full-sized despite the relatively small fields, so that there is frequent opportunity to shoot and to score. Play without goalkeepers and keep score.
Training Session #13: Individual Attacking.
Introduction: This session continues the theme of maximizing the time young players in particular get on the ball in training. This session combines fun games, technical training for attacking and open play.
Statue Tag - 20x20 yard grid
Two defenders stand outside the grid to start. All other players havea ball and spread out inside the grid. At a signal from the coach, the defenders enter the grid and attempt to tag the dribblers. If a dribbler gets tagged, she stops and holds her ball above her head. Statues can be revived by a dribbler with a dribble/pass between the statues’ legs. The defenders win if all players become statues within one minute. The dribblers win if anyone is still active. Play several rounds to allow everyone to be a defender.
Mirrors - 10x20 yard area
Each player has a ball. Players are paired up and facing one-another as shown in the diagram. Players work in short, intensive spurts on the touch routine listed below. When the coach calls out, “Go!” the players exchange spots (and balls) with their partners. Perform each of the touch exercises for 30 seconds.
Progression:
• dribbling in place.
• touches on top of the ball.
• 4-touch (touch outside with the outside of the left; touch inside with the inside of the left foot; touch outside with the outside of the right foot; touch inside with the inside of the right foot and repeat).
• triangles (start with the ball in front of the right foot. Pull the ball back using the bottom of the foot; stop the ball with the inside of the right foot; tap the ball across to the inside of the left foot; use the inside of the left foot to tap the ball back to the starting position). When players change balls, they should alternate the start foot.
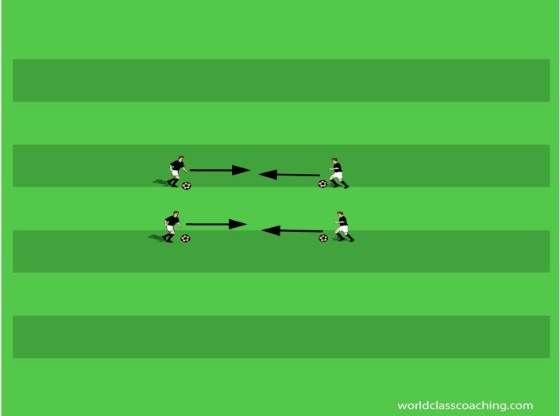
In the second phase of the exercise, players continue to face one-another in pairs, but back off to start 8 yards from one-another. Both players dribble toward one-another and perform moves (below) to change directions and return to their starting point. Each time the players perform a move, they need to alternate the foot used to make the move.
• inside cuts.
• outside cuts.
• pullbacks.
• hook turns. This is a new move for the players. As they approach their partner, they turn to get shoulder-on (one shoulder points at the partner). Using the bottom of the foot closest to the partner, the players pull the ball in front of the standing foot, hop and turn to face and dribble back to the starting point.
1v1 to a cone/ball goal - 10x10 yard grids
Players work in pairs in 10x10 yard grids with two balls. Place one ball on top of a disc cone and give the other ball to one player. The attacker can start play anywhere on the perimeter of the grid. The attacker attempts to dribble the ball past the other player, who is the defender, and use her ball to knock the other ball off of the cone. Each time she does this, she earns a point. If the defender wins the ball, she must dribble to the perimeter of the grid and restart play and the roles change. Play for three minutes and check scores. It is important that the coach encourage the defender to come out and challenge the attacker and not just wait by the cone.
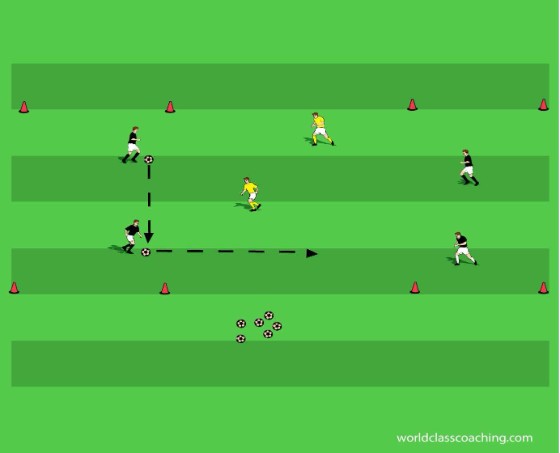
Angry Neighbor - 30x12 yard grid
Place a defender (angry neighbor) in each of the 3 10x12 yard grids. The remaining players should each have a ball and they line up at the end of the grid line. Explain that the goal of the game is to dribble the ball through the three “yards” past the the angry neighbors and then score by passing the ball into the goal at the far end. Whether a player is successful in getting through all three areas and scores, or if her ball gets knocked out of the grid by one of the angry neighbors, she then retrieves her ball and dribbles along the sidewalk (cone area on both sides of the grid areas) back to the line and the next attacker has a go. Play for three minutes and then change the defenders.
3 vs. 3 To Cone Goals - 20x20 yard area
Play 3 vs. 3 to small cone goals. Encourage players to change pace sharply when in possession in particular and to focus on winning duels.

