By Philip Cauchi
Question - My U16 team has had numerous difficulties with transitioning to the attack due to lack of central midfield play. Unfortunately I have lost my excellent CMF long term and we are struggling to adapt. Player pool is limited so we need to use what we have. I have always put them in a 442 with the middle 4 in a diamond. We are strong on D and a good attack (when we can get them the ball). What could I do to improve our play?
My U16 team has had numerous difficulties with transitioning to the attack due to lack of central midfield play. Unfortunately I have lost my excellent CMF long term and we are struggling to adapt. Player pool is limited so we need to use what we have. I have always put them in a 442 with the middle 4 in a diamond. We are strong on D and a good attack (when we can get them the ball).
The positive transition phase needs players who are able to switch rapidly from a defensive to an offensive mentality. Changing the players’ mental processes and to adapt quickly from one situation to another, requires concentration, high links of communication, reaction speed, game intelligence and experience. All of this requires well prepared training. As coaches we are therefore required to make sure that the training sessions we plan for our players are not only directly related to the game, but specifically to our needs. Training sessions must be constructed upon our style of play (high pressing, counter attacking, short build-up, etc.), our system of play (1-4-4-2, 1-4-2-3-1, 1-3-5-2, etc.), and above all on the principles of play and the positions of the players in relation with each other.
In training the players must face the reality of the game. Questions about the quality of players the opposition have, their style and system of play, their strengths and weaknesses and the answer of how we can exploit these should be the backbone of our training. This should be our point of reference! It is of upmost importance that this is successfully communicated and understood by all parties involved (technical staff and players).
The way we approach the game depends on the opponents and the players we have at our disposal. It is however recommended to play the usual system of play and whenever possible the same style. I say whenever possible as there might be circumstances where the opponent is much stronger than us. When we play with teams that are less or approximately at our level, we might adapt a dominant and a high pressing style of play. If the opponents are technically and tactically superior to us – thus having qualitative superiority – we might need to defend deeper and more compact and aim to play on the counter.
The system of play might be adjusted by moving the lines closer or away from each other according to necessities. As an example, if we are facing a team that have quality in midfield we might want to play in a 1-4-3-2-1 in the phase of non-possession. Therefore, the two central midfielders might need to drop to create a compact line of three in front of the defence, while one of the forwards drop to provide further numbers in the central area. This however has its drawbacks. The more compact we are, the harder it will be to play vertically on regaining possession of the ball, as this part of the field of play will be congested with players from both sides.
One of the main aims of training in what regards the positive transition is to create situations in which the players quickly move from a defensive formation to an offensive one without increasing the risk of getting caught on the counter attack, if the ball is lost. Training situations should be designed to stimulate the players and develop mental images of what may happen in a game. What the problems are and how these can be solved. We need to prepare our players to read the game and anticipate situations, not just react to the movements of the opponents. If we react the whole time, we will never be in control of the game.
Game situations vary all the time, however the principles of play remain the same. The players should develop a habit to adhere to our principles. This could only be achieved through carefully planned meaningful training. That is training where the principles of play are repeated in various situations. If training is properly planned, there is a higher probability of transfer to the match. Players will anticipate what the situation requires them to do.
The system of play that our opponents play should also be given importance. It might be that the opponents play with a diamond in midfield, thus creating numerical parity in part of the pitch. It may also be that the opponents play in 1-4-2-3-1 system of play and thus we are outnumbered 5v4 in midfield. We don’t need to change anything from our system of play. We might however need to instruct one of the forwards to drop deeper to either mark the opposition’s low playmaker to prevent them from building up centrally, and to have more numbers and therefore more options to play the ball upon winning possession in this part of the pitch.
If we defend with a compact rhombus in midfield and with two forwards it means that we are inviting the opponents to build from the flanks. We should delve deeper and recognise which of these flanks the opponents are the weakest. Who is the weakest link? Once we get to know who the weakest link is, we invite them to play to this player and then press aggressively to take away his playing options.
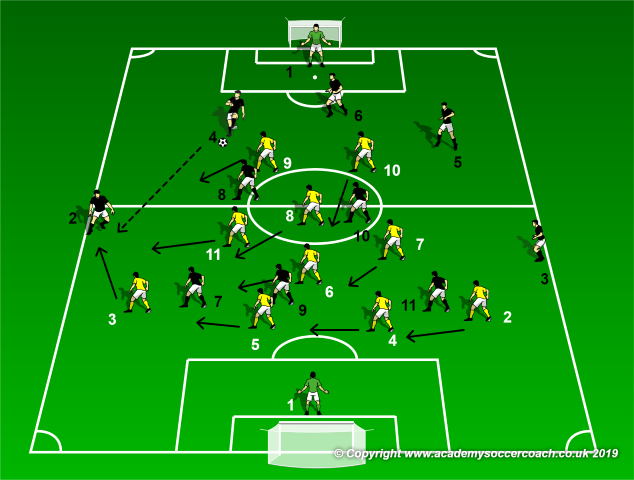
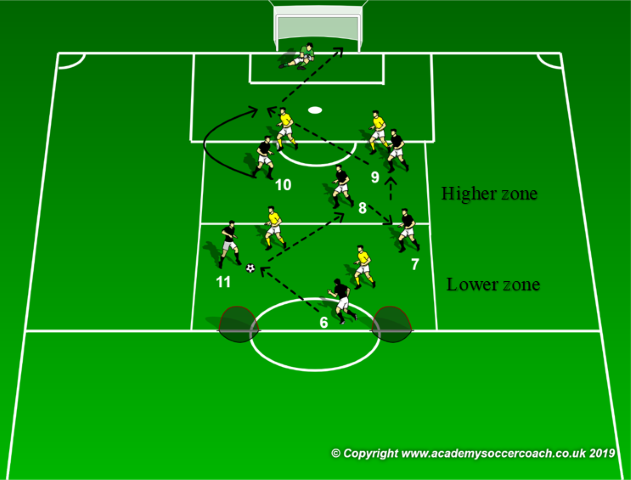
Figure 1 - Having central compactness with a 1-4-4-2 diamond
Playing with a diamond in midfield leaves our full backs exposed to numerical disadvantage. In the figure 1 we will need the help of the closest midfielder, in this case number 11 to create numerical parity or to even double team the player on the ball. Our number 5 will have to slide towards the left to cover full back 3. This automatically requires central defender 4 and full back 2 to slide over to cover the zone inside the penalty area in front of goal. If possible our central defenders do not get out of the central zone. We want them there ready to deal with aerial balls. It is typical of teams to try to pull the central defenders out of a central zone and play the cross towards the second post where the farthest full back – who is not as dominant in the air – has to deal with such balls.
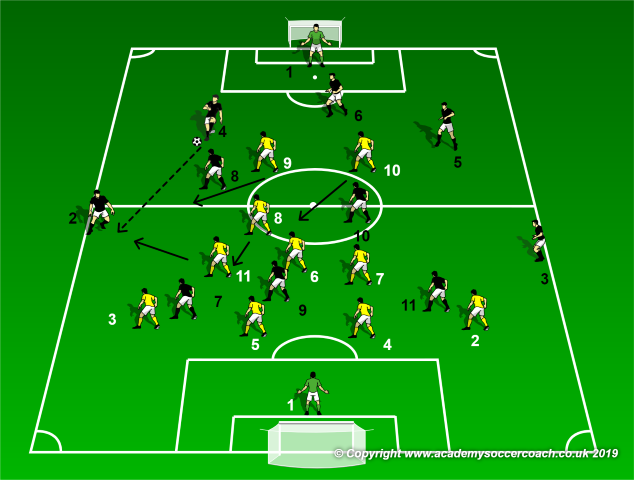
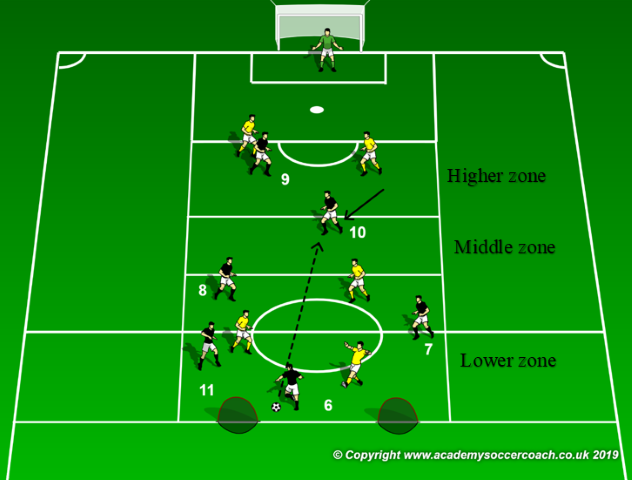
Figure 2 - Dropping the 7 and 11 in line with 6.
Dropping the 7 and 11 in line with 6 relieves more pressure on the full backs and width and balance can be maintained in the defensive line. The team is still compact centrally and if needs be, our number 10 may drop to fill the gaps between the lines. In the above image as the ball is played to the opposition full back, our left midfielder (11) applies pressure while attacking midfielder (8) takes his place to fill this pocket of space. Our striker (9) marks their number 8 to prevent the ball from being played back and switched towards the opposite side. Our full back (3) does not get pulled out of the team’s defensive structure, so our back line remains intact. Our other striker (10) might be needed to move back and fill the attacking midfielder’s (8) space. Therefore, reducing the opposition’s options to play from the middle.
The main outcome of a successful positive transition is to win the ball and play close to the opposition’s goal as quickly as possible in order to create a scoring opportunity. This requires great anticipation of play and quick off-the-ball movement from our forwards and other midfielders. The forwards move to make themselves available to receive the vertical pass (to feet or to space behind the defence), while the midfielders move to unmark themselves to receive the ball if a vertical pass is not possible thus retaining possession.
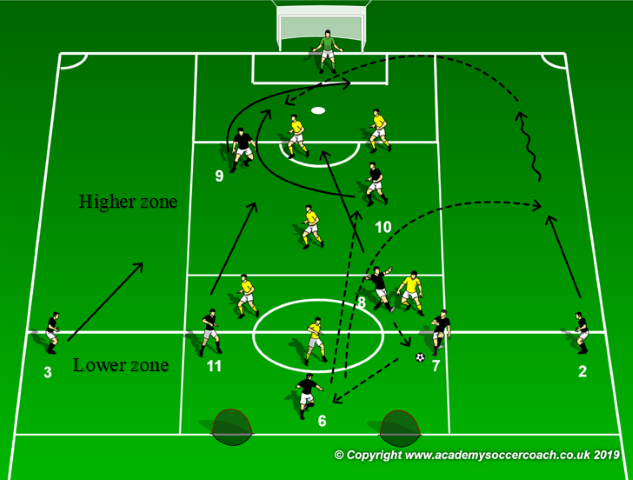
The problem with the above defensive structures is during the positive transition phase. The main reason being that the team is too deep and the players very close to each other. It might be better to restructure our team during the phase of non-possession. Playing with a flat 1-4-4-2 or 1-4-4-1-1 might be a better option during this phase. However, we must always keep in mind the opponent. In a flat 1-4-4-2 we have two central midfielders and who can be easily outnumbered when playing a team with three midfielders such as the 1-4-3-3. That is the reason of dropping one of the strikers into midfield, to re-establish numerical parity and to also prevent their midfield from constructing play from the back.

Figure 3 - Flat 1-4-4-2 with the 10 dropping to create further numbers in midfield.
As well as giving us stability in the non-possession phase we have players well positioned upon winning the ball. They just have to move a few meters at various angles to create the options we need to keep the ball with the intention of playing in verticality.
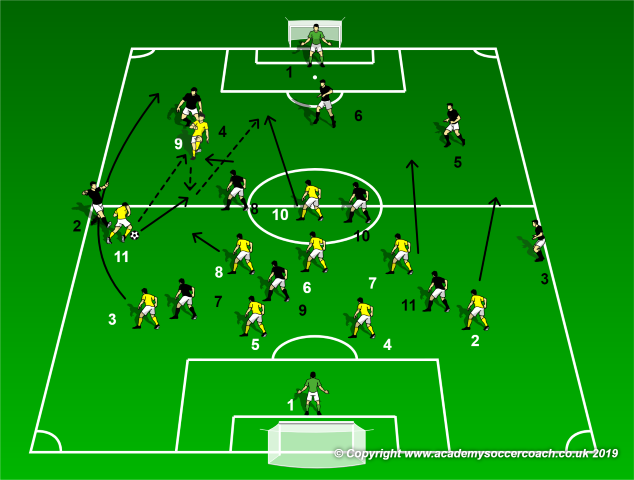
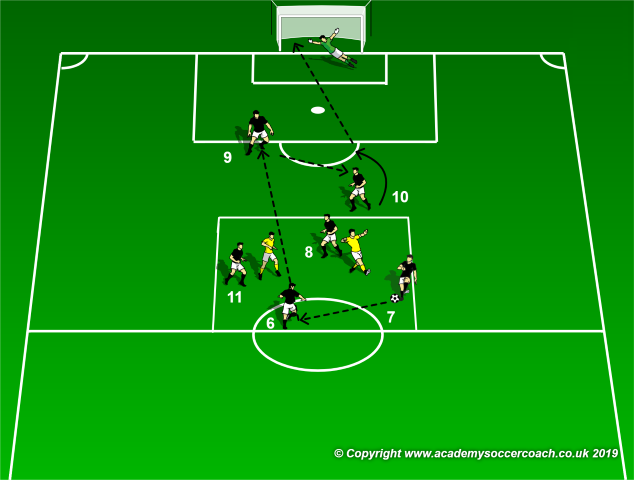
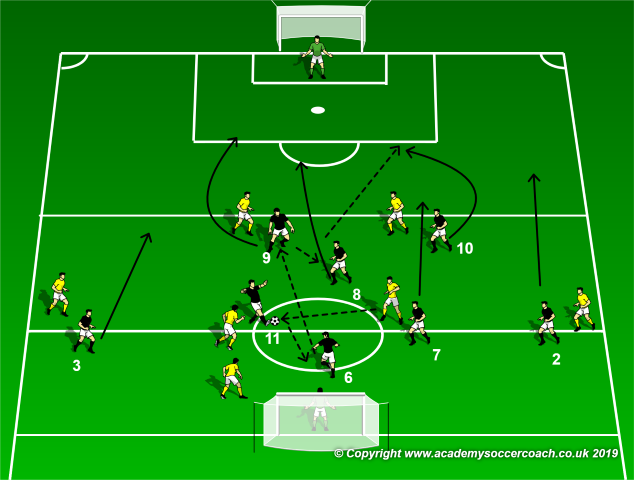
Figure 4 - Getting open on the positive transition.
Figure 4 shows how we can create and exploit space upon winning possession. The first sub-principle is for our striker (9) to get open and show for the ball, while the other striker (10) moves into an advanced position to exploit the space created by 9. This is just an example. The lesson here however is to have a proper plan and create the right habits in training for this phase to succeed. To continue with this example it is imperative for midfielder (11) to support his forward pass, while midfielder (8) covers him. Another sub-principle we might employ in our team is to have the ball-side full back to overlap and create width in attack with the aim of creating more space and options to finalize play.
In this article a number of training situations have been designed in order to improve the application of these principles and sub-principles. The suggested exercises are catered to work on different tactical moves within various game situations.
Aim: To play forward upon winning possession of the ball.
Key performance outcomes (required steps to reach our aim):
1. Midfield compactness during the phase of non-possession,
2. One of the strikers should always remain high – the target player.
3. Movement in midfield upon winning possession to create options to play vertically.
4. Movement of the strikers to be available for the ball.
5. Use of full backs to provide width in attack.
6. Insertion of midfielders into attack.
7. Support and cover of the other midfielders to retain possession or prevent the counter and recover the ball immediately (gegen pressing) in case possession is again lost.
Exercise 1 – Play in verticality with the forwards.
Description: In an area measuring 12 by 12 yards play 4v2 in favour of the attackers. When the attackers complete a pre-established amount of passes they pass to one of the strikers who must combine between them prior to finish on goal.
Key performance outcomes: 1, 2, 3 and 4.
Progressions:
1. Yellows (defenders) start with the ball and the black aim to win possession prior to passing it to the strikers to finish on goal.
2. As in (1) but play 4v3 in favour of the blacks in an area measuring 15 by 15 yards and where the yellows may score by guiding the ball over the black team’s goal line.
3. As in (2) but a defender is positioned to defend against the two strikers. The ball must be passed to one of the two strikers upon winning possession. At this moment the number 8 (offensive midfielder) joins the attack.
Exercise 2 – Play in verticality upon winning possession.
Description: In the lower zone play is 3v2 in favour of the attacking team (blacks). In the higher zone the same numerical situation takes place but without the ball. Both zones measure 10 yards in width by 12 yards in length. Attacking team start in possession of the ball. After completing a pre-established amount of passes, they play the ball to either the attacking midfielder (8) or to any of the two forwards (9 and 10). If the yellow team wins the ball they try to score in any of the two mini goals as shown in the diagram above.
Key performance outcomes: 1, 2, 3, 4, 6 and 7.
Progressions:
1. Start with the yellow team in possession of the ball.
2. Increase both areas to 15 yards by 18 yards and play 3v3 in the lower zone.
3. Play 3v3 in both zones. If this shows to be difficult, play with two neutral players positioned on the side of the lower area. The two neutral players play with the team in possession.
Exercise 3 – 4v3 to 3v2 attack in numbers.
Description: In the lower zone play is 4v3 in favour of the attacking team (blacks). In the higher zone we have a 2v2 situation off-the-ball. In the lower zone the attackers aim to play the ball to one of the strikers who drops into the middle zone to receive unchallenged and simulating receiving between the lines. A midfielder joins the attack to make it a 4v2. All areas are 15 yards in width, however the lower zone is twenty yards long, the middle is five yards and the higher zone is ten yards long. If the defending team (yellows) win the ball they counter on the two mini goals shown in the above diagram.
Key performance outcomes: 1, 2, 3, 4, 6 and 7.
Progressions:
1. Start with the yellow team in possession of the ball.
2. As in (1) but have two midfielders (blacks) who follow the attack with an opponent retreating back to make it a 4v3 in favour of the attacking team.
3. Have another defender tracking back to make it a 4v4.
Exercise 4 – Attack quickly with the use of full backs.
Description: In the lower zone play is 4v3 in favour of the attacking team. In the higher zone the situation is a 2v3 in favour of the defending team (yellows). Both the lower and higher zones measure 15 by 15 yards. Full backs are present at both flanks. Start with the yellow team in possession who aim to score in either of the two mini goals. The blacks aim to avoid conceding a goal and launch a quick counter attack. They may do this by playing directly to the strikers or to any of the full backs who dribble forward and deliver the cross. According to the level of your players you may have both full backs pushing up, or just the one with the ball while the other covers towards the inside.
Key performance outcomes: All.
Progressions:
1. Play 4v4 in the lower zone.
2. Upon recovering the ball the black team have fifteen seconds to finish on goal.
3. Play with opposing full backs, thus having a 1v1 situation on both flanks.
Exercise 5 – Counter against a high defensive line of constraint.
Description: Play takes place inside the marked area measuring sixty yards in width and forty yards in length. The focus is on the positive transition phase of the black team. If the black team win the ball, they play it behind the opposition’s defensive line to counter. Play always starts from inside this marked area. The yellow team always starts in possession of the ball. Apart from this, normal soccer rules apply. Therefore, the black team are repetitively working on preventing the opponents from earning space to finish on goal and countering at speed upon winning possession. We might need to work with the blacks having a numerical advantage at first, thus giving them more success and confidence in this phase and making them understand the importance of the movements required by certain players during the positive transition phase.
Key performance outcomes: All.
Progressions:
1. Play with a numerical advantage but the blacks have a pre-established time limit to score upon winning the ball.
2. As in (1) but progress to playing with numerical parity.
By Philip Cauchi

