I feel confident in saying that most coaches use a 5 v 2 possession game in their training plan. It's a great exercise that is a technical challenge but also requires the players to make good decisions about where to pass and how to support. Like any exercise, if you use it too often it can become stale and boring for the players. You can avoid this by using variations and progressions to increase pressure or change the focus of the drill.
Improving Your Team's Possession Play by David Goldstein is a great resource for training your players to better understand the concepts that are important if you're going to keep possession. It begins with the concepts and explanations important to possession play but also include a number of exercises to teach these concepts to players.
This 5 v 2 progression is from the drills and exercises section of Goldstein's book.
5 v 2 Run Around Exercise: Grid size is as small as the players can handle with success.
I observed this exercise in a camp I was working at in Western Pennsylvania. It was being taught by a high school coach who deserves credit and recognition but after 20 plus years the name of the particular person sadly escapes me. The concept of the exercise is brilliant. The exercise causes everyone to constantly readjust their supporting positions.
The starting organization and the rules are all the same as 5v2. The big difference is one rule:
- If a player passes the ball immediately to their left or right supportplayer they must make a run around them and back into the edge of the circle. If the ball is split across the circle the player making the pass does not have to run.
In essence this is a curved run. The player does not have to run if they pass the ball to a split person or if the pass is not to a player right next to them. Players only run if the ball is passed to the person on their left or right. This interchanging of people in support space means everyone is constantly moving to keep the left/right/split shape alive. It also starts to add flair and creativity to the environment. Players making runs around a player can receive the ball from flick passes and take over to escape high pressure. The exercise gets a bit confusing to players if two passes are sent to the right or left in a row. The player who is making the first curved run can stop running once the ball is passed again in the same direction. They do not overlap two players.
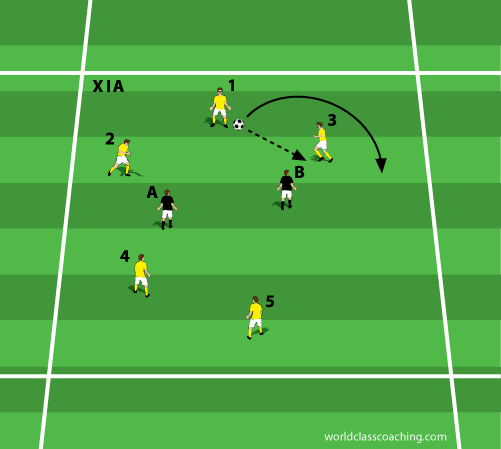
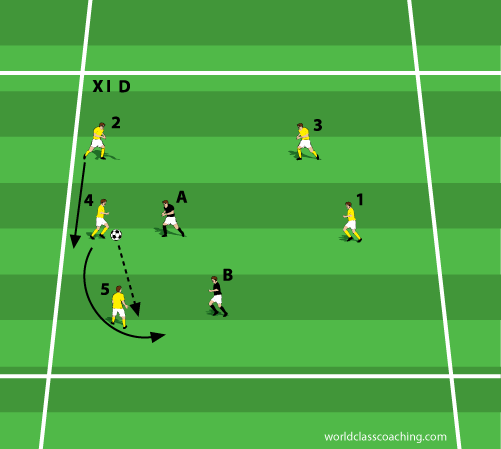
This diagram shows player 1 making the first pass and then the required curved run around the player that they passed the ball to too start the sequence. The pass is the dotted line from player 1 to player 3 and then the run around player 3 by player 1 is shown with a solid line. Notice that this run strips support on the right of player 3 and creates support on the left of player 3 by player 1 who is making the run around them. This will require all the other players to adjust their positions to create the left/right/split support shape.
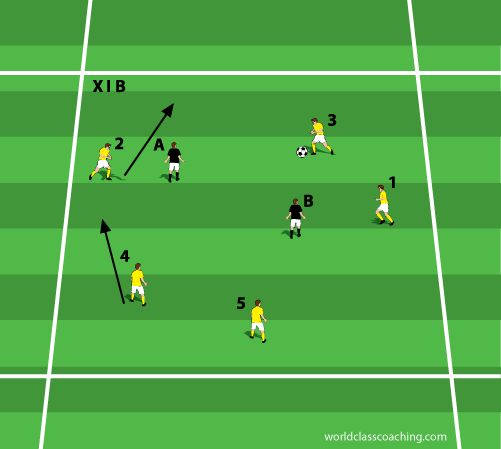
Here, player 2 sharpens to supply support on the right of player 3. Player 4 sharpens to get in a split position between the two defenders in the middle of the circle. Player 1 has already finished their curved run around player 3 which supplied support on the left of player 3. These adjustments to supply support to player 3 helps players to learn about sharpening to create support. The runs may not be long ones in length but it is critical if possession is to be successful to the team in a match.
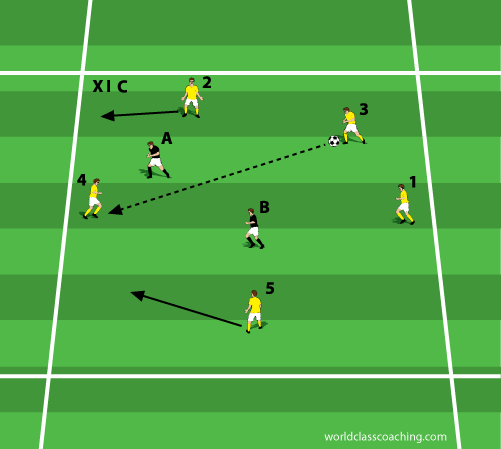
In this example, player 3 sends a split pass to player 4. Because the pass was not directly to the left or the right of player 3 the player does not have to make a run after the pass. However, player 2 and player 5 both have to sharpen into better support positions on the left and the right of player 4. The pass by player 3 to player 4 is shown with a dotted line that runs between the two defenders. The run by player 2 and player 5 are both solid lines into positions where their sharpening creates positions where the defenders won’t be able to intercept the ball.
Here, player 4 passes the ball directly to their right to player 5. This requires that player 4 make a run out and around player 5 to supply support on the right of player 5. Player 2 needs to make a run to replace the support on the left of player 5 and in this case the positioning of player 3 in the split pass requires no sharpening. The pass from player 4 to player 5 is shown with a dotted line. The run by player 4 around player 5 is shown with a solid line that is curved. The sharpening run by player 2 to supply support to player 5 on the left is marked with a solid straight line.
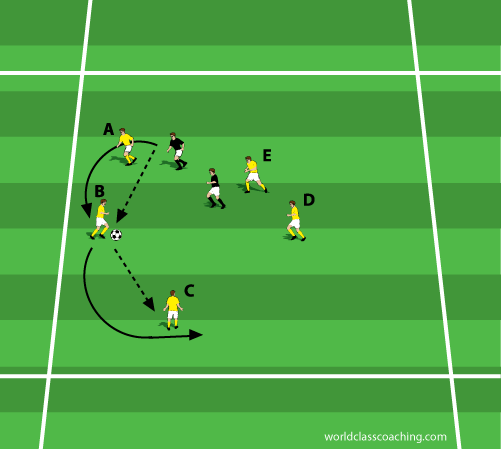
Finally, player A passes the ball to the right and starts to make the curved run out and around player B. Player B decides that the best pass for them is another pass to the right to player C. As player B starts their curved run out and around player C player A stops their run and supports player C on the left side. Player A does not try to overlap two players in a row. If the player they are overlapping has to overlap the next player to them then the first player stops their run. In the above instance player A would stop their run and fill the space that player B is vacating thus supporting player C on the left.
The defenders’ movement will help determine who gets to the left/right/split support but this is the general concept on the fly. The exercise gets a little messy if two passes to the right or left are made consecutively (See Diagram XI E, page 42) because the players start trying to overlap two people at a time. Again, the first overlapping player needs to just hold and support in the space newly created as the player making the new run around goes out and around.
Please share your variations or progressions on the 5 v 2 in the comments section below.
Have a great day!
Tom

