WORLD CLASS COACHING
Soccer Conditioning
TABLE OF CONTENTS
Part One
- Winning the Ball Back Quickly and Working on Conditioning
- The ‘Complete Player’ Challenge
- Defending the Counter Attack – Continuous
- Possession in a Compact Space with a Surrounding Circuit
- Crossing and Finishing with Agility
Part Two
- First Touch Endurance Box
- Endurance, Agility and First Touch
- Dribbling with Quick Changes of Direction
- Agility, Receiving and Dribbling Circuit
- Working on Anaerobic Endurance, First Touch and How to Lose a Defender
Part Three
- Agility, First Touch and Speed Dribbling
- 1 v 1's With a Conditioning Element
- Dribbling Challenge With Endurance
- Racing to Finish the Cross
- Continuous 1 v 1 Battles
Winning the Ball Back Quickly and Working on Conditioning
By Jebreel Bubtana, BRASA, Brazilian Soccer Academy
If you like to have your team play a high pressure game and win the ball back quickly when they lose it, then this is a great way to develop this. Playing a high pressure game can be very successful during games but must be worked on regularly during practices to ensure that the players are physically conditioned to be able carry this tactic out.
The exercise starts with four attackers and two defenders in a 15x15 yards square as shown below in figure 1.
The four attackers try to keep the ball away from the two defenders who have 10 seconds to try and win the ball back (figure 2). If the attackers keep the ball for 10 seconds then they are awarded a point and if the defenders win the ball within 10 seconds then they earn themselves a point. The aim is that the defenders work together to pressure the ball and either win the ball back or force the ball out of the square. As the defenders are in a numbers down situation, they must work very hard to win possession of the ball and it is this work ethic that is needed to win the ball back in a real game situation.
This is a great way to develop the understanding that the ball must be won back as quickly as possible in order to avoid an attack against your team. You can increase the pressure on the defenders by reducing the time that they have to win the ball back. You can also change the situation slightly so that the defenders start with the ball. It will be difficult for them to keep the ball for long as they will be heavily outnumbered. However, when the defenders lose the ball, the timer starts and they must win the ball back within 10 seconds. This is a good development as it emphasizes the fact that the ball must be won back quickly when lost.
Progression:
You can progress this exercise to include the transition from defence to attack and so making it more game realistic. There are now two 15x15 squares with a 10 yard gap between them as shown below. One square will start with a 4v2 like the previous part of the exercise and the second square will contain two players who are on the same team as the two defenders in the first square (figure 3).
The four attackers keep the ball away from the two defenders, who try to win the ball back as quickly as possible. Though the time limit for the defenders to win the ball is no longer in force, it is important to keep emphasizing winning possession of the ball quickly to the defenders (in a real game situation, it will result in the attacking team not be able to construct an attack). The attackers get a point for every time they reach 10 passes without the defenders winning the ball (figure 4).
When the defenders win the ball from the attackers, they must pass it across to their two team mates waiting in the other square, which earns their team a point (figure 5). As soon as they have passed the ball across, they must join their team mates in the square and keep possession of the ball.
Two of the players from the team that just lost the ball will now sprint across to the other square to try and win the ball back from the new attackers (figure 6). If they win the ball back, then they pass the ball back to their team mates waiting in the original square.

When you are coaching this exercise, make sure that you have plenty of soccer balls with you so that if the ball goes out of play, you can restart the game again quickly. This will keep the intensity high and work on the player’s anaerobic conditioning.
Coaching Points:
- The defenders must work hard to win the ball back, applying pressure on the ball as quickly as possible to force the attackers into a mistake.
- Once the defenders win the ball, they must keep their composure and get their head up to see where their team mates are in the other square. This will enable them to make a good pass to their team mate. The idea is that when you have worked so hard to win the ball back, that you do not waste the possession with a poor pass.
- In the transition between defence and attack, the players must sprint as fast as they can to the next square to support their team mates and provide them with extra options to pass to.
- In the transition between attack and defence, two players from the team that just lost the ball must sprint across to pressure the team in possession. This quick pressure is what will hopefully result in winning the ball back quickly.
The ‘Complete Player’ Challenge
By Daniel Severn
This week we have a fun, exciting and competitive exercise for you to try in your session. When I think of the ‘complete player’ I think of someone who can dribble past opponents, pass over varying distances, has a great first touch, shows composure in front of goal and also has that drive to win the ball back for his team. This exercise will work on each aspect mentioned! It’s time to create your very own ‘Complete Player’.
Set Up and Directions
Firstly you will need to set up the five stations as shown in the diagram. You can put the players in groups of three or four (I use groups of four in the diagram; this number helps keep the exercise moving as quickly as possible). Two players at the beginning of station 1, one player in the middle of station 4 and the final player in goal. If you have only three players in a group, then you would start with just one player at Station 1. The players will rotate positions with every turn.
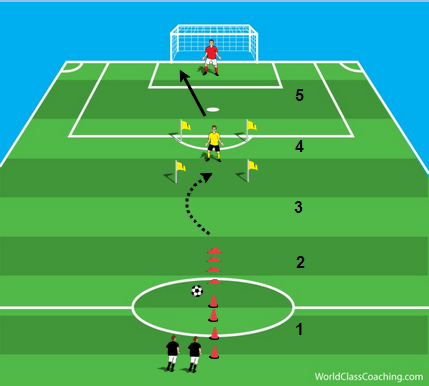
Station 1 – Agility. Jump over the cones with
both feet together.
Station 2 – Dribbling. Keeping the ball as close as possible, dribble through the cones at pace.
Station 3 – Long Pass. Now the player looks up at the target player already positioned in the next station and plays an aerial pass to the player.
Station 4 – Ball Winner. The player must now win possession of the ball from the player he/she passed it too.
Station 5 – Mr. Cool. Player vs Goalkeeper, play at game speed, find the best moment to score!
The exercise begins on the coaches’ whistle. The first player performs the agility over the cones at station 1 before collecting the stationary ball at the beginning of station 2. The player now moves through the cones keeping the ball under as close control as possible. When through the cones, the player looks up and plays a 20 yard aerial pass to the defender in the marked out square. The player immediately goes to retrieve the ball from the defender who tries to shield and protect it. As soon as possession is gained the defender becomes inactive and the player continues through to goal vs the goalkeeper, the aim here is simply to score!
I like to run this as a point scoring, timed exercise.
The players earn points for each station (eg. Complete station 1 without moving a cone = 1 point. Score a goal in station 5 = 2 points. Etc.) The player with the most points after 3 minutes is the winner. Adding in simple rewards such as this helps get the players competing against each other, creating a competitive atmosphere which has a great effect on any practice. The players continuously push themselves and by doing so the next player wants to emulate his/her teammate and pushes themselves even harder. The result is improved conditioning and techniques practiced at a very high intensity.
To progress this exercise you can now match up the winners from each group against each other and use some of the variations below to find your overall champion. You could even crown them as the most ‘complete player’!
Variations
Station 1 – There can be a variety of different movements through the cones, hopping, quick feet, shuffling, reverse shuffling, high knees; just be creative with this one.
Station 2 – You can specify which part of the foot, or even which foot to use. I.e. ‘Insides only’ or ‘left foot only’.
Station 3 – Vary the distance, longer for older ages, shorter for younger. The type of pass could also change; I often ask them to drive the pass along the floor using the laces.
Station 4 – Increase the size of the square to make it more difficult for the defender. You can add a time limit to win the ball back from the defender.
Station 5 – Limit the touches before shooting or specify which foot they must shoot with.
Another variation I have used is to make the player return to the beginning if they make a mistake at a station. For example if they cannot win the ball back from the defender in station 4 within the time limit, they must start again – with this system the only way to score points is to get a shot on target (1 point) or score a goal (2 points).
Enjoy creating your complete players!
Defending the Counter Attack – Continuous
By Daniel Severn
This exercise will help your players to develop an understanding of key defensive positioning, delaying an opponent and help to develop their decision making. It can be broken down into a more tactical practice, but I like to play this game with a continuous aspect to increase the intensity. It is also a great way to teach players how to keep focus when tiring in the game.
Set Up
You will need a minimum of 9 players to run this exercise as continuous (you can play this with just 6, but for the best intensity, 12 players is ideal). You begin with 1 Goalkeeper and 2 Defenders placed just inside the penalty area. You now have 3 lines of attackers set up as if they are playing the roles of a striker and the two wingers/wide midfielders. The Striker starts with the ball.
Set up is shown below in Fig 1.

Rules
- 2 minutes on the clock
- The defenders begin with 10 points
- Each goal they concede, they lost 1 point
- Winning pair are the ones with the most points remaining at the end
Directions
The striker begins with the ball centrally. As soon as the striker takes his first touch, the wingers may leave their cone. The three work as a team to beat the two defenders, combine and score.
Fig 2. 3v2 in action.
The play is over as soon as the defenders win possession, the ball goes out of bounds, or a goal is scored.
The second this happens, the next trio can attack. Keep this transition fast in order to test the defensive pairs’ positional sense. The first attack should be the only time the pair are waiting centrally, the other times they will have had their positions adjusted by the previous attack and will need to recover into better positions to begin defending the next attack. This is where it becomes more difficult for the defenders, they will need to keep their focus and work rate at a very high level to have the best chance of stopping the opposition scoring.
Encourage the attackers to be quick, attack any space left by the defenders and to take advantage of the extra player.
Fig 3. Transition. One group taking a shot and moving aside as the next trio begin attacking.
Coaching Points
- Communication. There can never be enough positive communication/talking on the field, the players should help organize each other, decide who is pressuring the ball, where each of them is covering, etc.
- Delay. Think positioning first, keep goal side and wait for the best opportunity to try and steel the ball. Over committing may result in being easily beaten and therefore an easier chance for the attackers.
- Show attackers wide. From the wider positions, the attackers have a worse angle to shoot, should they cross the ball, and you will have created a 2v2 in the area. Better odds than the 3v2 from central.
Variations
- The number of attackers/defenders. I have also performed this exercise as a 3v1, 3v3, 4v2 and 4v3.
- Ball starting position. The coach could play a ball into a different area each time. The wingers could start with the ball.
I hope you enjoy running this exercise.
Possession in a Compact Space with a Surrounding Circuit
By Daniel Severn
This weeks’ focus is on keeping possession of the ball when working with limited space. To make this even more challenging, I have added a conditioning circuit around the outside of the ‘possession area’. This practice will help develop concentration in possession when tiring, whilst developing a better endurance.
We will have three teams, each with four players, working here. Two teams will compete in a 4v4 possession game with conditions. The third team will perform techniques around the circuit.
Set Up and Directions

Possession:
The possession game takes place within the 20x20yd area.
Two teams compete to keep possession of the ball. Depending on the age of the players, I will often put a ‘Two-Touch’ limit on the individuals. If any player takes three touches or more, they must give the ball to the opposition before playing on.
A team scores a point by completing a five pass combination. The winners are the team with the most points when time is up.
Circuit:
The conditioning circuit is performed individually. Each player has a ball and will start in different areas of the circuit. The circuit is performed in a clockwise rotation.
Station 1 – Measured Pass with Agility. Here the player must pass the ball from one flag and try to get the ball to stop at the next flag. As soon as the player makes the pass, they must run to the ladder, perform agility movements (shuffle/quick feet) through the ladder, before retrieving the ball and moving towards the next station.
Station 2 – Close control dribbling. Here the player must dribble the ball as quickly as possible around the outside of each cone. To change direction they must only use the sole of their foot.
Station 3 – Same as ‘Station 1’.
Station 4 – Same as ‘Station 2’ but instead of using the sole of the foot to change direction, the player must use the outsides of the feet to cut around the cone.
Time/Rotation:
The exercise continues for 3 minutes. Once time is up, the teams have a 30 second break. During this time the team that was performing on the circuit moves to play possession and one of the teams playing possession moves to the circuit. This is repeated until all of the teams have completed the circuit three times (time and repetitions dependant on age).
Variation:
To add to the intensity of the ball possession game, you can play ‘Winner Stay’s on’. Meaning the team that ‘wins’ the possession games, gets to stay in the middle and avoid the conditioning circuit. This will increase the pressure from the defending team and create a more game-like scenario for the players in the middle.
I hope you enjoy this one.
Possession in a Compact Space with a Surrounding Circuit
By Daniel Severn
This weeks’ focus is on keeping possession of the ball when working with limited space. To make this even more challenging, I have added a conditioning circuit around the outside of the ‘possession area’. This practice will help develop concentration in possession when tiring, whilst developing a better endurance.
We will have three teams, each with four players, working here. Two teams will compete in a 4v4 possession game with conditions. The third team will perform techniques around the circuit.
Set Up and Directions
Possession:
The possession game takes place within the 20x20yd area.
Two teams compete to keep possession of the ball. Depending on the age of the players, I will often put a ‘Two-Touch’ limit on the individuals. If any player takes three touches or more, they must give the ball to the opposition before playing on.
A team scores a point by completing a five pass combination. The winners are the team with the most points when time is up.
Circuit:
The conditioning circuit is performed individually. Each player has a ball and will start in different areas of the circuit. The circuit is performed in a clockwise rotation.
Station 1 – Measured Pass with Agility. Here the player must pass the ball from one flag and try to get the ball to stop at the next flag. As soon as the player makes the pass, they must run to the ladder, perform agility movements (shuffle/quick feet) through the ladder, before retrieving the ball and moving towards the next station.
Station 2 – Close control dribbling. Here the player must dribble the ball as quickly as possible around the outside of each cone. To change direction they must only use the sole of their foot.
Station 3 – Same as ‘Station 1’.
Station 4 – Same as ‘Station 2’ but instead of using the sole of the foot to change direction, the player must use the outsides of the feet to cut around the cone.
Time/Rotation:
The exercise continues for 3 minutes. Once time is up, the teams have a 30 second break. During this time the team that was performing on the circuit moves to play possession and one of the teams playing possession moves to the circuit. This is repeated until all of the teams have completed the circuit three times (time and repetitions dependant on age).
Variation:
To add to the intensity of the ball possession game, you can play ‘Winner Stay’s on’. Meaning the team that ‘wins’ the possession games, gets to stay in the middle and avoid the conditioning circuit. This will increase the pressure from the defending team and create a more game-like scenario for the players in the middle.
I hope you enjoy this one.
Crossing and Finishing with Agility
By Daniel Severn
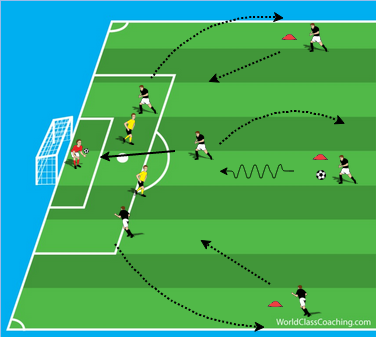
This week the focus is on scoring goals from crosses. I have added in some ladders and need for short sprints to help improve the players’ agility and explosiveness. During this exercise the players will be in pairs as attackers and are required to work explosively in order to get on the end of the crosses and score goals. This is a continuous exercise that you will need a minimum of 10 players plus a goalkeeper to run. The short sprints, agility and sharp changes of direction in this exercise will all help develop your players’ anaerobic capacity.
Set up and Directions:
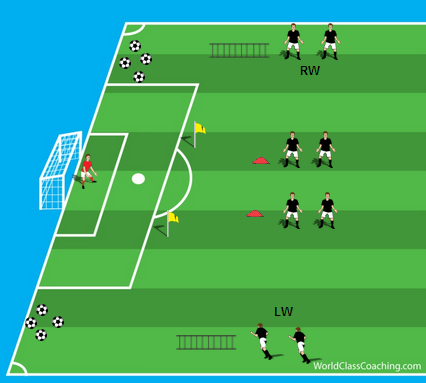
Firstly, set out ladders in front of your wide players (LW and RW) around 25yds from the end of the field. Add cones centrally, around 30yds from the goal – this is where your pair of attackers will begin.
Divide the soccer balls evenly and place half in each corner of the field, between the corner flag and the edge of the box.
Play begins when the right winger (RW) performs agility through the ladder. As soon as the RW gets through the ladder, the attackers must make their sprinting runs into the box. The RW retrieves a ball and crosses it into the area for the pair to attack (as shown below).
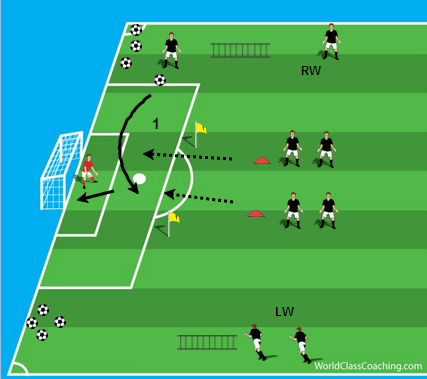
The players must time the runs well and communicate with each other to make sure they know who will attack the ball and also where they plan on making the runs towards (front post/back post/penalty spot etc.).
As soon as the first play is over, the left winger (LW) then begins to perform agility through the ladders. The same pair that just attacked then turns and sprints back around the flag poles placed 20yds from goal and makes a second ‘checked-run’ into the box. While they were moving back, the LW collects a ball and crosses it as soon as the attackers get around the flag pole (shown below).
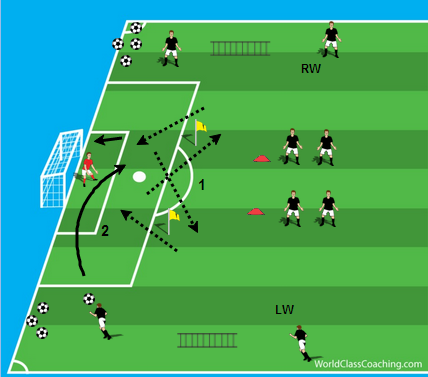
I show the players here performing a ‘crossover run’ as they return to the flag poles. This is just one of many variations the players can perform. The idea of this kind of run is simply to make it more difficult for the defenders to mark you in a game situation.
As soon as the attackers have received the second cross, the next RW will begin to move through the ladder and the process is repeated.
Timing and Rotation:
I will run this exercise in 4 minute stints. Allowing the players to work as a pair and develop a good communication with their ‘striker partner’.
I also use a simple points system to add in the competitive aspect. 1 point for a shot on target and 3 points for a goal. Every 4 minutes, switch the wingers and attackers and work with a new partner.
Variation:
Add defenders. If your players are scoring lots of goals, make it more challenging by adding in a set defender (or even two). Now the attackers will have to time the runs even better in order to beat the defenders to the crosses.
Ask your players to deliver specific crosses. A low, drilled cross. High, lofted crosses. Whipped, curling crosses.
I hope you enjoy the exercise!

