WORLD CLASS COACHING
Soccer Tactics and Strategies

TABLE OF CONTENTS
Part One
- Attacking and Defending Free Kicks
- Scotland Game Plan v Germany
- Bayern Pressing and Direct Attacking
Part Two
- Arsenal's Terrible Defending v Anderlecht
- Creativity to Create Goalscoring Chance
- Lack of Defensive Cover in the Midfield
- Bayern Munich's Positioning in Midfield
Part Three
- Playing with Inverted Full Backs
- Bayern's Move from Fixed to Flexible
- Using the Channel to Draw the Defense Over
Attacking and Defending Free Kicks
In the recent match between Real Sociedad and Real Madrid, there were 6 goals, with 50% scored from corner kicks, with several other missed headers and 2nd balls which could’ve resulted in more goals.
Interestingly, both teams chose to leave the back post open with no player on there, which turned out to be a zone which was tried to be exploited by both teams.
Sociedad Corner Routine
- 6 players forward, GK and 3 back, 1 at 35m
- Drilled, flat delivery to around 6m
- 2 men at the front zone for the flick on
- 2 men attack the back – 1 from a central starting position who loops around unmarked
- 1 player on edge of the box for rebounds
Near Post Flick on routine
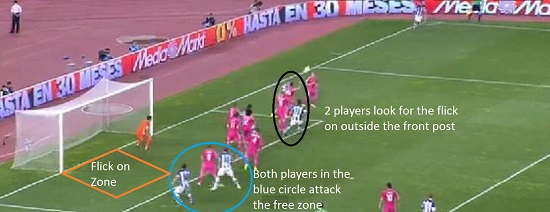
As the flat ball is drilled in, it has enough pace that a flick on will continue fast enough past the GK and central defensive players. Sociedad look to exploit the back post zone as there is nobody on the post to come off the post and cover any flick ons, so having 2 players here increases their chances.
Real Madrid set up with Kroos trying to block the low ball into the front zone, with 3 man-markers and 4 players across the 6m line, and 1v1 on the 18m line but little protection beyond the far post.
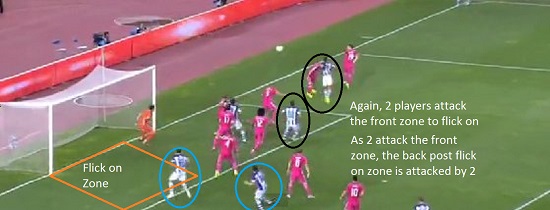
As the ball is flicked on, it is too high to catch, and follows into the flick on zone, which results in a tap in from inside 3m. If the scorer had stood inside the zone, he could’ve been offside.
Vela in the poacher position due to the player on the front post playing everyone onside
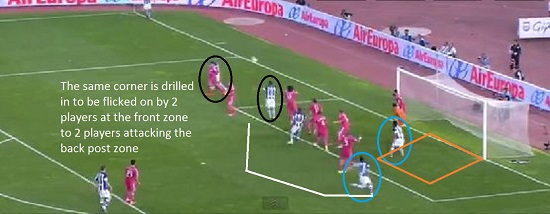
Sociedad use the same routine – drilled ball at head height to the front zone, with a player arcing to the back post. Interestingly, as Real Madrid now have a player on the front post, this allows Vela to drift into the back post zone and stay onside from any flick on, which he scores from.
Ramos goal – Front post zone with Bale creating space
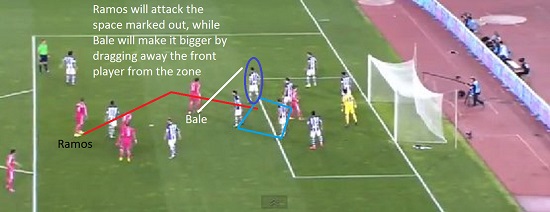
Similar to Real Sociedad, Real Madrid have 2 players attack the front zone – Bale to create space for Ramos who attacks the zone between the 4 players in the diamond. Benzema will arc to the back post while Pepe attacks the space inside the back post at 6m.
Sociedad set up with 5 players staggered across the 6m line but not really in a cohesive shape to defend and inswing corner, with 1 player covering between the post and 6m.
The distance that Ramos and Pepe run from, will give them a huge power advantage when they go to meet the ball in the air, while Bale is explosive enough to accelerate and jump wth a 5m run to the zone he will attack.
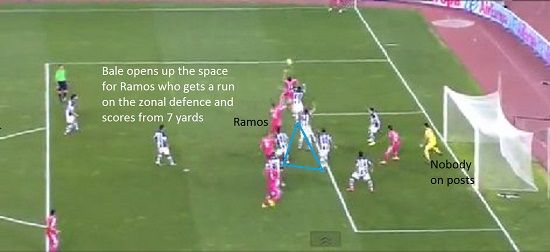
Ramos wins the header easily as Bale drags away the marker. The body shape of the Sociedad defenders doesn’t allow them to match the running jump that the attackers have advantage of due to the deep position and distance of the run, giving Ramos enough pace to out-jump everyone.
As there is nobody on the back post, Sociedad have nobody to clear off the line with the GK too close to the front post. Madrid have James in a deep position diagonal from the corner incase the ball is flicked out and away from goal.
Ramos 2nd chance
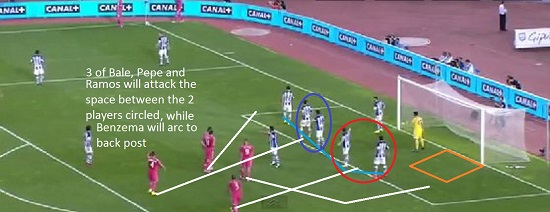
Similar to the goal, Bale, Pepe and Ramos make the same runs, but Sociedad have adjusted the way they set up, now with 5 players across the 6m line, with a player covering the front zone who will protect the post and come out to win anything between 6m and goal line.
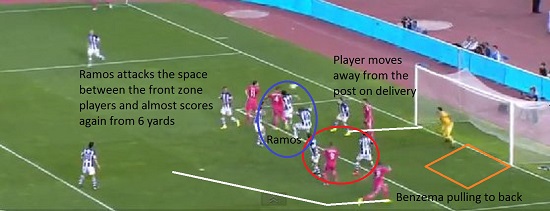
Similar to the goal scored by Ramos previously, he gets a clear run and jump on his opponent and narrowly misses to the far post. Sociedad have nobody with the correct starting body position to challenge, while the run between 2 players results in confusion as to who takes responsibility for the marking.
For teams playing against Real Madrid, Ramos loves to attack the space front zone space and heading to the back post (ie Champions League final) , so to prevent scoring opportunities Ramos needs to be tracked and blocked from getting within 8m of goal, while keeping a player in position to clear anything towards the back post.
For Real Madrid, the warning signs existed from the 1st corner, they should’ve adapted to ensure coverage of the back post zone where the 2nd ball was the target for Sociedad.
Scotland Game Plan vs Germany
Scotland went into the game against newly crowned World Champions, Germany on the back of a 6 game unbeaten run. New coach Gordon Strachan has assembled a team with a solid work ethic who can follow out his tactical instructions against stronger opposition and win, as shown by home and away victories over Croatia. The set up of the Scotland team has changed drastically over the past 18 months, with the re-introduction of high pressing, a more offensive game plan and the use of Steven Naismith as a CF, who likes to drop off and roam, leaving space for more movement across the front line from midfielders and wingers.
In this match v Germany, we saw another side to the ‘new Scotland’; a clear coherent game plan designed to use Germany’s ideals against them. Scotland wanted to direct the game to Germany’s left and Scotland’s right, trying to keep the ‘space invader’ Thomas Muller from being able to have an impact from the right, while trying to win the ball on the right and leaving a 2v1 on the far side in Scotland’s favour if it was switched, to release the rapid Ikecha Anya down the left in transition while maintaining defensive balance with Whittaker covering behind at left back.
Scotland using Germany’s pressing against them
When the ball was won, Scotland would often try to play 2 or 3 quick passes before going forward. Traditionally, Scotland would regain the ball and instantly go forward, but this wouldn’t work very often against Germany. Why? Germany are better than Scotland at defensive transitions than Scotland are in attacking transitions from ‘base’ positions.
To get away from Germany in attacking transition, Scotland needed to draw Germany away from the ‘base’ position to press (as they usually do) then find a way to attack the spaces they leave to press.
Using a rondo to evade pressure and counter attack
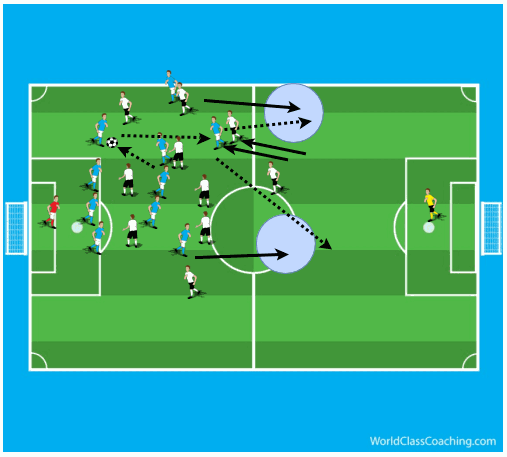
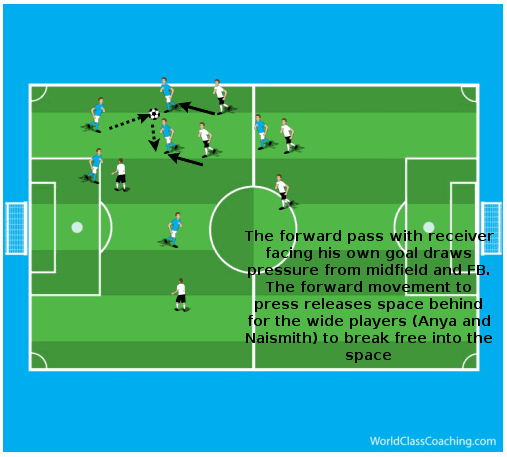
Scotland would often play 2-3 passes before attempting to go forward. In the 1st half it broke down as Naismith isn’t a natural back-to-goal player, so in the 2nd half, with the introduction of Steven Fletcher, Scotland now had a player who is comfortable in receiving with pressure from behind as a target man, and is creative enough to find runners behind the defence.
As the ball was to be played forward, he would drop in, dragging the man-marking CB with him, leaving a huge space either side of the covering CB as the FB went to press and other is advanced.
If Anya could get away from his marker after he was pressed, he could have a chance at getting behind the Germany defence and be through on goal, while Naismith could support from the right.
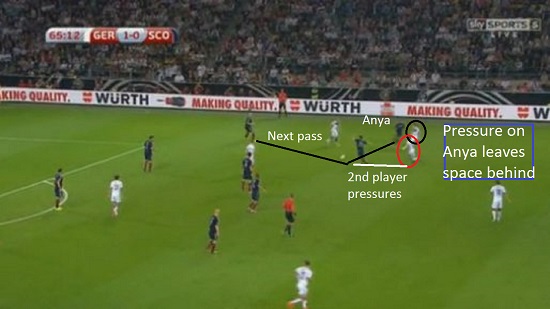
Scotland’s equalizing goal; Anya via Fletcher

The ball is regained by Scotland, and they quickly are under pressure from Germany. As the 2 receivers have their back to goal, Germany have a pressing trigger to close them down quickly. Scotland use this to their advantage as the FB stays spare for the eventual pass back.
The key to this attack is that the FB (Black Circle) presses Anya as he receives, leaving space behind. The 2nd player (red circle), will press anything central, again leaving space behind.
Scotland create the space to attack
Now that both players who were covering positions are drawn forward, Scotland have more space to use to attack from – both pressing players aren’t set to drop back and block the forward passes.
Releasing the attackers after the pressure is drawn

With the 2nd pass, Goetze is drawn in to press. This opens up space that he covered which screened the forward pass to Fletcher. Now that the FB has moved inside and possibly trying to cover the pass into Fletcher, Anya is free from him and able to break ahead of Fletcher. Naismith is ready.
Fletcher draws out the CB and releases more space for Anya to attack behind FB & CB
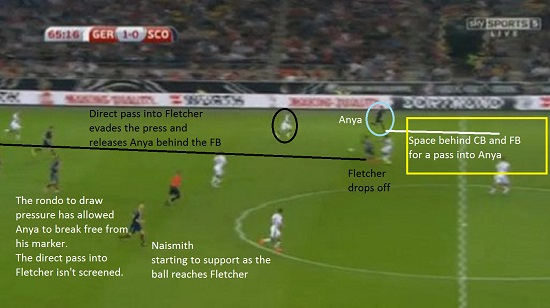
As Fletcher drops off and recieves, he is marked, which is what he wants; the space left behind is for Anya to attack, while Fletcher tries to find the pass into him on the left.
Naismith is trying to get forward but won’t win the race to attack the other side, so will arrive late.
Anya goes to goal
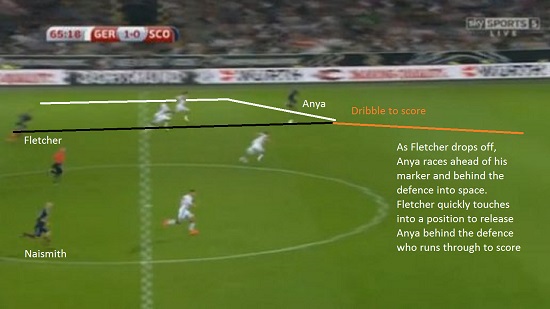
Fletcher takes a good touch away from his marker then releases the pass that Scotland have been looking for all game – Anya behind the advanced FB and run to goal, which he scores from.
Scotland’s game plan in the game was undone by 2 pieces of instinctive finishing from Thomas Muller, but the overall game process was excellent and show signs that Scotland may be a force in Euro 2016 qualifying.
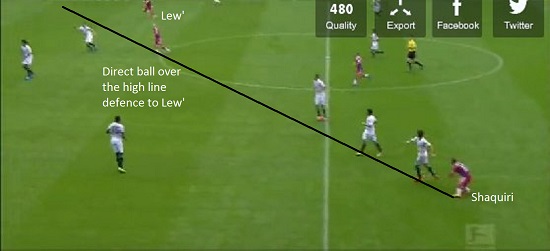
Bayern Pressing and Direct Attacking
Bayern Munich under Guardiola have changed significantly since the treble winning team under Jupp Heynckes, but one thing which has returned this season is the direct passes over the top of a defence in attacking transition. This was an aspect missing last season but with Xabi Alonso, David Alaba, Xherdan Shaquiri able to play accurate passes over 40m, and players able to run behind a defence in Robert Lewandowski, Arjen Robben and Mario Goetze, they have the ability to do so.
Pressing results in regain and instant forward pass resulting in a goal
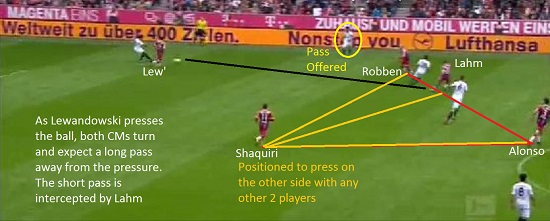
As Bayern press from the front, Bayern like to make play predictable. Here they leave the pass to the full back available but as the CB is under pressure, both CM’s turn and move away to recover the expected loose ball. Instead, the CB recognises the offered pass, but makes a bad decision to pass short into the Bayern press.
Shaquiri is in position to treble up with any of Robben and Lahm or Lahm and Alonso for any loose balls played into the line of Robben, Lahm and Alonso. This can block any exits to the far side.
The ball is recovered by Lahm from the CB’s pass, resulting in a goal for Lewandowski.
Pressing on the side results in loose ball recovery and direct switch to attack the full back
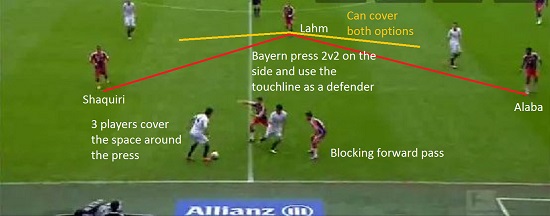
Around the pressure area, Bayern always cover around the zone with at least 3 players, covering all exits and giving a good chance at recovering the ball. Here, the pass inside is intercepted by Lahm.

Lahm turns after intercepting the ball and instantly looks for the diagonal long pass over the defence and into the run of Robben on the far side, resulting in a shot at goal.
Space coverage around the 1v1 results in goal from direct pass over the defence
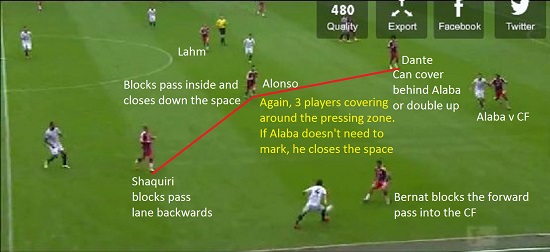
Bernat presses the ball and gives little space, forcing the FB into a fast decision – he tries to pass through Bernat and into the CF who is marked by Alaba.
As Bernat and Alaba are marking, Bayern have 3 players spare around the ball who are spare and can recover loose balls – Dante can double press anything on the blind side of the CF or cover Alaba if he is dragged away into the corner. Alonso blocks the central pass while closing down the space to cut inside to, while Shaquiri blocks the backwards passing lane, and can close down the space.
Alonso recovers the ball to give to Shaquiri
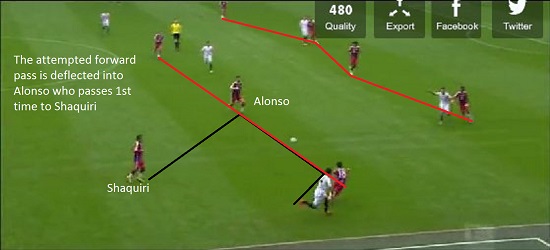
The forward pass is blocked, and bounces to Alonso, who is the only player who can recover the ball. He gives Shaquiri more time to make the forward pass by releasing 1st time.
Shaquiri has enough time to take a touch then drill a pass over the top of the defence for Lewandowsi who is already on the move. He takes a touch to control before scoring.
Positioning in counter-pressing results in goal from space of displaced centre back
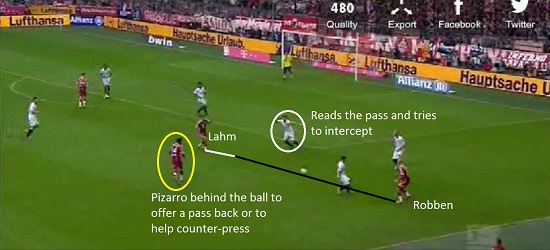
Robben in a wide area will regularly play 1v1 diagonally to attack the goal and shoot, or he often looks to pass horizontally into the half space where an opponent player is tempted to leave position to press.
As the player presses, they leave a space in their defensive unit, allowing Bayern to counter-press and attack the space created by using the pressure against the opposition.
To set up the counter-press, a player must directly be in position of where the ball will be lost and then double press to regain v that player; here, Pizarro (yellow circle).
Using the counter-press to set up a scoring chance
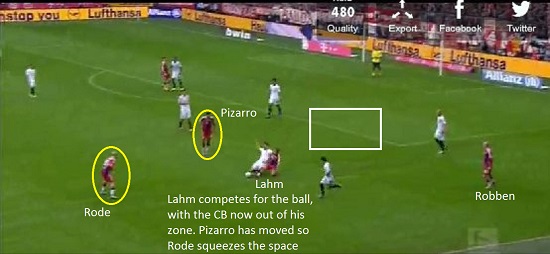
As Rode covers behind Pizarro who has decided to move, Rode is the recovery player who will pass 1st time forward to Pizarro. From here, Bayern want to attack the half space where the CB has pressed from.
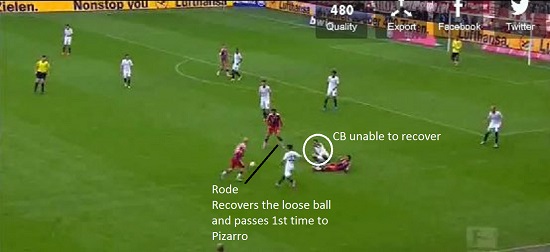
As the ball is recovered, Rode passes forward quickly and Bayern go to goal and exploit the space.
Pizarro creates the space needed for Robben to score
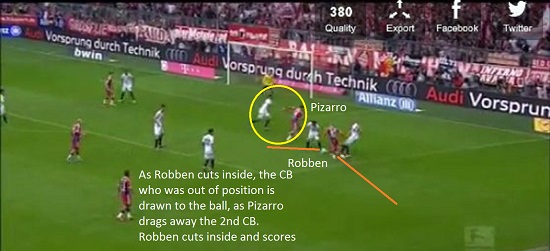
As Robben attacks the FB and displaced CB, Pizarro makes extra space by making a diagonal run to offer a pass through the pressing players. This would result in a pass across goal, so the CB goes with him, leaving a huge space infront of goal which Robben uses and scores.
I feel that Bayern using more direct passes over the defence, especially in transition from the midfield zone will result in more scoring chances, and in this game they showed that Robert Lewandowski is a player who will benefit from a more direct style of play, similar to Dortmund.

