By Gregg Gillies -
Warm Up: Lateral Dribbling
Set Up: You'll need 3 to 12 cones, depending on the number of players you have and how many you want in a each group so they can maximize the number of touches they get. See the diagram below for how you set up the cones.
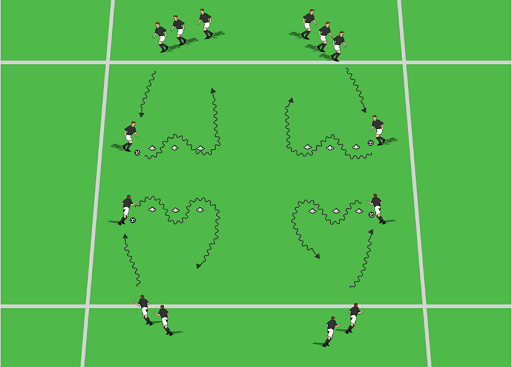
By placing the cones side on to the players, they need to execute two 90 degree turns. This encourages our players to utilize a quick, sharp chop cut with the inside or outside of the foot to change direction at the first and last cone, instead of only dribbling straight ahead between cones.
Coaching Points:
The focus is good control, with quick, soft touches at speed, utilizing the inside and outside of both feet.
They will start and end with a quick acceleration, pushing the ball a little further ahead of them, but under control enough to make the sharp turn at the first cone.
Have them utilize the toe down dribble both toward the first cone and away from the last cone.
Players should have slightly bent knees when they change direction and should be keeping the ball close, so that they are balanced and under control, ready to go in any direction. They should not be reaching out with one leg, extending it too far away from them to make a cut and change direction.
It's important to focus on the following with regard to all foot skill drills.
Technique (Footwork) - Players must be able to dribble with both feet, while making short, sharp touches on the ball. The ball can not be allowed to get away from them or they will lose control.
Technique (Vision) – Does the player have the ability to get their head up and see what's around them or do they just focus on the next cone? Sometimes you can let them know that you will be holding up fingers and they will need to tell you how many, while they are performing the drill.
Positive Attitude and Confidence – It's very important to be supportive of your players and encourage them when it comes to their dribbling. Most players take way too big a touch and always want to use speed to basically pass to themselves (especially at younger ages) and use their speed. It's important that they become confident with the ball at their feet. It doesn't matter how good they become at one touch passing, if they can't have the ball at their feet, they will not be successful at the game of soccer.
Progressions and Variations:
There are many ways to progress this drill. How many, and which ones, you use will depend on the age and skill level of your players, as well as how much time you will spend on this drill. I recommend doing this drill for nore more than 10 to 15 minutes. You can break up the variations amongst different practices.
Some progressions include:
- Left foot only
- Right foot only
- Inside of the foot only
- Outside of the foot only
- As many touches as possible between cones
- As few touches as possible between cones
The next progression is to turn this competitive. While we must spend time utilizing some drills to develop technique, it's not what our players signed up for. If you want to get the most out of them, find a way to make almost anything you do competitive in nature. It will help to accelerate the development of your players.
That means, turn this into a relay race. Before the next player can go, the one dribbling must stop their ball next to that player, and then they slap hands.
It is easiest to have no rules in terms of touches but if you have enough coaches to keep an eye on the players (the most competitive get creative about cheating!), you can use rules like left foot or inside of foot only.
In order to maximize touches, better to keep the teams small and have each player go two or three times per relay race.
Square Dribbling With Foundational 1v1 Moves
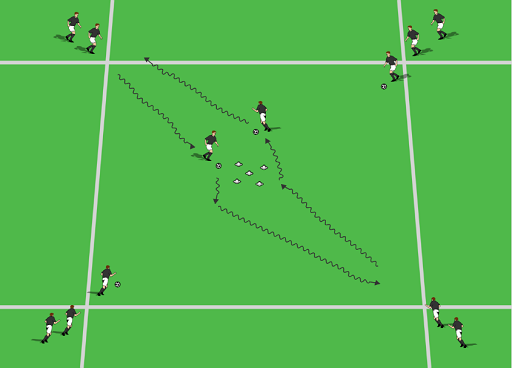
Set Up: Use a 20 yard by 20 yard square. Place five cones in the center (see diagram below). The first player in each line should have a ball.
To start, the first player in two lines opposite one another, dribble toward the center cones. These center cones (you could also use poles, corner flags, dummies, or coaches) are a “defender”. When the player approaches the cones, they make a move (the moves list is below) and beat the “defender” to the right (everyone goes right or left at the same time.
Once those two players get by the “defender' they pass to the next player in line. As soon as they beat the “defender” the first player in the other two lines, dribble toward the center and do the same thing, make a move, beat the “defender” and pass to the next player in line. Then the first two players in the first two lines go again.
Coaching Points:
The focus is good control, with quick, soft touches at speed.
Players should have slightly bent knees when they change direction and should be keeping the ball close, so that they are balanced and under control, ready to go in any direction. They should not be reaching out with one leg, extending it too far away from them to make a cut and change direction.
As with the first drill, it's important to focus on the following with regard to all foot skill drills.
Technique (Footwork) - Players must be able to dribble with both feet, while making short, sharp touches on the ball. The ball can not be allowed to get away from them or they will lose control.
Technique (Vision) – Does the player have the ability to get their head up and see what's around them or do they just focus on the next cone? Sometimes you can let them know that you will be holding up fingers and they will need to tell you how many, while they are performing the drill.
Positive Attitude and Confidence – It's very important to be supportive of your players and encourage them when it comes to their dribbling. Most players take way too big a touch and always want to use speed to basically pass to themselves (especially at younger ages) and use their speed. It's important that they become confident with the ball at their feet. It doesn't matter how good they become at one touch passing, if they can't have the ball at their feet, they will not be successful at the game of soccer.
Progressions and Variations:
The moves to beat the “defender” should utilize what I call foundational 1v1 moves to beat a defender.
Some progressions include:
Simple Outside of the Foot touch
Lunge fake – when approaching the defender step out hard to one side as if you are about to accelerate around the defender in that direction but do not touch the ball. Then, using the outside of the opposite foot, take a touch the other directio around the defender.
- Scissors
- Double Scissors
- Step Over
- Matthews
- Matthews with Scissors
Fake Kick and Go (fake a kick to the left with the right foot, place the right foot on top of the ball, take a slight backward hop on the left foot, and then accelerate away to the right by touching the ball with the outside of the right foot). You can also do the opposite.
How many moves or the difficulty of the move is left up to you, the coach. You know your players skill level the best. Obviously you won't be using the Matthews with Scissors, or the Maradona with 4 year olds.
Common Mistakes
Most players, when learning moves like above will do a combination of three things. They practically come to a stop when they are going to make the move, such as a scissor. Encourage them to keep their speed dribble. They don't need to slow down to perform lunk fake or scissors.
Another common problem is they make the move too late. They get way too close to the defender before making the move. One way to work on this is to have coaches stand in the middle as defenders. Don't actively defend, but if they get so close to you that you can stick your foot out to knock the ball away without moving, do it. This will help them learn proper distancing when it comes to these moves.
Finally, as I mentioned above, most players take way too big a touch and always want to use speed to basically pass to themselves (especially at younger ages) and then beat the defender to the ball.
You can have a coach stand next to the line they are headed to, and if the touch from the move is too big, the coach can come out and take the ball before the player runs it down.
1v1 to 2 goals (encourage the Foundational 1v1 Moves)
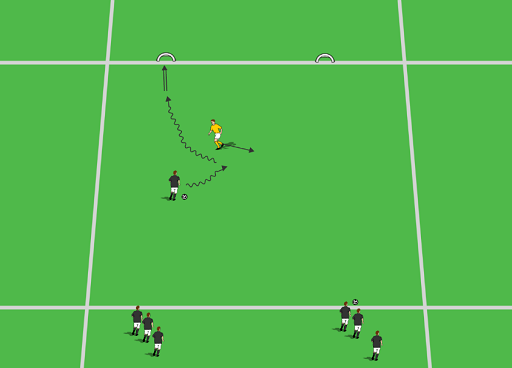
Set Up – Use a 20 yard by 20 yard square. Place two small goals on one endline, 3 to 5 yards in from the sideline. Place two lines of players on the other endline, one each across from a goal. Every player should have a ball. See diagram 1.
Rules – The first player in one line dribbles toward the goals and shoots. The first player is th eonly one that goes to goal unopposed. At this point on, the drill continues in the following manner.
As soon as that first player shoots, the first player in the second line dribbles into play and can score in either goal. The player that just shot the ball, now turns and must defend 1v1.
Once that second player shoots, the defender goes and gets their ball and goes to the back of their same line. The next player in the first line now dribbles to try and score in either goal and the player that just shot defends.
Continue the drill in this manner. The player that just show always turns and plays defense against the next player in the other line. Once a player is finished playing defense, they go get their ball and head to the back of the line.
We've gone from cones, to moves, unapposed, with the second drill having a non-active “defender” involved.
Now we take it to a game environment, with live defense. But the offensive player gets the advantage of attacking two goals.
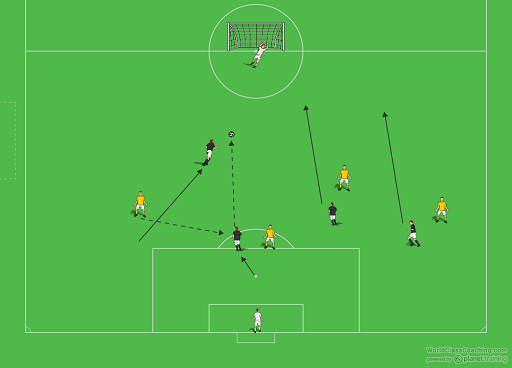
Diagram 1

In diagram 1 above, the first player to dribble and shoot (in black) then becomes the defender (now in yellow, just to differentiate offense and defense in this article).
Diagram 2
The next player dribbles and attacks the defender (now in yellow).
Diagram 3
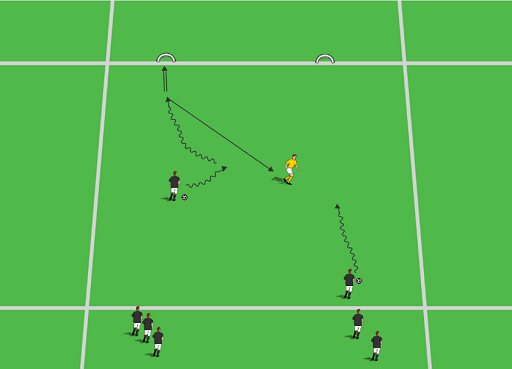
The player that just show races over to defend the offensive player in the other line.
Coaching Points:
The focus is good control, with quick, soft touches at speed.
Players should have slightly bent knees when they change direction and should be keeping the ball close, so that they are balanced and under control, ready to go in any direction. They should not be reaching out with one leg, extending it too far away from them to make a cut and change direction.
As with the first drill, it's important to focus on the following with regard to all foot skill drills.
Technique (Footwork) - Players must be able to dribble with both feet, while making short, sharp touches on the ball. The ball can not be allowed to get away from them or they will lose control.
Technique (Vision) – Does the player have the ability to get their head up and see what's around them or do they just focus on the next cone? Sometimes you can let them know that you will be holding up fingers and they will need to tell you how many, while they are performing the drill.
Positive Attitude and Confidence – It's very important to be supportive of your players and encourage them when it comes to their dribbling. Most players take way too big a touch and always want to use speed to basically pass to themselves (especially at younger ages) and use their speed. It's important that they become confident with the ball at their feet. It doesn't matter how good they become at one touch passing, if they can't have the ball at their feet, they will not be successful at the game of soccer.
Progressions and Variations:
Once the players are comfortable, you can add one rule. They must perform at least one foundational move, as determined by you. For example, in order to be allowed to score, they must perform at lunge fake, scissor, or step over.
This builds on the previous drills, but with a higher difficulty level. Giving them two goals to shoot at makes performing moves more easily (so they will see more success), as the defender can't over play them.
To make it more about the moves, you can also make a rule that they must score within 5 yards.
The next progression is to turn this competitive. While we must spend time utilizing some drills to develop technique, it's not what our players signed up for. If you want to get the most out of them, find a way to make almost anything you do competitive in nature. It will help to accelerate the development of your players.
In this case, you can put the two teams against one another and pick a number, such as first team to 5 goals. Obviously, the first goal doesn't count as that player is going unapposed. To make it fair, if the team going on offense first breaks a 4-4 tie, the other team gets a chance to tie (think bottom of the ninth in baseball).
Scrimmage/Small Sided Game: 1v1 Mark Up
Set Up: This game can be done in any numbers from 2v2 up to full sided but best if used in the 3v3 to 7v7 range. Depending on your numbers you can run two or three games of 3v3 simultaneously and then combine into a larger 6v6 (or bigger) game. The smaller games will give the players more touches and more opportunities and space to challenge defenders 1v1.
Rules: All normal soccer rules apply except for one change. Every player on a team is matched up individually against a player on the other team. What this means is, there is no help defensively. For example, if Izzy and Shannon are matched up against one another, only Izzy can defend against Shannon when Shannon has the ball and vice versa. There is no devensive help!
Coaching Points: When you can only be stopped by one player on the other team, you become very aware of where they are, where the ball is, and where you might go to get free for a pass. Teams will learn that quick speed of play, movement off the ball and challenging defenders will wreak havoc on a defense.
This game gives player the opportunity to be aggressive in challenging players 1v1 within what is basically a normal game environment. There is also a very good defensive element built in and that is accountability, especially in terms of tracking back. If you don't track back defensively after an offensive run, your team will pay for it and all your teammates will know whose fault it was. There is no hiding defensively in this game, the way some players do on a big field.
This session will help players to think ahead, anticipate what comes next and encourage them to move off of the ball, instead of just watching it.
Progressions and Variations:
One progression you can add is the rule that every time a player gets a ball, they must make an offensive move, like the previous 2 goal 1v1 drill.
By Gregg Gillies
Gregg Gillies is a nationally licensed coach through the USSF and is a Youth Athlete Development Specialist and Head Coach at Mount Laurel United Soccer Club, where he currently coaches a u14 girls team, the MLU Raptors. He also is the owner of www.NoLimitsSoccerTraining.com, where his focus is on maximizing a player's individual technical skills, soccer IQ, and overall athletic development.

