By Sean Pearson
Session Length: 90 mins
This session focuses on players recognizing when, where are how to move the ball away from pressure on one side of the field to a point on the other side of the field to attack from. One of my frustrations with players is not seeing the ‘bigger picture’ of the situation in front of them when the space around them is crowded. Players either force the ball further into the ‘scrum’ or if the ball gets passes out or pressure, because of a lack of awareness and incorrect body position the player receiving this ball, plays the next pass back where it has come from. The end result? Usually a loss of possession. So below I talk about when to switch the ball, player movement to help the switch and where to attack from after the switch. The reason I talk about this last point is the point of a switch is to change the point of attack to create a scoring chance, not to just keep possession by going back and forth over and over again.
Warm Up: 10 mins
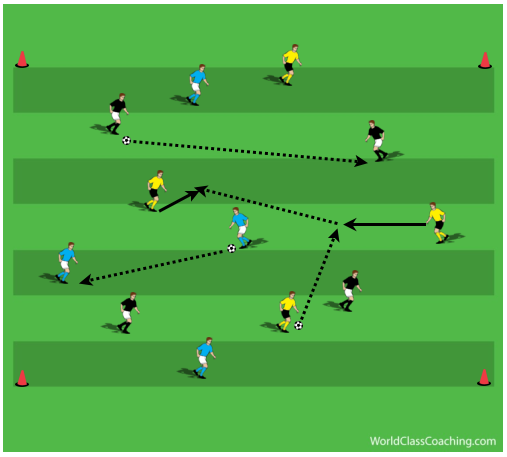
Use a basic passing warm up to get players moving, receiving, passing and making decision.
- 3 teams passing to only their own team, everybody on two touch. So players have to move to see the ball and make decisions on where and when the ball can be played,
- Players can pass to anyone but if they receive from the same color they keep the ball, if they receive from a different color they must play a one time pass back, but it can’t be in the same direction.
Technique Time: 15 mins
The first points of switching the ball are correct body position and to focus on receiving on the back foot. If you are square (chest facing the ball instead of shoulder) or receive with the front foot the ball will naturally go back towards the direction of the ball, back into pressure, which is a main cause of problems.
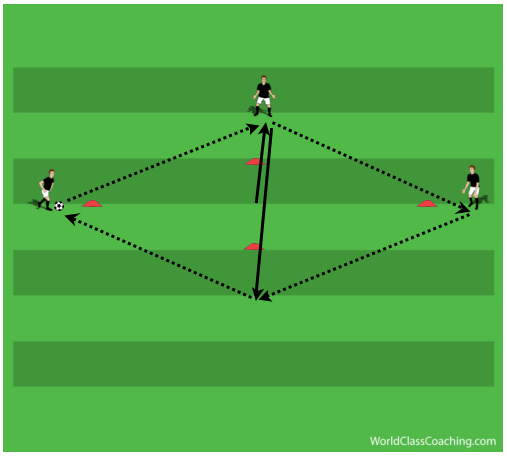
- In 3’s have the player in the middle move above and below each cone beside them
- Turn their body shape so their chest is facing the cone and both shoulders point towards both passer and receiver. This body shape is called ‘open’
- All players should receive on the back foot (foot furthest from the ball), this will facilitate the first touch being in front of the body, not going back towards the pass
- The second touch should be played with the front foot, across to the opposite player. The reason the front foot is used to pass is because it is quicker (which is important in switching) and the inside of the foot naturally points towards the player you are passing to
- This will be difficult for most players but it does not mean you should give up, you should persevere to create a more technically rounded individual. If you give up, you are failing the player. After circulating the ball clockwise, circulate the ball anti-clockwise so players become comfortable receiving and passing on both feet
Conditioned Game Time: 25 mins
As well as continuing to maintain consistency in players having an open body shape, receiving on the back foot and passing on the front foot, you must now focus on player movement (when & where) and decision making.
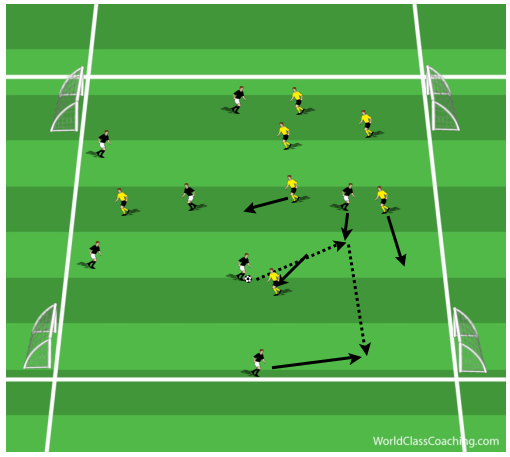
Use 4 goals, an area of 40x30 yards and two sides of equal numbers (any odd players use as neutrals). Set both teams with 2 CBs, 2CMs, 2WM/FBs and 1 ST. Place any additional players in central areas to keep the wide areas as open as possible. The aim is to score on one of the goals you are attacking. The defense will try to stop this so the team in possession must use this congestion on one side to attempt to switch quickly and score in the opposite goal.
Option 1
- The easiest way to switch the field, but also the slowest, is across the back of a team. The reason this is successful is because your team will usually outnumber the opposition
- When a WM has possession and can’t go any further forwards because of players blocking paths they must be aware of this and not force the ball through the crowd, they should protect the ball by turning back
- At the same time the CB on the side of the ball should drop further away from opposition players (to give themselves more space and time with the ball) and closer to the side of the ball, creating a shallow diagonal pass. A deeper diagonal pass can potentially be intercepted
- The 2nd CB drops and the opposite WM pulls away and higher up the field helping the attack
- Both CBs should have an open body position, receive on the back foot and pass on the front foot
- When the WM receives the ball they should push their first touch, with their back foot, forwards to attack quickly as the opposition will aim to now condense that side of the field, so speed and execution are everything
- To facilitate this scenario tell your striker not to press or intercept the CBs but to stay tight tonot allow penetration through the middle.

Option 2
The first option is the easiest but also the slowest and most predictable, in order to successfully execute it the players must act quickly. For this second option tell your Striker to stand in between the 2 CBs to stop this ‘switch round the back’ happening.
- The closest CM drops into the space behind the striker, creating a triangle with the 2 CBs.
- They face both center backs to facilitate the switch and because they could be pressured from behind
- In order for the switch to be quick and successful certain players should aim to pass first time. This does not give the opposition time to react
- The 1st CB still plays back foot, front foot. The 1st CM aims to play one time to the 2nd CB but if the pass is too hard or difficult they should also play 2 touch (back foot, front foot)
- The 2nd CB should see what has happened in front of them before making a decision on how many touches. If the FB from the opposition begins to mark the WM because they think this is where the ball is going the CB should pass to the 2nd CM. The WM continues their run forwards, the CM can then pass behind the FB and they will probably be ball watching
- If the FB catches on and marks the 2nd CM, then the 2nd CB passes out wide to the WM, using the back foot, front foot technique
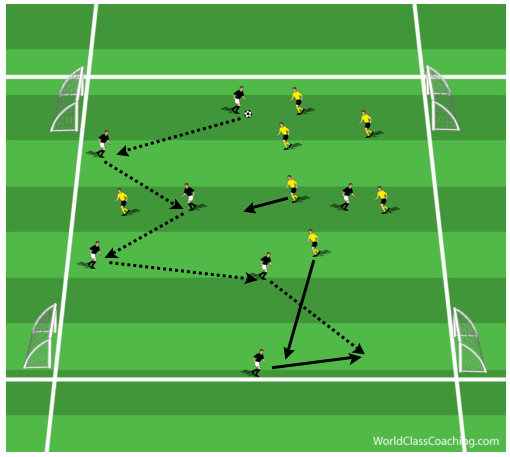
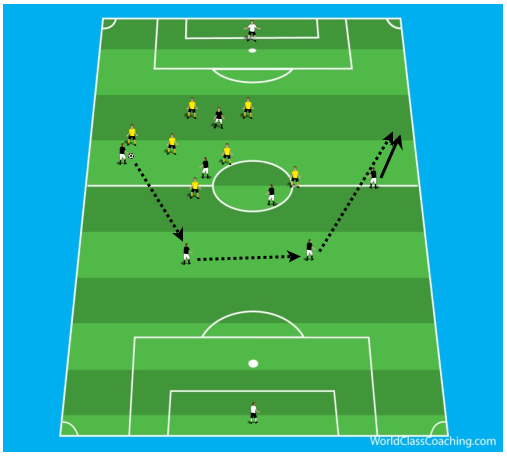
Option 3
To speed the switch up you can bypass the 2nd CB.
- The 2nd CM moves away from the opposition midfield but faces them, this is so they can see any player that pressures them
- Here a choice can be made. I like to give players 2 options in certain situations because the team you are not coaching will cheat to stop the one option
- The CM can either pass straight out wide because the opposition press the ball
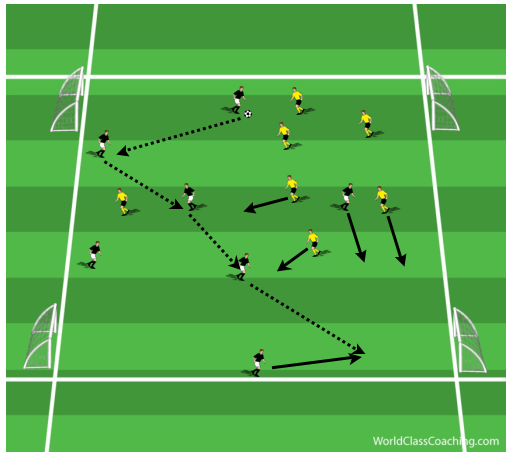
- Or, if the pass is cut off, the CM can use the striker to play the ball out wide
- In this scenario we see as soon as the pass is played backwards, away from pressure, it is constantly going forwards to attack. This option is harder to execute but is easily more effective if accomplished
Phase of Play: Changing the Point of Attack: 25 mins
Now we change to attacking a central goal so it will be harder to score, but players should take experiences they have just gone through into this part of the practice. They should be able to see the ‘picture’ of the different scenarios appearing on the field.
Defending Formation: 4-2-3-1
Attacking Formation: 4-2-3-1
This is to help with their being more space on the outsides, creating a 1 v 1 matchup with the WM v FB. It is now imperative that when switching, players continue to use the techniques and decisions mentioned to increase the speed of the switch to attack at different points after it.
Option 1
- Same as before, if one WM tries to attack their opposite FB but the field tightens around them they should be aware of this, the 1st CB should also see this and drop back and across creating a shallow diagonal pass back
- Now it is important to speed up decision making. The 1st CB sees the ST is deep and can pass across the field. The opposite WM moves wide and the 2nd CB makes a decision
- They can either switch the ball across and let the, probably faster and more skillful player, attack the FB or they can be brave and step forward with the ball creating a different ‘picture’ for the opposition to deal with
- This option works best when the opposition expect the full switch to the WM and move to stop the attack. Seeing the movement to stop the WM the CB stepping forward with the ball creates problems for the opposition as gaps appear because the defense has moved too far across the field
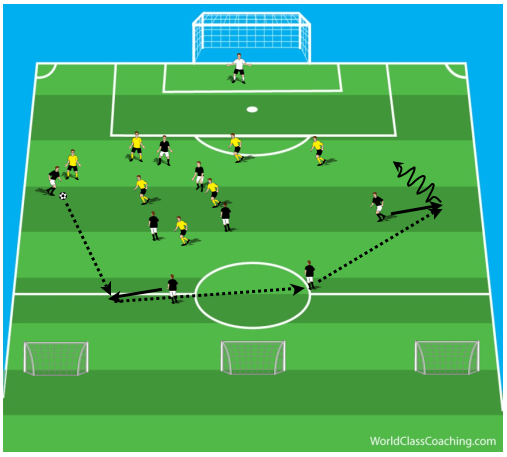

- If the CB steps forward it is important the opposite CB slides across and the opposite CM drops, in order to be in position in case of a counter attack
- The CB should then look to pass the ball early and into the space between defenders for either the ST, AM or WM. Pass early to speed the attack and to be closer to their original position to help stop a possible counter attack
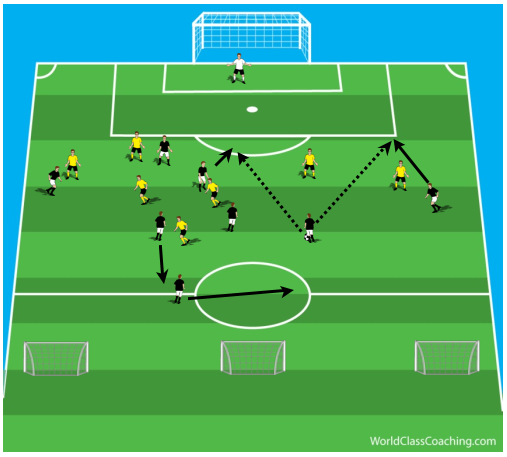
Option 2
- If the striker begins to block off the CB switch use the CMs
- The 1st CM turns their body shape to face the opposite side of the field and the 2nd CM moves away and drops
- The CB passes to the 1st CMs back foot. If there is pressure they can play a one time pass to the 2nd CM, if not they can pass to the 2nd CM or AM
- This passing decision is made easier by the opposition CM. If they hold their position a pass is played to the 2nd CM, if they pressure the 2nd CM a pass to the AM is played. This is the multiple option technique at work because now the opposition are guessing where the ball is going so are at a disadvantage
- After this pass from the 1st CM further decisions are made as to who attacks, where and how according to the scenario your players see on the field

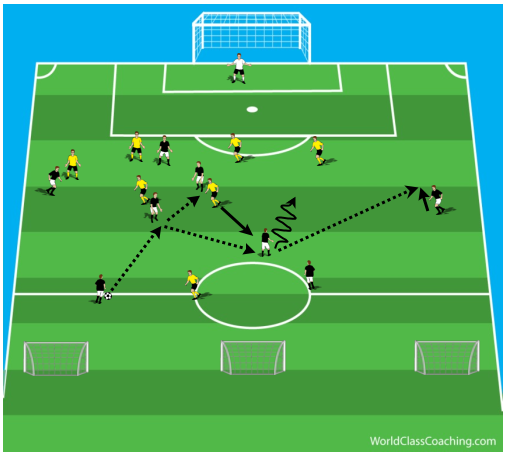
Scrimmage Time: 15 mins
Now use the 2 teams with the same formations and players in the same positions to see when your players can spot when to start a switch, what decisions and directions they should chose during the switch and what areas of the field to attack from.
- Below, the 2nd CB passed in front of the WM because there is a lot of space in front of them, passing to their feet will only slow the attack down
- Players should use their strongest foot for this pass as it needs to have strength, pace and accuracy
Throughout the session continually correct:
- Body position
- Be strict on the technique of receiving back foot, passing with the front foot (where necessary)
- Using the scenario to make a decision (don’t force something that is not there)
By Sean Pearson
By Sean Pearson Sean is also the author Coaching Team Shape in the 3-3-1, Coaching Team Shape in the 4-2-3-1 and Coaching Team Shape in the 4-3-3

