By Mike Smith
The idea of transition, which Merriam Webster defines as the passage from one state to another, should contain elements of both states until the full change is made. From a soccer perspective, this to me means taking an extra step between defending and all out attack especially when a quick counter opportunity is not there. The idea is to be able to utilize several different means of attack based on how your opponent responds to losing the ball i.e. – do they drop quickly deep, apply immediate pressure, clog the mid field, etc….. and not totally expose your team to a counter attack. The following lesson looks at the idea of creating two diamonds in the transitional part of the field which is very effective for getting numbers around the ball, drawing defenses out of position, and exposing the weak side wings for an attacking switch. Here is a basic analysis of the concept:
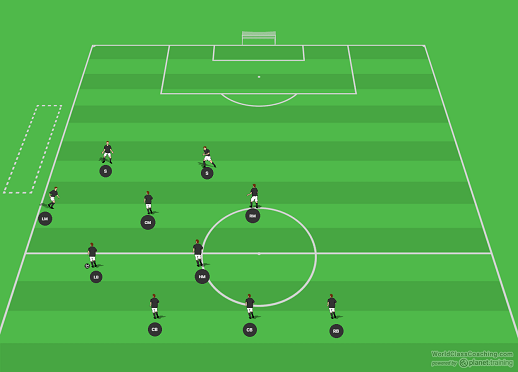
After the ball is won and the initial push up has been made, the outside back ( in the diagram the left back) has clear possession of the ball. (It could easily be the left mid who wins a wide clearance as well.) It is important the wide defender push up into the mix to either possess out or support the left, center and holding mids. Against a two forward set up, there are still 3 defenders left to cover. The left, center and right mids simply shift over , with the key being the holding mid coming in as the base of the second diamond. Finally, after an initial surge forward, both strikers check down a bit, in front of the opponents back line, to complete the diamond shape. One can easily see all the options available here as the players work with in the shape, here are a few, shown matched up against a standard 4-4-2 :
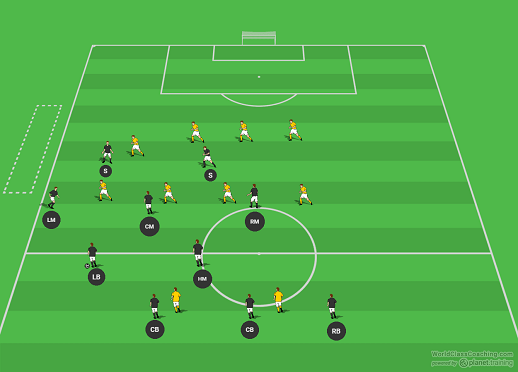
With 7 players in good shape around the ball at mid field, the possibilities to build a successful attack and still prevent getting counter attacked are many. IF the opponents defenders come up to pressure the strikers there is a direct play to the corner for a cross. IF the opponents midfielders balance themselves to prevent central penetration, there is a relatively easy switch to the Right Back on the far wing. IF the right mid pulls wide and draws the opponents outside mid or defender out with them, there will be central space open for the center mid, holding mid and strikers to exploit. The only real answer is for the opponent’s strikers to drop in, which then allows for easy switching / possession across the back line. Here are a couple exercises to use at practice to work this concept into your system.
Lesson 1
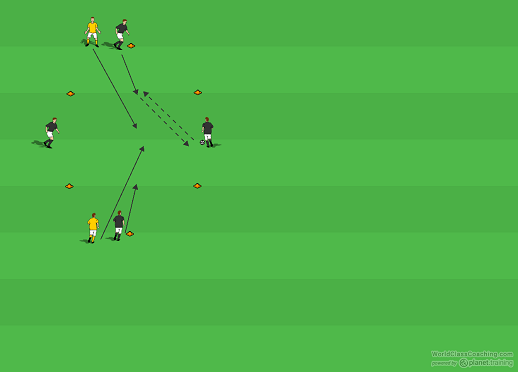
4 v 1 / 4 v 2
Set Up
It sounds almost too good to be true, but a quick look back at the second diagram shows how easily this type of shape can create 4 v 1s and 4 v 2s in multiple places on the field. ( If the right back moves up a bit, there are two diamonds in the back as well). In addition to just letting the players work common 4v1 and 4v2 keep away drills, try this as well.
Groups of 6 players work in a 15 – 20 yd by 15 -20 yd cone grid. Additional cones are placed 10 yds out at the top and bottom sections of the grid ( as shown ). Two attacking players start on the wings of the cone grid, one of these players starts with the ball. An attacker and a defender are each placed at the top and bottom extended cones. Play starts with the top attacker checking down and calling for the ball as the wide player who starts with the ball passes to the top of the grid. The checking down player will be under pressure from the defender, who may come down with them, so the best option is to pass right back to the player who started with the ball. The bottom attacker and defender also enter play on the initial pass so as the player who starts with the ball receives the ball back, the drill should become a traditional 4 v 2 keep away / split game. After a set number of completed passes ( 10 ) or a steal by the defenders, players switch positions and restart the drill.
Coaching Points
On top of good touch, movement, passing, communication and energy level, the main focus here is the checking down to the ball and getting a clean pass back while under pressure. The coach should make sure all players get several chances to check down and start the drill as this simulates both the strikers checking down and the defender checking up in the two diamond concept.
Lesson 2
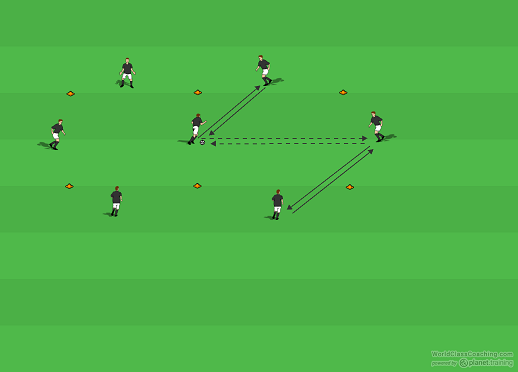
Switching Between Diamonds
Set Up
7 players work within two 15yd grids set side by side. As shown, players take positions on the outsides of the grids, with one player starting in the shared center section of both grids. This creates the two diamonds. The central player starts with the ball. After passing to a wide player, the central player switches off with the player at the top of the grid, who sprints in to receive the pass back from the wide player. Upon passing back to the center, the wide player switches off with the player at the bottom of the grid. The player in the center turns and runs the same progression with the other side or other diamond. Have the players off the ball communicate and encourage constantly. Once the groups are moving as fluidly as possible add one and eventually two or even 3 defenders to better simulate game conditions. If the defender steals/intercepts the ball, they switch with the player they stole it from.
Coaching Points
Good movement, touch, passing and communication are the keys here. In a match, the center mid may very well stay in the middle and distribute, but in this activity, the idea of checking to and from positions while keeping shape and possession will help the supporting / attacking positions in an actual match.
By Mike Smith
Currently the Head Coach for University Heights Academy Boys Soccer in Hopkinsville, KY , Mike is in his 14th year as a high school head coach with 23 years coaching experience overall and 34 year as a student and fan of the game. He holds a USSF D License.

