By Sean Pearson
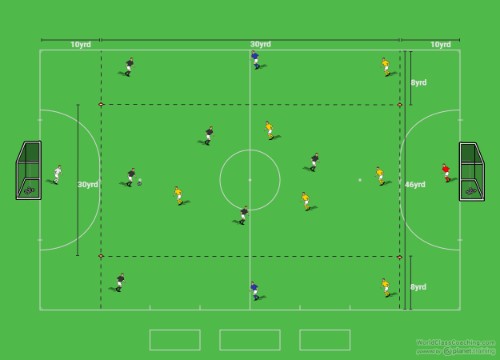
Area Size: 40 x 46 Yards
Teams: 20 mins
Players: 7 v 7 + 2
Objectives
- To switch the ball early and often
- To use the neutral to overload the fullback 2v1
Set-Up
Two teams set up in a 3-2-1 formation with 4 zones. 2 end zones for the GKs, a central zone for the CB, 2 CMs and striker and 2 wide zones for the FBs and neutrals.
Execution
This small sided game is about how to create and use the 2v1 overload against the opposition fullback. This can be used to work on your specific style of play or for you to practice a strategy against a team that you know plays a 4-4-2 diamond system to get behind their defense.
Straight away the focus is to get the ball out wide, the central players are there to facilitate and switch the ball as often as possible to get the ball into the wide areas. The ball can be passed to either the full back or the neutral player.
Rather than just receiving the ball and making straight runs it is important to manipulate the defender’s movement. To do this diagonal runs are encouraged by the player who is running with the ball. Below we see the neutral receive the ball and drive into the space ahead of them drawing the defender to that space. At the same time the ball is moving to the neutral the full back is beginning to overlap them. Now this creates a dilemma for the defender.
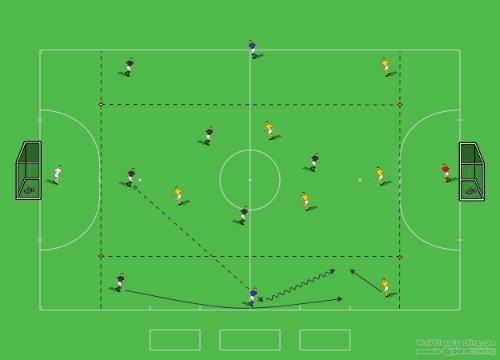
The neutral player aims to commit the defender as close as possible to them to allow the overlapping fullback as much space as possible. Passing too early causes the full back to rush their decisions as it gives the defender more of a chance to stop the cross.
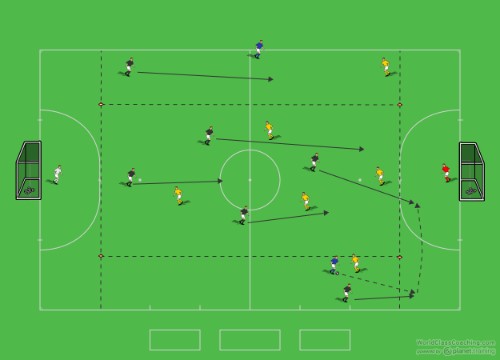
As the ball is played into the end zone the central players, and opposite wide player, should advance their position up the field just like a game. To start with, to increase the success just allow 1 or 2 attacking players into the end zone to finish the cross. You can add a touch limit if you wish. Eventually allow defenders to follow them in. The full back should be encouraged to pick out a teammate.
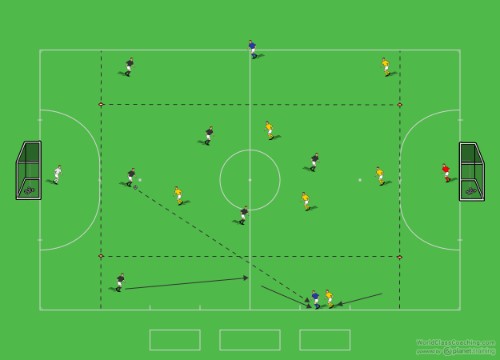
To further manipulate the defender’s position and movement, instruct the neutral to move higher and wider, away from their original position. As the ball travels to them they aim to commit the defender to them, therefore pulling them wide. The full back sees the new position of the defender and sees the space to utilize inside the neutral.
If the full back is close to the neutral, then the neutral can play the pass 1 time. If not they should hold onto the ball until the defender is committed, to again give the full back as much time as space to drive into the end zone as possible to complete the cross.
The idea behind both scenarios is to get behind the full back by drawing them away from where you want the ball to go. If they try and cheat and stay in the position the ball is going allow the neutral to take the ball forward and cross. Your 2 should then have every option covered depending on where the defender goes. But remember the neutral must move the defender to either side of the zone to help the full back have as much space and time as possible.
Variations
- Allow 1 player from the central zone to help the lone defender. This forces the 2 to act quickly like in a game to create and successfully execute the 2v1
- After the initial entrance from the full back/neutral into the end zone allow all players to enter it.
- If you do not have any GKs finish with 1 touch into the corners to challenge your player’s finishing in an empty net.
By Sean Pearson. Sean is also the author Coaching Team Shape in the 3-3-1, Coaching Team Shape in the 4-2-3-1 and Coaching Team Shape in the 4-3-3

